
If you find that your internet connection in Windows 11 or Windows 10 has suddenly stopped working or that you are facing certain Network and Internet connectivity problems, here are a few troubleshooting steps you may want to try.
Fix Network & Internet connection problems in Windows 11
You can use the following methods or tools to fix Network & Internet connection problems in Windows 11/10:
- Renew IP address
- Flush DNS cache
- Run Network & Internet Diagnostic Troubleshooters
- Enable or Disable IPv6
- Reset Winsock
- Reset TCP/IP
- Reset Hosts file
- Reset Windows Firewall settings to default
- Reset your browser
- Run Network Reset.
These suggestions are followed by other fixes too. Take a look at them!
1] Renew IP address
IPConfig is a tool built into Windows, that displays all current TCP/IP network configuration values and refreshes Dynamic Host Configuration Protocol DHCP and Domain Name System DNS settings. You can access this tool via the command line. If you have a bad IP address, then renewing your IP address this way may help solve your internet problems.
Type cmd in start search and press Ctrl-Shift-Enter. If you wish, just out of curiosity, you may type ipconfig and hit Enter, to view the status of the computer’s Internet Protocol or IP address.
Type ipconfig /release to let go of the current IP address.
Next, type ipconfig /renew to obtain a new IP address.
If you get an error message when you Run the “Ipconfig /Renew” command see KB810606.
If you repeatedly face this problem, you can have it renewed on every startup by creating the following .bat file and placing it in your startup folder.
Open Notepad and type:
ipconfig /release
ipconfig /renew
Save it as, say, iprenew.bat file.
Read: How to find out, renew, change IP address.
2] Flush DNS cache
Internet connection problems can often be traced to a corrupted DNS cache. Resetting or flushing this cache is an easy fix for many of these problems. This is how you can flush Windows DNS cache in Windows 11/10.
Search for Command Prompt. Right-click on it and ‘Run As Administrator’. Type the following and hit enter:
ipconfig /flushdns
You should be able to see a confirmation dialog window:
Windows IP Configuration. Successfully flushed the DNS Resolver Cache.
Next, type ipconfig /registerdns and hit Enter.
This registers any DNS records that you or certain programs may have added to your Hosts file.
Just in case you are interested, to view the complete syntax for this command type ipconfig /help and hit Enter!
3] Run Network & Internet Diagnostic Troubleshooters
The Network & Internet Diagnostic & Repair Tool in Windows 11/10 will help you identify potential issues that may be preventing network connectivity and automatically take appropriate steps to correct them. If a computer on the network loses Internet connectivity, you can see which connection is down and then use Network Diagnostics to help determine the cause and find possible solutions.
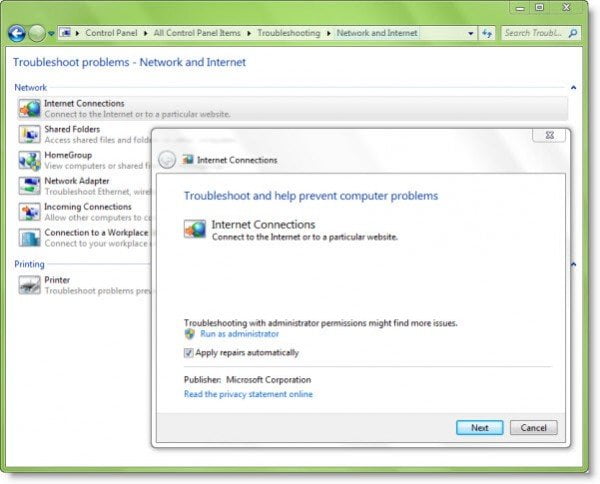
To access it, open Control Panel > Network & Sharing Center. In the lower part, click on Troubleshoot Problems. From the window which opens, you can select Internet Connections or any other issue you want to troubleshoot and repair.
Type the following commands in Run box and hit Enter to open the required Troubleshooters directly:
To open Internet Connections Troubleshooter:
msdt.exe -id NetworkDiagnosticsWeb
To open the Incoming Connections Troubleshooter:
msdt.exe -id NetworkDiagnosticsInbound
To open the Network Adapter Troubleshooter:
msdt.exe -id NetworkDiagnosticsNetworkAdapter
Go here if the Troubleshooter throws up Windows couldn’t automatically bind the IP protocol stack to the network adapter message.
4] Enable or Disable IPv6
Enable or Disable IPv6 to solve Internet connectivity problems. By default, Windows prefers IPv6 over IPv4. So if you are having problems connecting to some websites with IPv6, you can configure your Windows to use IPv4 instead of IPv6.
5] Reset Winsock
Reset Winsock and see if that helps. Windows Sockets, or Winsock, is a technical specification or programming interface that defines how programs handle input/output requests for Internet applications, i.e., TCP/IP in Windows.
6] Reset TCP/IP
Reset TCP/IP and see if that works. TCP/IP is one of the core components your Windows computer needs to connect successfully to the Internet.
7] Reset Hosts file
Reset Hosts file and see if that helps. The Hosts file in Windows 11/10, is used to map host names to IP addresses. If, for some reason, you find that your Hosts file has been compromised or corrupted and you cannot connect to the internet, you can reset it to its default.
8] Reset Windows Firewall settings to default
Reset Windows Firewall settings to default. This will help if the firewall has been configured incorrectly and is blocking connections.
9] Reset your browser
These posts will show you how to Reset Edge, Chrome or Firefox.
10] Use Network Reset
The Network Reset feature in Windows will help you reinstall Network adapters and reset Networking Components to their original settings.
There are other free tools like NetChecker, NetAdapter Repair or Complete Internet Repair Tool. that may help you fix your internet connection problems.
Other links to related error messages:
- Cannot connect to Internet after upgrading Windows.
- An error occurred while Internet Connection Sharing was being enabled message.
- Fix Windows Connectivity issues with Hotspots and Wi-Fi adapters.
- How to reset Internet Options to default.
- Fix Can’t connect to this network WiFi error.
Hope something helps!
