If your computer doesn’t comply with the latest hardware requirement for installing Windows 11, you can follow this tutorial to install Windows 11 on unsupported processor or hardware. There are mainly three methods, and you can use any one of them as per the situation you are in.

When Microsoft announced Windows 11, only one thing made a mess – TPM or Trusted Platform Module 2.0. Although Microsoft relaxed that requirement up to a point, it is not recommended to install Windows 11 unless you know about the consequences. However, if you have a computer that doesn’t meet Windows 11 hardware requirements but want to try the latest operating system of Microsoft on it, here is how you can do that.
As mentioned earlier, you can use three methods, and here we have mentioned all of them for your convenience.
How to install Windows 11 on unsupported hardware or processor
To install Windows 11 on an unsupported PC or CPU/RAM, you have the following three ways:
- Install using Windows 11 Setup.exe
- Clean installation of Windows 11 with Registry edit
- Create a Windows 11 image to install
To learn more about these ways, continue reading.
1] Install using Windows 11 Setup.exe

It is probably the easiest method to install Windows 11 on unsupported hardware. Whether you have TPM 1.2 or no TPM, you can use this way to get the latest version of Windows OS without upgrading your hardware. Although the Windows 11 Setup displays a warning message saying, “Damages to your PC due to lack of compatibility aren’t covered under the manufacturer warranty,” you can continue with the setup by clicking the Accept button.
To install Windows 11 on unsupported hardware using this method, do the following:
- Download Windows 11 ISO file from Microsoft.
- Double-click on the ISO file.
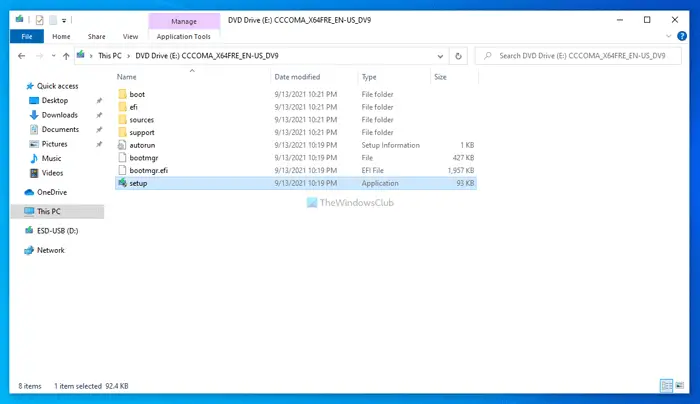
- Double-click on the setup.exe file.
- Click on the Accept button.
- Choose one among Keep personal files and apps, Keep personal files only, and Nothing.
- Click the Next button.
- Click on the Accept button if it displays the warning message.
- Click the Install button.
- Let it finish the installation.
Your computer might restart several times to finish the installation. Once done, you can use Windows 11 on your unsupported computer.
Also, this method lets you keep your personal files and apps. Depending upon your preference, you can select any one of the first two options. However, if you want to get Windows 11 as a fresh installation without any old files, you can choose the Nothing option.
Related:
- How to bypass Windows 11 TPM requirement?
- How to bypass Windows 11 Secure Boot requirement?
- How to bypass Windows 11 Online Account requirements?
2] Clean installation of Windows 11 with Registry edit

This method requires you to have at least TPM 1.2. Otherwise, you cannot bypass the TPM requirement to install Windows 11. If you have TPM 1.2, you can follow this tutorial to create Windows 11 Installation media on your computer. Then, follow the following steps:
Press Win+R to open the Run prompt.
Type regedit > hit the Enter button > click the Yes option.
Go to this path:
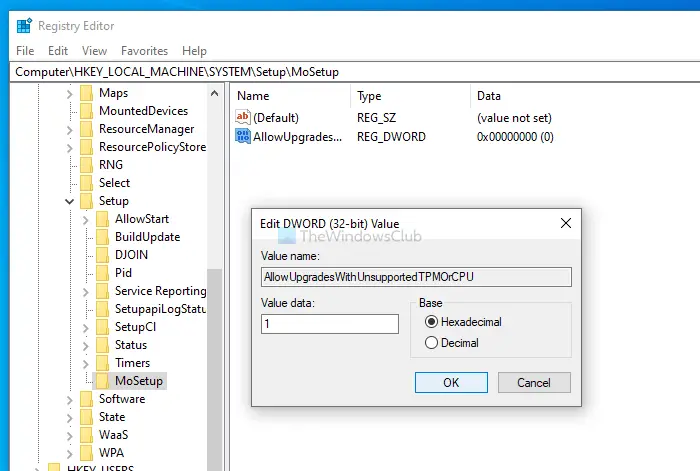
HKEY_LOCAL_MACHINE\SYSTEM\Setup\MoSetup
Right-click on MoSetup > New > DWORD (32-bit) Value.
Name it as AllowUpgradesWithUnsupportedTPMOrCPU.
Double-click on it to set the Value data as 1.
Click the OK button.
Restart your computer.
Click on the F12, F9, Delete, or any other designated key to open the boot manager.
Continue with the regular Windows installation process.
For your information,
- You can also use the Windows 11 Installation Assistant to upgrade from Windows 10 to Windows 11 without TPM requirements. In that case, you will be able to keep your files and apps.
- If you use the aforementioned method, you will end up deleting all the files. Also, using the Windows 11 Installation Assistant requires you to have the PC Health Check tool on your computer.
- If you cannot find the MoSetup key, you can create it. For that, right-click on Setup > New > Key, and name it as MoSetup. After that, you can continue with the aforementioned process.
3] Create a Windows 11 image to install
This method is only for IT admins who need to deploy Windows 11 on multiple unsupported hardware in the office, school, or other organization. You can use DISM or any other third-party tool to directly create and apply the Windows 11 image to the disk.
Read: Windows 11 won’t install.
How to bypass Windows 11 CPU requirements?
Open the Registry Editor and navigate to the following path:
HKEY_LOCAL_MACHINE\SYSTEM\Setup
Right-click on Setup and choose New > Key
Name it LabConfig on the left side
Now select labVonfig and then right-click in the empty space on the left side and choose New > DWORD (32-bit) Value
Name it BypassCPUCheck and give it value of 1.
Then, continue with the Windows Setup.
Read: Upgrade unsupported computer to Windows 11 using Rufus easily
How to bypass Windows 11 RAM requirements?
To bypass Windows 11 RAM requirements:
Press Win+R to open the Run prompt.
Type regedit > hit the Enter button > click the Yes option.
Go to this path:
HKEY_LOCAL_MACHINE\SYSTEM\Setup\MoSetup
Right-click on MoSetup > New > DWORD (32-bit) Value.
Name it as BypassRAMCheck.
Double-click on it to set the Value data as 1.
Click the OK button.
Restart your computer.
You can also bypass Windows 11 requirements easily using Flyby11.
Why is my PC not compatible with Windows 11?
There could be several reasons why your PC is not compatible with Windows 11. However, the most common issue is the Trusted Platform Module 2.0. If you do not have an old computer, you might not have the TPM 2.0 installed. Other than that, it requires a 64-bit processor to install Windows 11. You can check the Windows 11 system requirements to know the exact reason.
Read: Your PC will no longer be supported and won’t be entitled to receive updates
Does my PC meet Windows 11 requirements?
To check if your PC meets Windows 11 hardware requirements, you could use the PC Health Check tool on your computer. It tells you whether you can install Windows 11 or not within moments. Apart from that, you can also use Checkit, which shows the problem with your PC that is blocking the Windows 11 installation.
Leave a Reply