If you are thinking of a fresh or clean install of Windows 11, you have to create a bootable USB media for Windows 11. This guide will show you how to create a Windows 11 bootable installation media using Media Creation Tool. Using this method, you can also upgrade to the latest Windows 11 Feature Upgrades too.
There are multiple ways to upgrade from an older version to Windows 11. However, your options are limited if you want to perform a clean install of the latest version of Windows. You need to create a bootable USB flash drive or DVD for that.
You have mainly two options – Media Creation Tool or third-party software like Rufus. Although there are many other third-party tools for creating a bootable USB drive for any Windows version, you can use Rufus to complete the process smoothly. We have shown both methods; you can follow either.
Before you start with the steps, you should know that:
- An 8GB or more USB flash drive is required.
- All the data on your pen drive will be deleted. It is recommended to backup all the important files before you begin.
- You can use the same pen drive to install Windows 11 on multiple computers. It is mainly for a fresh installation of Windows 11.
- You must have a 64-bit architecture to install Windows 11.
- The first method requires an internet connection. However, the second method doesn’t require an internet connection as long as you have Rufus and Windows 11 ISO on your PC.
- Although it is possible, Microsoft doesn’t recommend users to install Windows 11 on unsupported hardware.
Use Windows 11 Media Creation Tool to create Windows 11 bootable installation media
To create Windows 11 bootable installation media using Media Creation Tool, follow these steps:
- Download the Media Creation Tool from the official website.
- Double-click on it to open.
- Click the Accept button.
- Click the Next button on the language selection page.
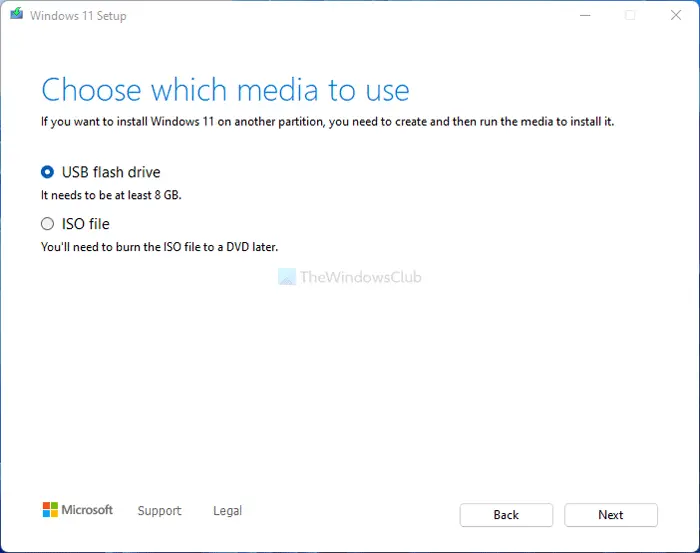
- Choose the USB flash drive option.
- Click the Next button.
- Plug in your pen drive.
- Select the pen drive and click the Next button.
- Let it finish the downloading.
To learn more about these steps, continue reading.
First, download the Windows 11 Media Creation Tool. For that, you can visit the official download page at microsoft.com.
After downloading, double-click the setup file and click Accept to get started. Then, you need to choose a language. If your required language is already selected, you can click the Next button.

Otherwise, remove the checkmark from the checkbox, select the language, and click Next. After that, select the USB flash drive option and click on the Next button.

After that, plug your pen drive into your computer, select it, and click Next.
Once done, it will start downloading the Windows 11 ISO. At last, it will create the bootable USB drive automatically.
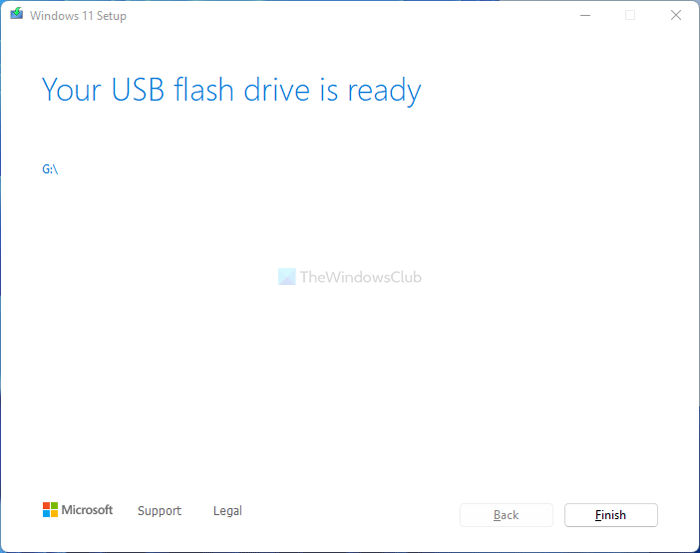
If you see the Your USB flash drive is ready message on your screen, you can restart your computer and the Windows 11 installation.
You can also use the Media Creation Tool to Upgrade PC to Windows 11.
Read: How to use Windows 11 Installation Assistant to install Windows 11
Related: How to create bootable USB drive in Windows 11 using Rufus
How do I create a bootable USB drive for Windows 11?
There are two ways to create a bootable USB drive for Windows 11. You can use either the Windows 11 Media Creation Tool or Rufus. The first method doesn’t require the Windows 11 ISO, whereas the second method does.
Read: How to install Windows 11 on unsupported hardware.
Can you create a Windows 11 bootable USB?
Yes, you can create a bootable Windows 11 USB flash drive. Whether you are using Windows 11 or Windows 10, you can use the aforementioned guide to create a bootable pen drive for Windows 11. Both methods are verified, and they take almost the same time.
Read:
- How to get Windows 11 now
- Download Windows 11 Disk Image (ISO) file from Microsoft.