
This post will show you how to change the taskbar size on Windows 11 using Windows Settings. We also show you how to do it in Windows 10 using Registry Editor.
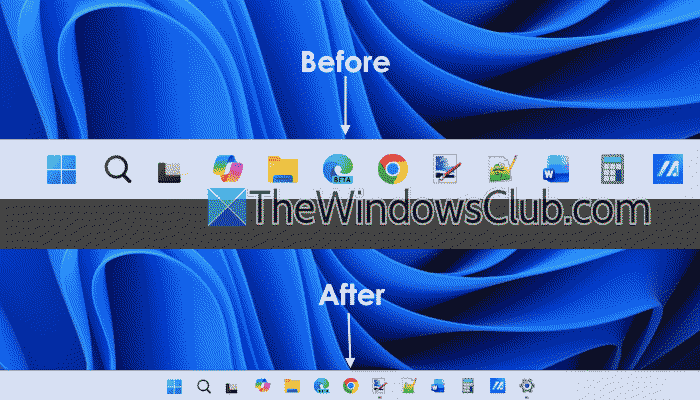
In Windows 11, Microsoft brings you a new task menu, widgets window, search field, and UI options. Along with changes, the taskbar is centrally placed at the bottom.
How to change Taskbar size on Windows 11
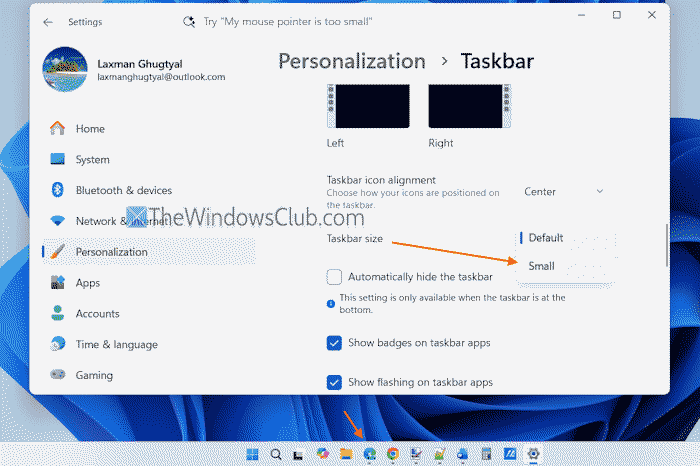
Starting with Windows 11 version 26H2 (build 26300.8758) and version 25H2 (build 26300.8493), you can now change the Taskbar size from Default to Smaller in the Settings app. This is helpful for smaller screens where every pixel counts. Here are the steps:
- Press Win+I to open the Windows 11 Settings app
- Select the Personalization category
- Access the Taskbar page from the right section
- Scroll down the page
- Expand the Taskbar behaviors section
- Open the drop-down menu next to the Taskbar size option
- Select the Small option to make the Taskbar compact. The change is applied immediately.
Later, whenever you want to increase the Taskbar size or set it to default, repeat the above steps and select the Default option in the drop-down menu for the Taskbar size option.
Change Taskbar size using the Registry Editor in Windows 11
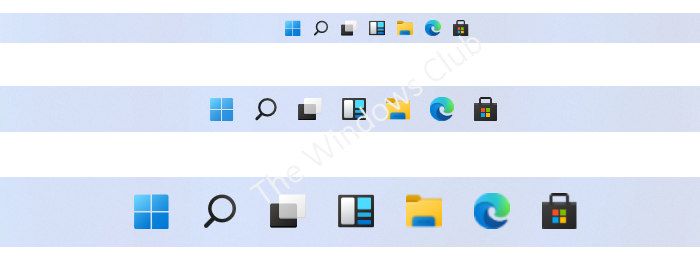
In recent versions, you can also use the Registry Editor to change the Taskbar size. This Registry trick works for the latest builds (e.g., Windows 11 version 26H2 build 26300.8758 or higher).
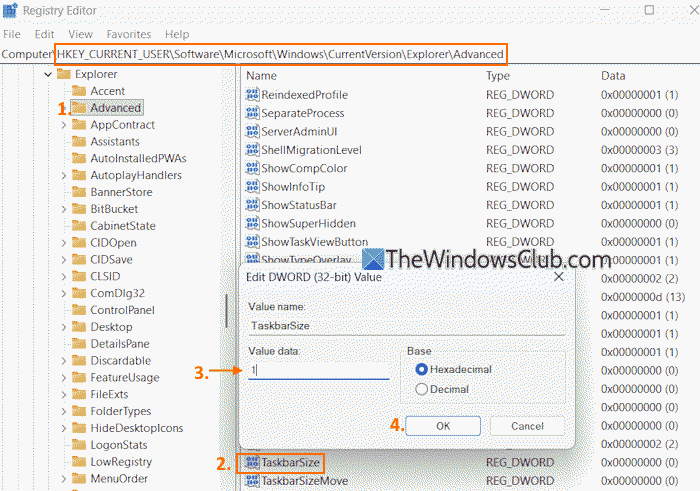
Before using this trick, you should back up the Windows Registry. Once the backup is done, follow these steps to change the Taskbar size from Default to Small using the Registry Editor in Windows 11:
- Press Win+R hotkey to open the Run Command box
- Type regedit in the text field and hit the Enter key. This will open the Registry Editor window
- Access the Advanced Registry key under the HKEY_CURRENT_USER root key. Here is the path to that key:
HKEY_CURRENT_USER\Software\Microsoft\Windows\CurrentVersion\Explorer\Advanced
- Look for the TaskbarSize DWORD (32-bit) Value in the right section. If that key is not present, you can manually create a new DWORD (32-bit) Value and rename it to TaskbarSize
- Double-click on the TaskbarSize DWORD value to open its Edit Value box
- A small box will open
- Enter 1 in the Value data field of that box. This will change the Taskbar size from Default to Small
- Press the OK button
- Close the Registry Editor window.
The changes are applied instantly. If not, restart File Explorer, and a smaller Taskbar will be there.
Later, when you want to change the Taskbar size from Small to Default (medium) using the Registry Editor method, repeat the above steps, and access the Advanced Registry key. Open the Edit Value box of TaskbarSize DWORD (32-bit) Value by double-clicking on it and add 0 in the Value data field. Press OK to apply the changes.
That’s all.
The following Registry method covered below works for earlier Windows 11 builds.
To change the Taskbar size you have to show small Taskbar icons on your Windows 11 PC.
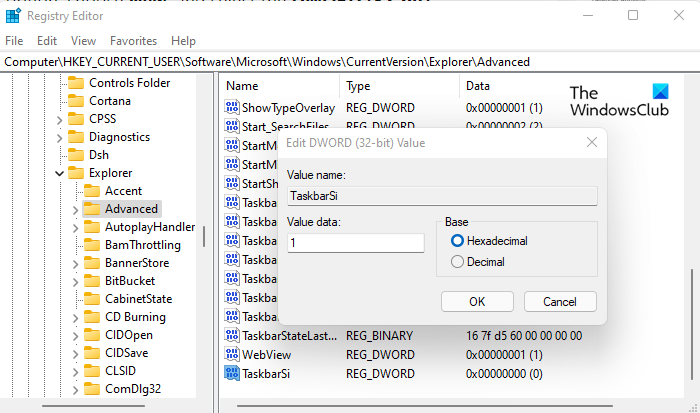
To get started, open the Registry Editor. For this, you can search for “regedit” in the Taskbar search box and click Registry Editor in the search results.
If the UAC prompt appears on the screen, click the Yes button to approve it.
Once you’re in the Registry Editor window, go to the following path:
HKEY_CURRENT_USER\Software\Microsoft\Windows\CurrentVersion\Explorer\Advanced
For the resulting key, create a new DWORD (32-bit) Value. To do this, right-click the Advanced registry key, select New from the context menu, then click DWORD (32-bit) Value.
Now right-click on the new DWORD Value, rename it TaskbarSi, and press Enter to save it.
Then double-click the TaskbarSi DWORD key and enter a value of 0 to 2 to change the taskbar icon size.
- You can set the Value data 0 for the small size.
- If you prefer the default taskbar size, set it to 1.
- For the larger taskbar size, you need to set the Value data 2.
Once you made the changes, click the OK button to save it and then restart your computer. On startup, you will see that the size of your taskbar has changed according to your preference.
If you wish, you can reverse the changes to their original size. To do so, open the Registry Editor and go to the following address:
HKEY_CURRENT_USER\Software\Microsoft\Windows\CurrentVersion\Explorer\Advanced
Now go to the right side of the Registry Editor window, delete the TaskbarSi DWORD (32-bit) Value, and you’re done.
This way, you can change the size of the Windows 11 taskbar.
Read: How to resize the Start Menu in Windows 11.
Resize the Taskbar in Windows 10
With a few clicks and drags here and there you can easily resize the Windows 10 Taskbar. You can make it even taller, giving you more room for application shortcuts. If you’re using a vertical taskbar, you can make it wider. In this post, we will show you the easy steps to take to resize or change the Height or Width of the Taskbar on Windows 10.
To resize the Windows 10 taskbar, you need to unlock it. To do so, right-click on the taskbar and locate the Lock The Taskbar option on the context menu. If that option has a checkmark beside it, click on it to uncheck it. If there is no checkmark, then you’re all set.
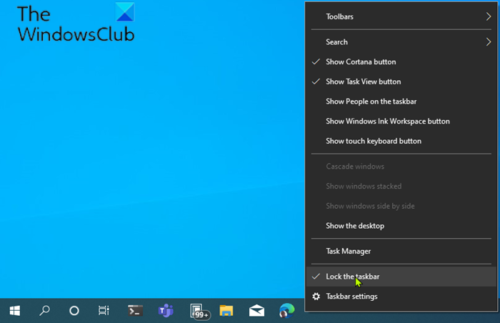
With your taskbar unlocked, you are now free to resize or even move it to the left, right, or top edge of your screen.
Read: How to disable Lock the Taskbar option in Windows Settings.
This post will show you how to move Taskbar to the Top on Windows 11.
How do I resize my Taskbar size?
To resize the Taskbar size in Windows 11, you need to use the Registry Editor. Open it and go to HKEY_CURRENT_USER\Software\Microsoft\Windows\CurrentVersion\Explorer\Advanced. Create a REG_DWORD value named TaskbarSi and set the Value data as 1 or 2. By default, it is set to 1, representing a normal size.
Read: How to increase Taskbar to 2 or more rows in Windows 11
Can you customize Taskbar in Windows 11?
Yes, you can customize the Taskbar in Windows 11 using Windows Settings and Registry Editor. You can add or remove icons, change the Taskbar size, show or hide data/time, enable or disable system tray icons, and more. You can also show or hide preset Taskbar icons.
Read: How to enable Remember window location on Windows 11.
How to change the Height of the Taskbar in Windows 10
To resize or change the height of the Taskbar, do the following:
- First, position your mouse cursor on the edge of the taskbar.
- The pointer cursor will change into the resize cursor, which looks like a short vertical line with an arrowhead on both ends.
- Once you see the resize cursor, click and drag the mouse up or down to change the height of the taskbar.
- When you reach the desired height, you can release the mouse button, and the taskbar will stay that size.
- If you wish, you can then right-click on the taskbar and lock it again using the Lock The Taskbar option so that you don’t accidentally resize it later.
How to change the Width of the Taskbar in Windows 10
To resize or change the width of the taskbar in Windows 10, your taskbar must be vertical and unlocked.
If your taskbar is not already vertical, click on it and drag your mouse cursor to the left or right edge of the screen. When the cursor gets close enough to the edge, the taskbar will snap vertically.
Once that is done, you can follow the steps outlined below to resize or change the width of the Taskbar.
- Position your mouse cursor on the edge of the taskbar.
- The pointer cursor will change into the resize cursor, which looks like a short horizontal line with an arrowhead on both ends.
- Once you see the resize cursor, click and drag the mouse left or right to change the width of the taskbar.
- When you reach the desired width, you can release the mouse button, and the taskbar will stay that size.
- If you wish, you can then right-click on the taskbar and lock it again using the Lock The Taskbar option so that you don’t accidentally resize it later.
Hope this helps.
