If you receive an INACCESSIBLE_BOOT_DEVICE (0x7B) error on your Windows 11/10 PC, this post offers some fixes to resolve this issue. This error occurs when Windows cannot access the system partition during startup, and usually occurs after rebooting from an update, using the Reset This PC option, hardware change, disk configuration adjustment, BIOS/UEFI storage changes, or driver corruption.

There can be multiple reasons for the INACCESSIBLE_BOOT_DEVICE (0x7B) error.
- Missing, corrupted, or misbehaving filter drivers that are related to the storage stack
- File system corruption
- Changes to the storage controller mode or settings in the BIOS
- Using a different storage controller over the default driver from Windows
- Moving the hard disk to a different computer that has a separate controller
- A faulty motherboard or storage controller, or faulty hardware
- Failure of the TrustedInstaller service to commit newly installed updates because of Component-Based Store corruption
- Corrupted files in the Boot partition.
Fix INACCESSIBLE_BOOT_DEVICE (0x7B) BSOD error
If you see INACCESSIBLE_BOOT_DEVICE (0x7B) error in Windows 11/10, follow these suggestions to resolve the issue.
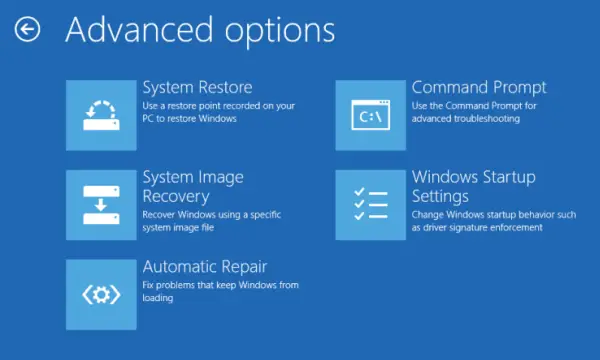
Now, since you cannot boot to the desktop in normal mode, you will have to boot into Safe Mode to carry out these suggestions. If you cannot enter Safe Mode, then try to access and use Advanced Startup options to carry out these suggestions.
If you cannot do both, you may have to boot into Windows with your Windows Installation Media or Recovery Drive and select Repair your computer to enter Troubleshoot > Advanced Startup Options > Command Prompt. You can now use CMD to run some required commands.
- Perform System Restore
- Use Command Prompt to uninstall the problematic update
- Run Automatic Startup Repair
- Run System File Checker using CMD
- Reset Windows.
- If you think a boot device may be at fault, you may need to edit the boot options.
- Remove any recently added hardware.
- Check if the disk firmware version is incompatible with Windows 11/10. If not, you may need to update to the latest firmware version. See if you need to update the BIOS.
- If you recently added a driver, restart your computer, enter the Advanced Boot Options menu. You may boot Windows into Safe Mode and try a system restore.
- If you think the cause could be hard disk corruption, Run
Chkdsk /f /ron the system partition. If you cannot boot into Windows, use the Recovery Console and runChkdsk /ror run Chkdsk from the Repair Console. - If you just upgraded to Windows 11 and then you see this error, then, download and use Media Creation Tool, using another computer and save it to a USB device. Use it to perform a clean install, by clicking on the setup file or booting from the USB. If you are asked for a product key, click on Skip this step. Windows will activate itself when you sign in with your Microsoft account.
Read: UNMOUNTABLE_BOOT_VOLUME Blue Screen Error
Advanced troubleshooting for INACCESSIBLE BOOT DEVICE (0x7B) error in Windows 11/10
Use the following suggestions to resolve the INACCESSIBLE BOOT DEVICE error in Windows 11/10.
1] Check the hard disk connections

Your computer might not be able to access the boot drive due to loose cable connections. Check this. Turn off your computer completely, then open the case. Now, check all the cables connected to your hard drive. If the cable connections are loose, disconnect the cables and connect them properly. Now, turn on your computer and see if the error occurs.
Read: Blue Screen after Windows Update in Windows 11
2] Verify that the boot disk is accessible
Boot into Advanced Recovery, and then open Command Prompt. Here, we will figure out if the boot disk is connected and available.
Microsoft recommends that you execute diskpart, and then run list disk command. This command will display the list of physical drives attached to the computer. If they are connected, you should receive details just like the image below:
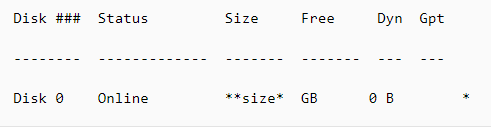
Note:
- UEFI interface will have an asterisk () in the **GPT* column.
- BIOS interface will not have an asterisk in the Dyn column.
If the list disk command lists the OS disks correctly, run the list vol command in diskpart. It should generate an output similar to the next image.
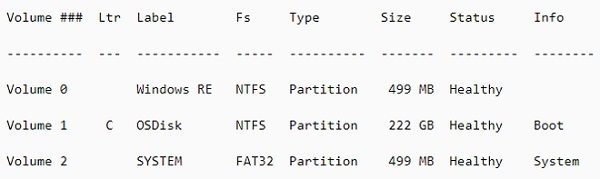
The image above displays Volume 1 as the boot disk. If there is no similar listing, you may have to either repair the boot partition on your own or connect with the service center of the OEM.
3] Verify the integrity of the Boot Configuration Database
Boot Configuration Database, a replacement of Boot.ini file, contains boot configuration parameters and controls how the operating system is booted. If there is any corruption or misconfiguration, we will have to fix it. Before that, let’s diagnose if there is a problem.
Boot into Advanced Recovery, and then open Command Prompt. Type bcdedit and hit Enter. You should results like in the image below. UEFI and BIOS have their slight differences.
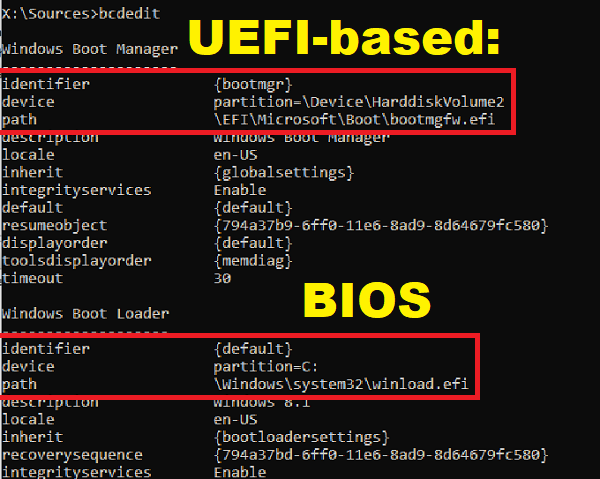
In the results, notice if the identifier is set to default, and the device & path, point to the correct partition. It can only ensure that the “winload” file loads correctly. If this is not what you see, we will have to fix BCD.
The BIOS interface will not have any path, but the drive. But the UEFI interface will display the full path in the device partition parameter.
a] Set default device partition
- Take a backup of BCD using the command
bcdedit /export C:\temp\bcdbackup. To restore at a later stage, you can replace /export with /import. - If the device under {default} is wrong or missing, run the bcedit command with the set option
bcdedit /set {default} device partition=C:
b] Re-create the BCD completely
If you receive an error message that says The boot configuration data store could not be opened, The system could not find the file specified, then execute bootrec /rebuildbcd on the Command Prompt.
c] Verify Location of winload and bootmgr
Bootmgr (Windows Boot Manager) and Winload (Windows OS Loader) are components of the boot process. PreBoot loads Boot Manager, which in turn loads Winload. If the files are not in their correct locations, the boot process will hang. Here are the locations of the files-
- bootmgr: %SystemDrive%\bootmgr
- winload: %SystemRoot%\system32\winload.exe
Before going ahead, make sure to make a backup of all the contents under the SYSTEM partition to another location. It will come in handy if something goes wrong. Use the Command Prompt to navigate to the System drive, and create a folder where you can back up everything.
Navigate to these directories, and unhide files using Attrib -s -h -r command. If they are not in their place, let’s rebuild it.
Bcdboot <**OSDrive* >:\windows /s <**SYSTEMdrive* >: /f ALL
Where “OSDrive” is where Windows is available, and the system drive is where the bootmgr resides.
Reboot and see if this has helped.
4] Reset BIOS to the default
One easy way to fix this error is to reset your computer BIOS to the default. Enter your computer BIOS and find the setting to reset it. Alternatively, you can remove the CMOS battery and reinsert it. This action will also reset the BIOS to the default.

Resetting the BIOS to its default settings will fix the problem if the error occurs due to an incorrect boot order.
5] Toggle the VMD Controller setting (if applicable)

You can also try toggling the VMD Controller setting in your system BIOS to see if it helps. If the VMD Controller setting is enabled, disable it. If the setting is disabled, enable it. You need to check the official website of your computer manufacturer to see whether this feature is available on your system.
6] Make changes to the Hard Drive Controller
If you recently made changes to your hard drive controller, that could be the reason; reverse them. You carry out any of the following procedures :
- Use System Restore.
- Reconfigure the new hard drive controller.
- Remove the new hard drive controller if reconfiguring doesn’t work and you don’t essentially require it.
- Run Startup Repair
- Go back to the version of the hard drive controller and device drivers you had before the driver update.
All these may or may not solve the problem, depending on what caused it. If this solution doesn’t work, at least you’ll know your hard drive controller isn’t the problem.
7] Verify SCSI chain termination
If you are using SCSI hard drives, faulty termination is likely the cause of the error. So you need to address this problem to solve it. However, home computers usually use PATA or SATA, not SCSI, so this might not be your problem to begin with.
8] Verify installation
Make sure the hard drive is installed correctly. If you haven’t installed any new drives recently, the problem could be something else.
9] Verify BIOS configuration
You need to make sure that your hard drive is correctly configured in the BIOS. Change settings as needed to ensure proper configuration.
10] Scan for virus
As mentioned earlier, the stop error can result from a virus. So you need to scan for viruses and primarily check the boot sector and MBR for malware. If this is the problem, follow the usual routine of antivirus software assistance and restart your device. Always keep your antivirus up to date to prevent this problem from happening.
11] Update drivers
Outdated hard drive controller drivers can cause this error, so update the device drivers.
12] Change mode in BIOS
Some advanced SATA features can cause this error. Change the SATA (AHCI) mode to IDE (ATA or Compatibility) to resolve the error and prevent it in the future. In some older versions, the solution might be just the other way around. Clearing the CMOS can also help.
13] Run chkdsk
If the boot volume is corrupted, running chkdsk on the hard drive will solve the problem. You might have to run chkdsk from the Recovery console.
14] Hard drive errors
If a hard drive has gone bad, you will need to replace it. There is no way out from a damaged hard drive.
To prevent the error from recurring, configure the patching infrastructure so that CU and delta updates are not installed simultaneously during a single reboot.
Read: Bluescreen after installing Drivers in Windows
Further Troubleshooting
When you receive Error 7B Inaccessible_Boot_Device after installing Windows Update, it’s completely different from the scenarios we covered above. We will have to check if there is a pending Windows installation and unload the registry hive to fix it. Boot Windows into Safe Mode using any media installation or if you can get access to Advanced Recovery mode.
Windows Update Installation Status
Open the Command Prompt, and run the following command to verify the Windows update installation and dates. Assuming C is your system drive:
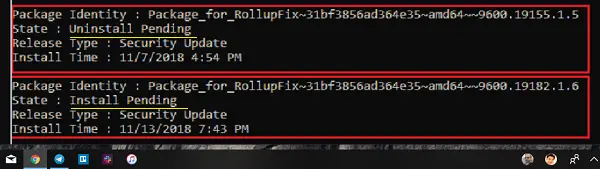
Dism /Image:C: /Get-packages
The result of this command should reveal the Install pending and Uninstall Pending packages.
- Run the command
dism /Image:C:\ /Cleanup-Image /RevertPendingActions. - Navigate to C:\Windows\WinSxS, and then check whether the pending.xml file exists. If it does, rename it to pending.xml.old.
Revert Registry Changes
Load Hive
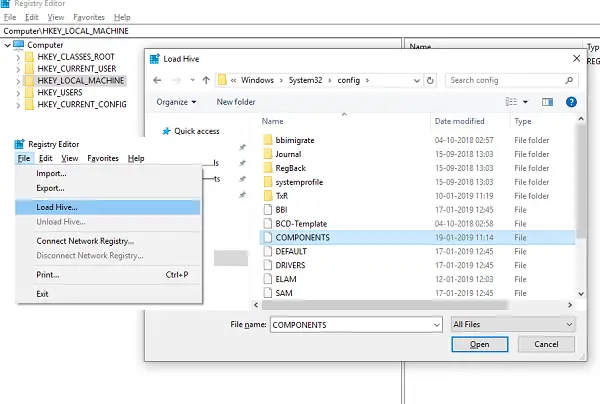
- Type regedit in the run prompt to open the Registry Editor.
- Select HKEY_LOCAL_MACHINE, and then go to File > Load Hive.
- Navigate to C:\Windows\System32\config, select the file that is named COMPONENT. Open it.
- Save the name as “OfflineComponentHive.” It is our new Hive.
- Expand HKEY_LOCAL_MACHINE\OfflineComponentHive, and check whether the PendingXmlIdentifier key exists.
- Create a backup of the OfflineComponentHivekey, and then delete the PendingXmlIdentifier key.
Unload Hive:
Select OfflineComponentHive, and then select File> Unload Hive. Select HKEY_LOCAL_MACHINE, go to File > Load Hive. Navigate to C:\Windows\System32\config, select the file that is named SYSTEM. Open it. When prompted, enter the name OfflineSystemHive for the new hive.
Expand HKEY_LOCAL_MACHINE\OfflineSystemHive, and then select the Select key. Check the data for the Default value.
- If the data in HKEY_LOCAL_MACHINE\OfflineSystemHive\Select\Default is 1, expand HKEY_LOCAL_MACHINE\OfflineHive\ControlSet001.
- If it is 2, expand HKEY_LOCAL_MACHINE\OfflineHive\ControlSet002, and so on.
Expand Control\Session Manager. Check whether the PendingFileRenameOperations key exists. If it does, back up the SessionManagerkey, and then delete the PendingFileRenameOperations key.
Reboot the computer, and you should not get any error related to 7B Inaccessible_Boot_Device.
If nothing works, perform a clean installation of Windows. However, this action will wipe out all the data.
For a few more suggestions, visit Microsoft here.
How do I fix the Windows 11 boot error?
It depends on the boot error you receive when starting your computer. The methods for troubleshooting and fixing the boot error on Windows 11 depend on the specific error. You can note down the error code and search for its possible solutions on the internet on another working computer. Boot issues can result from both hardware and software problems. For example, boot issues after upgrading or installing a new SSD, after enabling the Secure Boot, after a power outage, etc. In each case, the ways to fix this error are different.
How to remove a CMOS battery?
A CMOS battery is a small coin-shaped battery. Its function is to provide a continuous power supply to the BIOS chip, so all BIOS settings are saved after the computer shuts down and the external power supply is turned off. Removing a CMOS battery resets the BIOS settings to the default values. To remove a CMOS battery, you can use a screwdriver. Open your computer case and locate the battery. Gently pull it out with a screwdriver.
What causes Inaccessible Boot?
There are several reasons for an inaccessible boot, including a corrupted or damaged boot partition on the hard drive, a damaged or incorrectly configured boot loader, or malfunctioning or failed hardware components, such as the hard drive or RAM. The inaccessible boot can often be fixed using a diagnostic or repair tool, such as the Windows Startup Repair Tool. If the problem persists, it may be due to a hardware failure, wherein you will need to get a new one and reinstall everything.