
If you see the error message, “Hardware virtualization must be turned on” while trying to install or launch a game in Google Play Games on your Windows PC, this post will help you fix the issue.

Google Play Games relies on virtualization technology to create an Android gaming environment inside Windows. If virtualization is unavailable or not configured correctly, Google Play Games may fail to start and display the following error message:
Hardware virtualization must be turned on
To install and play many games in this app, you’ll need to turn on this feature. For details, visit your computer manufacturer’s website.
What does Hardware virtualization must be turned on mean?
Hardware virtualization is a CPU feature that allows your computer to emulate a different operating system using technologies like Intel VT-x or AMD-V. It helps software efficiently use system resources for virtualization-related tasks. When virtualization is disabled in the BIOS/UEFI settings or blocked by another system feature, Windows may display the message, “Hardware virtualization must be turned on” to notify users that they need to enable it before using the feature or application.
Hardware virtualization must be turned on in Google Play Games
To fix the error message, “Hardware virtualization must be turned on” in Google Play Games on a Windows 11/10 PC, use these fixes:
- Check if your CPU supports virtualization
- Turn on virtualization in BIOS/UEFI
- Turn on required Windows virtualization features
- Disable Hyper-V and related Windows features
- Close or uninstall conflicting emulators and virtual machine software
Let us see these methods in detail.
1] Check if your CPU supports virtualization
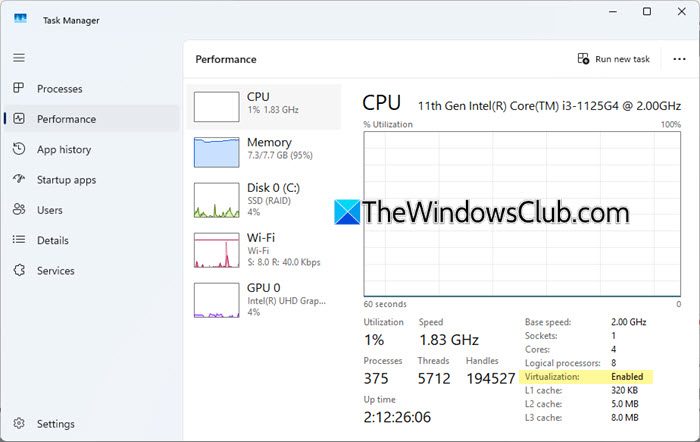
If your processor does not support virtualization, apps that depend on it may fail to work properly. So, first make sure your processor actually supports it.
Press Ctrl + Shift + Esc to open Task Manager. Go to the Performance tab. Select CPU from the left pane.
Look for the Virtualization option on the right side:
- If it says Enabled, virtualization is already turned on.
- If it says Disabled, your CPU supports virtualization, but it is currently turned off in BIOS/UEFI.
- If you do not see the Virtualization option, your processor may not support it, and Google Play Games will not work on your Windows 11/10 PC.
2] Turn on virtualization in BIOS/UEFI
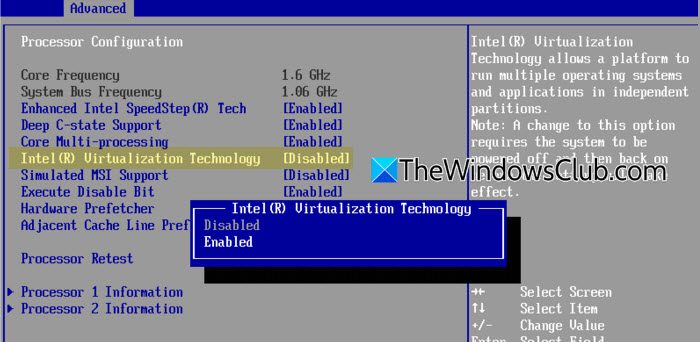
Most modern processors support virtualization, but many PCs ship with virtualization turned off by default. So, if Task Manager shows it as Disabled, the feature must be enabled manually.
To enable virtualization in BIOS/UEFI, follow these steps:
Restart your computer. During startup, repeatedly press the BIOS key such as F2, F10, F12, DEL, or ESC (varies by manufacturer).
Once you are inside BIOS/UEFI, go to the Advanced tab, then go to the CPU Configuration section. Locate the virtualization setting:
- Intel Virtualization Technology (VT-x) on Intel PCs
- SVM Mode or AMD-V on AMD PCs
Change the setting to Enabled. Press F10, then select OK to save the changes.
Exit BIOS/UEFI and reboot your PC.
If Virtualization still shows as Disabled in Task Manager, enable it again in BIOS/UEFI and save the changes properly. Then completely shut down the PC and turn it back on, as this may apply the changes better than a normal restart.
Note: The virtualization setting may appear under a different name depending on your PC or motherboard manufacturer. If you cannot find it in BIOS/UEFI, check your manufacturer’s support page or manual for the exact location and name of the feature.
3] Turn on required Windows virtualization features
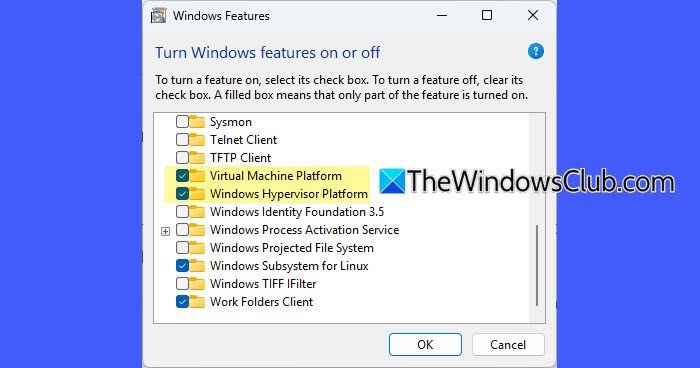
Certain optional features help Windows support virtual environments and virtualization-based applications properly. If they’re not enabled, some applications may fail to detect virtualization, even if it is enabled in BIOS/UEFI.
Press Win + R, type optionalfeatures, and press Enter. In the Windows Features window, enable the following options:
- Virtual Machine Platform
- Windows Hypervisor Platform
- Hyper-V (if available)
Click OK and allow Windows to install the required components.
Restart your computer. After restarting, try launching the application again and check if the error disappears.
Note: On newer Windows 11 builds, you may also manage virtualization-related features from the Virtual Workspaces settings page.
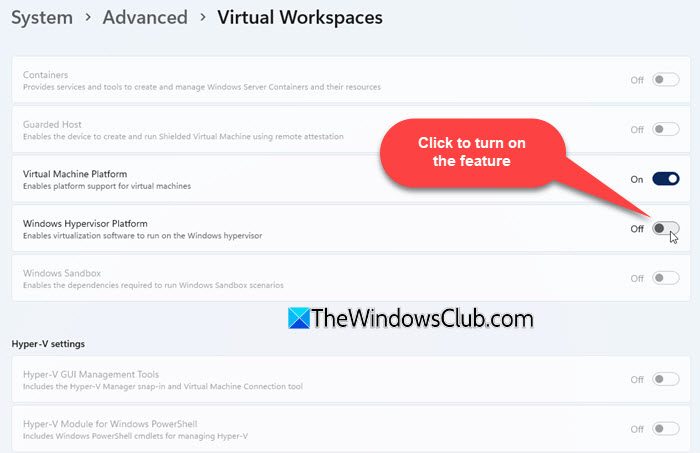
4] Disable Hyper-V and related Windows features
Features like Hyper-V, Windows Sandbox, or Virtual Machine Platform may interfere with virtualization-based apps and emulators. Even if virtualization is enabled, these features can sometimes prevent applications from detecting it properly.
To disable these features in Windows 11/10, uncheck the following options in the Windows Features window:
- Hyper-V
- Virtual Machine Platform
- Windows Sandbox
- Windows Subsystem for Linux (WSL) (if not needed)
Click OK and restart your computer.
5] Close or uninstall conflicting emulators and virtual machine software
Some Android emulators and virtualization programs can conflict with Google Play Games and prevent it from detecting hardware virtualization correctly. Common conflicting programs include:
- BlueStacks
- LDPlayer
- NoxPlayer
- VMware Workstation
- Oracle VM VirtualBox
Completely close these applications and restart your PC. If the error still appears, temporarily uninstall the conflicting software and then try launching Google Play Games again.
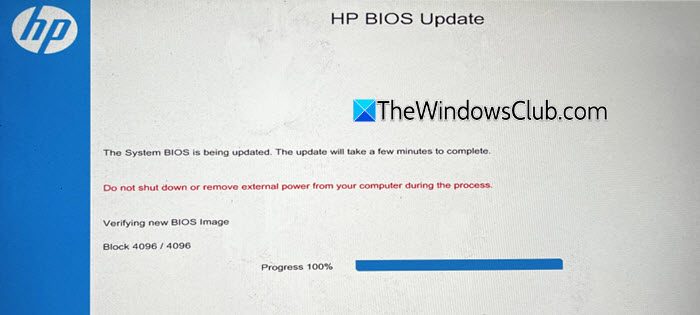
If none of the above solutions work, try updating your BIOS/UEFI firmware and chipset drivers from your PC manufacturer’s website or reinstalling Google Play Games.
I hope this helps.
Read: Best Android Emulators to run Android apps on Windows PC.
Should I turn on virtualization for gaming?
If you only play regular PC games, turning on virtualization usually will not improve gaming performance. However, you may need it for apps like Android emulators, virtual machines, or Google Play Games on PC. Most modern PCs support virtualization safely, so it is generally okay to enable it if an app asks for it.
Read Next: A hypervisor feature is not available to the user, Event ID 7000.
