If the Migrate option is grayed out for a virtual machine in VMware, you won’t be able to move the VM to another host or datastore. This issue usually occurs in VMware vCenter when the VM is stuck in a protected or restricted state after a previous operation. Fortunately, you can restore the migration option by removing the restriction and refreshing the VM’s status. In this post, we will see what to do if the Migrate option is greyed out in VMware.

The Migrate option generally becomes unavailable because vCenter still believes the virtual machine is involved in another operation, such as a backup, snapshot, or migration. In many cases, an interrupted or failed task leaves stale entries in the VPX_DISABLED_METHODS table, which prevents migration even after the original operation has finished. Outdated vCenter services or pending VM tasks can also keep migration disabled until the restriction is removed.
Migrate option is grayed out in VMware vCenter
If the Migrate option is greyed out in VMware vCenter, follow the solutions below.
- Enable the disable migration method from the vSphere Client
- Re-enable the migration method through the VMware MOB
- Restart vCenter Services
- Verify that no backup or VM task is still running
- Remove stale disabled-method entries
Let us talk about them in detail.
1] Enable the disabled migration method from the vSphere Client
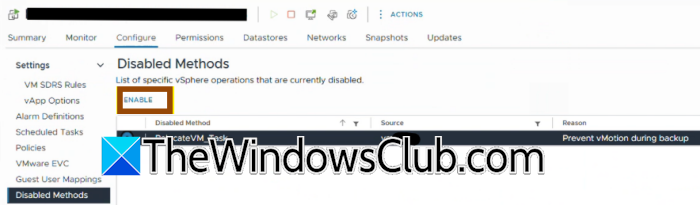
Starting with vCenter Server 8.0 Update 3, VMware lets administrators remove disabled VM operations directly from the vSphere Client. This is the safest and quickest solution because it clears the restriction without modifying the database. To enable the migration method, follow the steps mentioned below.
- Open the vSphere Client.
- Select the affected virtual machine.
- Go to Configure > Disabled Methods.
- Locate the disabled migration method.
- Click Enable.
- Refresh the client and check whether Migrate is available again.
This should bring the greyed-out Migrate option for you.
2] Re-enable the migration method through the VMware MOB
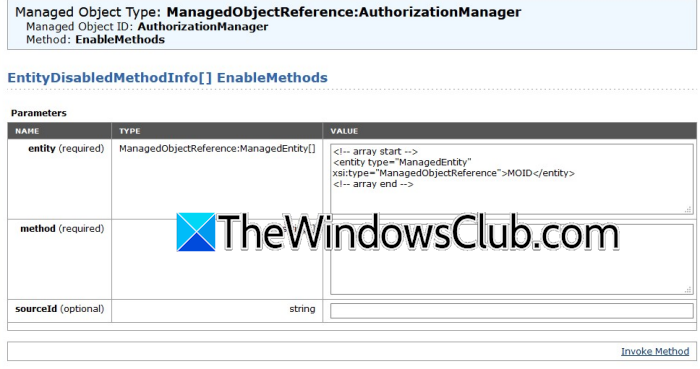
If the Disabled Methods page is unavailable or you’re using an older vCenter version, you can enable the migration method through the VMware Managed Object Browser (MOB). This removes the restriction associated with the affected VM. Follow the steps mentioned below.
- Find the VM’s Managed Object ID (MOID) from the vSphere Client URL (for example, vm-141).
- Open the following URL in a browser: https://<vCenter>/mob/?moid=AuthorizationManager&method=enableMethods
- Sign in with an SSO administrator account.
- Enter the VM’s MOID in the entity field.
- Enter RelocateVM_Task as the method.
- Click Invoke Method.
- Refresh the vSphere Client and verify that the Migrate option is enabled.
Finally, check if the issue persists.
3] Restart vCenter services
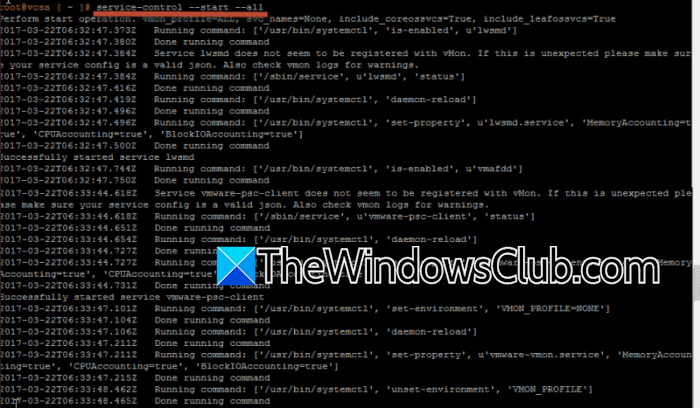
Sometimes, vCenter continues to cache disabled VM operations even after the underlying issue has been resolved. Restarting the management services forces vCenter to reload the VM state and clear stale information. Follow the steps mentioned below to restart vCenter Services.
- Connect to the vCenter Server Appliance.
- Open an SSH session.
- Restart the vCenter services.
- Wait until all services start successfully.
- Sign back in to the vSphere Client
Check whether the Migrate option is available.
4] Verify that no backup or VM task is still running
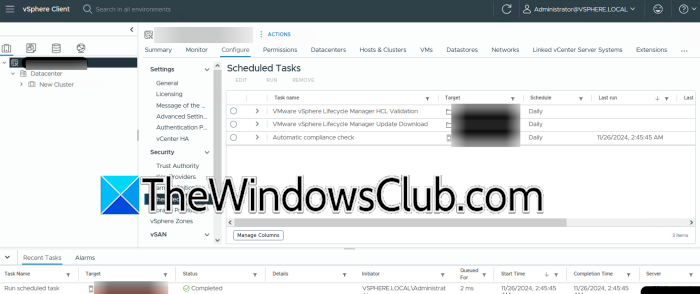
Many backup applications temporarily disable VM migration while they process snapshots. If the backup does not finish correctly, the restriction may remain active. Confirming that all backup and VM operations have completed can help with the migration restore.
You need to open the Recent Tasks pane in the vSphere Client, and verify that no migration, snapshot, or backup task is running. Now, check your backup software for failed or stuck jobs. Complete or cancel any pending operations.
Finally, refresh the vSphere Client and test the migration again.
5] Remove stale disabled-method entries
If none of the previous solutions work, stale records in the VPX_DISABLED_METHODS database table may still block the VM. Removing these entries clears the restriction, but you should perform this procedure only after taking a backup or snapshot of the vCenter appliance.
Follow the steps mentioned below to do the same.
- Create a backup or snapshot of the vCenter Server.
- Connect to the vCenter appliance using SSH.
- Stop the vmware-vpxd service.
- Connect to the VCDB PostgreSQL database.
- Verify that the affected VM exists in the VPX_DISABLED_METHODS table.
- Delete the corresponding entry.
- Start the vmware-vpxd service.
Open the vSphere Client and verify that the Migrate option is restored.
That’s it!
Read: How to migrate VMware VMs to Nutanix using Nutanix Move
How do I enable VM migration in VMware?
To enable VM migration, first verify that no snapshot, backup, or migration task is currently running on the virtual machine. If the option remains unavailable, restart the required vCenter services or use the VMware Managed Object Browser (MOB) to re-enable the migration method that was disabled. In some cases, administrators may also need to remove stale entries from the VPX_DISABLED_METHODS table after backing up the vCenter database to restore migration functionality.
Read: Backup VMware Virtual Machines with Azure Backup Server
Can a VMware snapshot block virtual machine migration?
Yes, a VMware snapshot can temporarily block virtual machine migration while it is being created, consolidated, or removed. Backup applications that rely on snapshots may also disable migration until the backup process finishes successfully. If a snapshot operation fails or gets stuck, vCenter may continue to mark the VM as busy, keeping the Migrate option grayed out even after the original task has finished.
Also Read: Host TPM Attestation Alarm in VMware vSphere.