If you are looking to use Linux Mint without creating a separate partition on your computer, a hypervisor such as VMware Workstation is the way to go. In this post, we will see a step-by-step guide to installing Linux Mint on VMware Workstation.
Linux Mint is a widely used, beginner-friendly Linux distribution built on Ubuntu and Debian, designed to provide a smooth desktop experience. It features the Cinnamon desktop as its flagship environment, with MATE and Xfce also available, making it easy for Windows users to transition. Known for its stability and long-term support, Linux Mint comes with essential applications pre-installed, strong multimedia compatibility, and built-in security tools. As a free and open-source system, it offers full customization, giving users a complete and reliable operating system right from the start. VMware Workstation allows you to run Linux Mint as a virtual machine without partitioning your hard drive or modifying your existing operating system. This is perfect for testing, development, or learning Linux in a safe, isolated environment.
How to install Linux Mint on VMware Workstation
To install Linux Mint on VMware Workstation, follow the steps below.
- Install VMware Workstation
- Download Linux Mint
- Create a virtual machine
- Add Linux ISO
- Install the operating system
Let us talk about them in detail.
1] Install VMware Workstation
Since our hypervisor is not preinstalled on Windows, you need to go ahead and download VMware Workstation Pro for free. Once done, run the installer to install it on your computer.
2] Download Linux Mint
Linux Mint is a Linux operating system built on Ubuntu, mainly designed for desktop and laptop use. It offers strong support for multimedia, graphic design, web browsing, and gaming, which has helped it become one of the fastest-growing Linux distributions. For more details, you can visit linuxmint.com.
3] Create a virtual machine
Once we have the virtual machine hypervisor and the required ISO, it’s time to create a suitable virtual machine. To do so, follow the steps mentioned below.
- Open VMware Workstation.
- Click on Create a New Virtual Machine.
- Click on Next.
- You can choose between the Typical and Custom setup wizard. Select Custom if you want full control over all configuration options, but if you’re fine with the default settings, proceed with the Typical installation.
- Click Next.
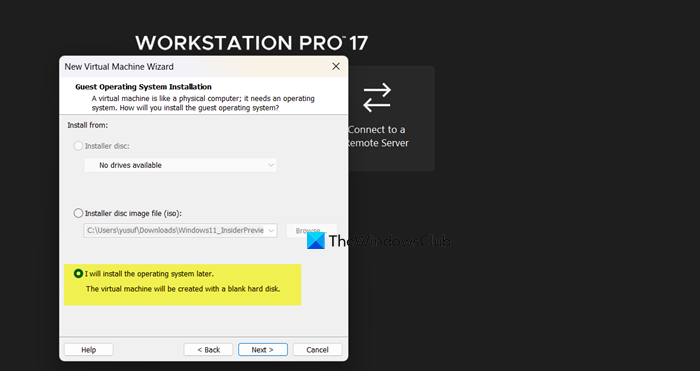
- Select I will install the operating system later and click Next.
- When you are on the Guest operating system page, select Linux, and choose the needed version.
- Enter the virtual machine’s name and select the hardware location.
- Select the virtual machine’s disk capacity and split the disk size, or not, your call.
- Click on Customize hardware.
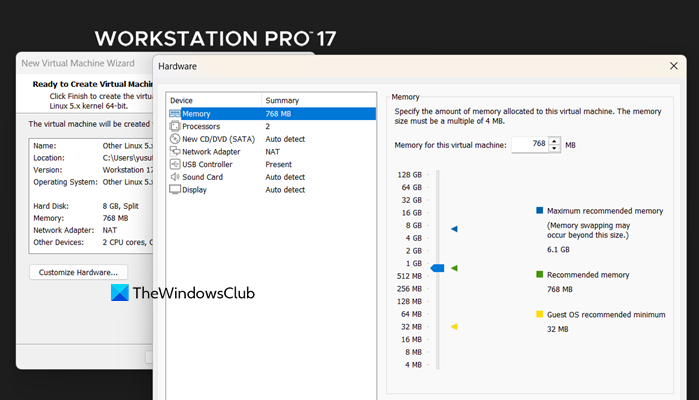
- Go to the Memory tab and set your base memory depending on your needs.
- Now, go to your Processor and set your CPU.
- Click Close > Finish.
We have created the virtual machine now and are ready to supply the downloaded ISO file.
4] Add Linux ISO
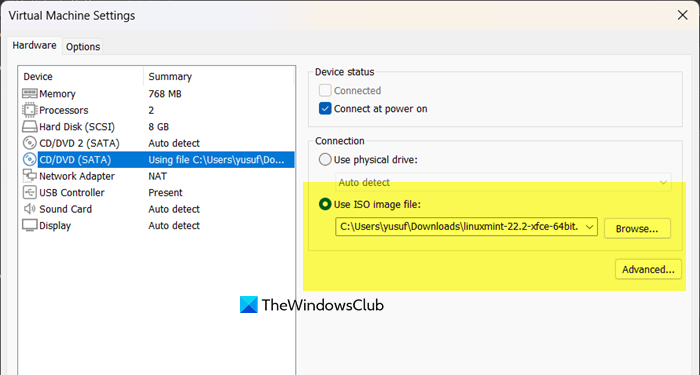
Since we selected the option that says I will install the operating system later, we need to add the downloaded ISO now. For that, you need to right-click on the newly created virtual machine and select Settings.
Go to CD/DVD (SATA), click on Use ISO image file, select Browse, go to the location where you have stored the file, select the ISO file, and click on Open.
Read: How to Install Ubuntu in VMWare Workstation
5] Install the operating system

Now that we have everything ready, let’s go ahead and install the operating system. You can follow the steps mentioned below to do the same.
- Select the virtual machine and select Power on this virtual machine.
- Now, select Start virtual machine using the arrow key and then hit Enter.
- It is going to take some time to load, so wait for that, and once done, you can try out Linux Mint.
Once you get the taste of Linux Mint, it’s up to you to install it permanently or not. If you do decide to install the OS, click on Install Linux Mint.
First, choose your language and keyboard layout, then decide whether to install multimedia codecs. Next, partition the disk by either erasing it for automatic setup or using the advanced option for custom partitions. Confirm the changes, select your time zone, and create an admin account to continue.
The installation will then begin. Once it finishes, reboot the virtual machine and remove the installation media when prompted. After restarting, Linux Mint will boot and complete the installation in VMware Workstation.
Hopefully, with these steps, you will be able to install Linux Mint.
Read: How to install Fedora on VMware Workstation
How do I install Linux on my VMware workstation?
To install Linux on your VMware Workstation, you begin by creating a new virtual machine within the software, selecting your downloaded Linux distribution ISO file as the installation source, and then following the virtual machine wizard to allocate resources like RAM and storage; after completing the wizard, you power on the virtual machine to boot into the Linux installer, which will guide you through the standard installation process for that specific distribution, just as you would on a physical computer, followed by installing VMware Tools for optimal integration.
Read: How to install Debian on VMware Workstation
How to install OS on VMware Workstation?
To install any operating system on VMware Workstation, the universal process involves launching VMware and creating a new virtual machine, where you specify the installer disc image file (ISO) for your desired OS, configure the virtual hardware such as processors and memory, and then complete the virtual machine creation; starting the VM boots the OS installer, allowing you to proceed with its specific setup steps inside the virtual environment, effectively simulating a standard installation on dedicated hardware.
Also Read: Install Kali Linux on VMWare Workstation.