If you find that some of your newly installed devices are not working correctly, or your Windows computer freezes frequently, you might want to consider removing old, unwanted, unnecessary, unused and non-present device drivers in Windows 11/10.
What is the difference between Non-present and Hidden devices?
Non-present devices are old, unused devices that were once installed but are no longer attached to the computer. Hidden devices are drivers that Device Manager does not show by default, including Non-present devices and certain system devices or software components that Windows hides.
Read: How to show Hidden Devices and Non-present Devices in Device Manager
How to remove Unwanted, Unnecessary and Non-present Devices in Windows 11
To remove old, useless, unwanted, or unused device drivers from your Windows 11/10 computer, open System Properties.
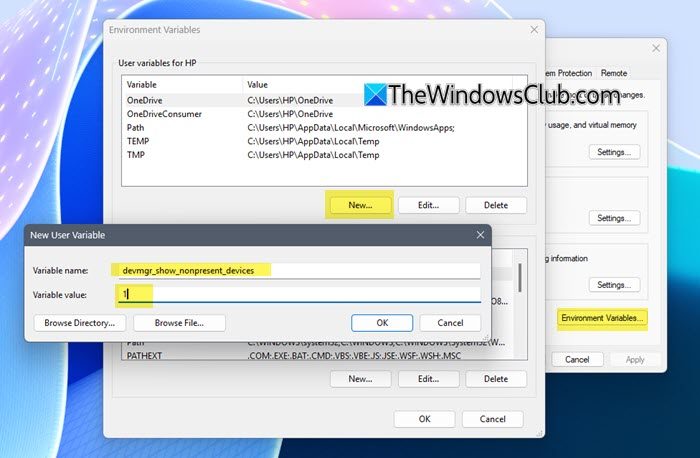
Click on Environment Variables. Alternatively, simply open the Control Panel and type Environment Variables.
Now, under the User variables box, click on New and type-
devmgr_show_nonpresent_devices
in the Variable Name text box & 1 in the Variable Value box. This will set a flag to allow you to view unused devices.
Click OK and exit.
Now type devmgmt.msc in Start Search and hit Enter to open the Device Manager.
Click View tab and select Show hidden devices. Expand the branches in the device tree & look for the faded icons.
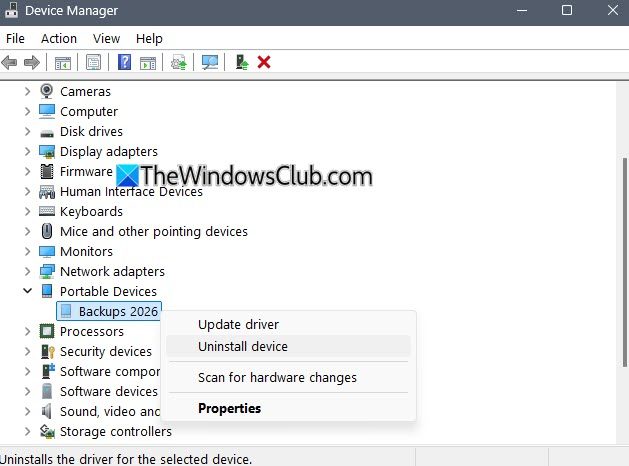
These indicate unused device drivers. Right-click on it and select Uninstall.
Read: How to clean up DriverStore filerepository in Windows 11
How to remove Non-present Devices using pnputil
You can use pnputil to list and remove Non-present devices.
Run the following command in CMD (Admin) to list them:
pnputil /enum-drivers
To remove a driver package, run:
pnputil /delete-driver ABCD.inf /uninstall /force
Here, replace ABCD.inf with the driver name from the list.
The paramaters used are:
-
/uninstallremoves it from any devices using it. -
/forceensures removal even if Windows thinks it’s still needed.
How to remove Non-present Devices using devcon
You can use devcon to list and remove Non-present devices. You will have to download the Windows SDK or extract devcon.exe from it.
Run the following command in CMD (Admin) to list them:
devcon listall
To remove a non-present device, run:
devcon remove <HardwareID>
Here, replace <HardwareID> with the driver or hardware ID from the list.
The parameters used are:
-
/uninstallremoves it from any devices using it. -
/forceensures removal even if Windows thinks it’s still needed.
You can also use free tools to remove unused and old device drivers. We are discussing a few below.
Use freeware GhostBuster to remove unwanted or ghosted drivers
GhostBuster is an application that lists all the devices, detects ghosted devices, and removes these if they match selectable device types and/or device classes with a single mouse click.

By default, Windows does not show ghosted devices. Windows will show Ghosted devices only if two criteria are met:
- An environment variable DEVMGR_SHOW_NONPRESENT_DEVICES with a value of 1 is added.
- In Device Manager (Start Menu & Run ‘compmgmt.msc’) – if you select the View > Hidden Devices menu item.
Because Windows has to detect whether a device is ghosted by trying to start it, many ghosted devices will increase Windows’ startup time. The ‘regular’ way to remove these devices is to right-click each one, select the Uninstall menu item, and wait for Device Manager to uninstall the device and rebuild its device tree.
Ghostbuster does this in one click, removing all ghosted devices that match your selection criteria!
You can select and deselect classes or devices via the right-click context menu in the devices list view. Only ghosted devices (grayed text) AND devices that match the selection criteria (light yellow background) will be uninstalled when the ‘Remove Ghosts’ button is pressed. All other devices remain untouched.
Beware that Windows has a fair number of devices that are ghosted but should not be uninstalled (such as devices in the sound, video, and game controller classes, or system and non-plug-n-play devices). GhostBuster marks most of these as services. Please note that these “Ghosted Devices” can also be useful and are one reason Windows doesn’t look for drivers every time you connect a device.
You can visit the GhostBuster home page on Code Plex for more.
Manage, Remove Devices & Drivers with Device Remover for Windows PC
Device Remover is a freeware, powerful Device Manager alternative for Windows 11/10. It lets you see the Hidden and Other devices and manage or remove device drivers easily.
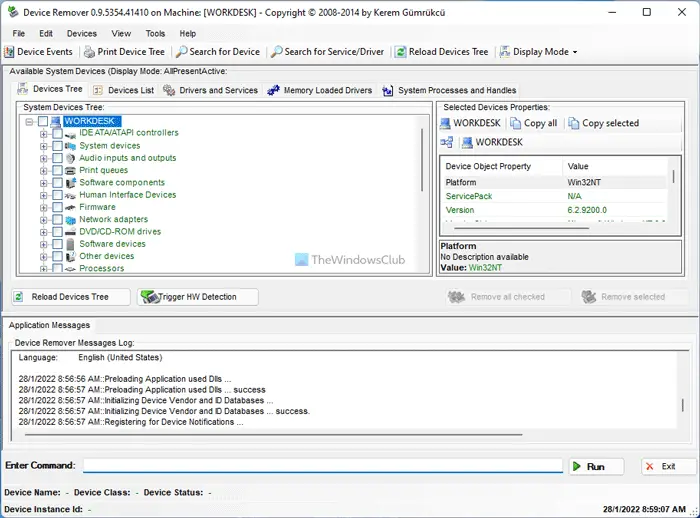
When you start Device Remover the Debug Console will open. Only after this will you see the main window for Device Remover.
Features:
- In-Depth view of all installed Devices, Device Classes, Drivers and Services on a Windows System
- Easy mass removal or edit of multiple Devices
- Modification & Manipulation of Devices, Drivers, Registry entries and Services on the System
- Live detailed View of Device Detections on the System
- Multiple Device Problem-solving Features and Functions
- Detect new hardware easily.
You can download it here.
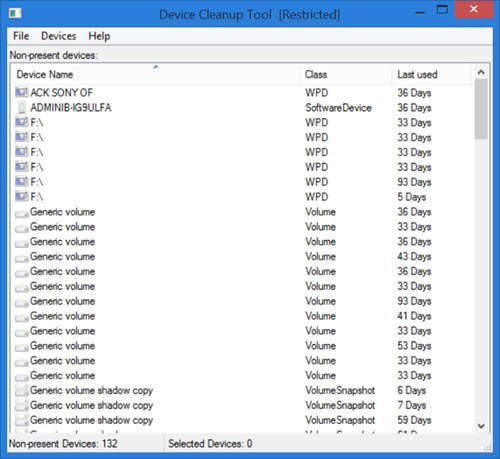
Remove Non-present devices in Windows 11 with Device Cleanup Tool
Device Cleanup Tool is a free portable tool that lets you remove multiple or all old, non-present, unused, previous hardware devices from your Windows computer. Non-present devices are those devices that were once installed but are now no longer attached to the computer. When you use the built-in Windows Device Manager, you can delete the devices one by one, and not all at once. This is what’s possible with this Device Cleanup Tool. You can select one, multiple, or all non-present devices and delete them together.
Using the Device Cleanup Tool is very easy. Simply download the zip file from the Uwe Sieber website. Upon extracting the zip folder, you will see two versions of the Device Cleanup Tool; one for 32-bit and another for 64-bit PCs. Double-click the .exe file that is compatible with your system.
The tool immediately lists the devices not present on your PC. You will see the device name, its class, and the number of days since the device was last used. You can see in the image the last used days, such as 36 days, 59 days, etc.
As mentioned in the tool’s Help file, all those devices listed by the Device Cleanup tool are currently ‘Not present’. That means, usually, they have the problem code 45, which is:
CM_PROB_PHANTOM, The device currently exists only in the registry.
The ‘last used’ time comes from the Write time of the device’s registry key under:
HKEY_LOCAL_MACHINE\SYSTEM\CurrentControlSet\Enu
On some Windows PCs, this time is calculated based on startup; hence, devices on these PCs will have the same age. However, on most Windows systems, the time is set when the device gets active; hence, for such systems, the ‘last used’ time is relevant.
From the list generated by the Device Cleanup tool, you can select one, multiple, or all devices and delete them together. If the device is reconnected, it will be detected as a new device the next time you use the tool.
There are three tabs in the toolbar of the Device Cleanup tool – File, Devices, and Help.
When you click on File, you can see functions such as Refresh (F5), Create System Restore Point, Show Windows Device Manager, and Exit.
When you click on Show Windows Device Manager, the built-in Device Manager opens up. It’s like a shortcut to the Windows device manager. The non-PnP devices and ‘soft’ devices are not listed in by the Device Cleanup tool. That’s because they cannot be automatically reinstalled. Hence, in order to delete them, you need to use the Windows Device Manager.
The creators of this tool also warn that you should be careful with the Microsoft MEDIA class devices. Make sure you know what to do with the listed devices before deleting them.
The Devices tab lets you Select all devices and Remove selected devices. To delete a single device, right-click the device and click Remove Device. Remember, you will have to have administrator rights to remove the devices; otherwise, you may get an ‘Access Denied’ error.
The Help tab, just gives details about the tool, including its version number.
You can download the tool from this web page.
Please exercise the utmost caution before removing any unused or ghosted drivers.
How do I completely remove drivers from Device Manager?
It is possible to completely remove drivers from Device Manager. Whether it is an audio or graphics driver, you can remove it from the Device Manager. For that, press Win+X, select Device Manager and select a driver you want to remove. Right-click on the driver, select Properties and switch to the Driver tab. Click on the Uninstall Device button and let it finish.
How do I remove devices and drivers from my computer?
To remove devices and drivers from your computer, you have two options. You can use the native Device Manager or a third-party alternative called Device Remover. Either way, you can uninstall the device and its corresponding driver from your PC within moments.
How to find which drivers are outdated in Windows 11?
The best way to find out which drivers are outdated in Windows 11/10, is by using an OEM tool like MyASUS app, Dell Update utility, Lenovo System Update, AMD Driver Autodetect, Intel Driver & Support Assistant, HP Support Assistant, etc. These tools will identify the outdated drivers and offer to update them.
TIP: How to identify Unknown Devices and USBOblivion may also interest you!
Is it OK to delete old drivers?
Drivers are software that tell the Windows OS about the device connected to the computer, so the device can work properly. Failing a device driver causes the device to malfunction. You can delete old drivers only if they are no longer needed on your system. If Windows is still using that old driver, uninstalling it can cause problems. Hence, instead of deleting the old driver, consider updating it to the latest version, provided that the driver is still in use.
BONUS TIP: Display Driver Uninstaller will help uninstall AMD, INTEL, NVIDIA Drivers
Additional resources: