
Some Acer users encountered the Security Boot Fail error when turning on their laptops or PCs. The error occurs after they turn on their system and prevents them from booting into Windows 11/10. If you encounter this issue with your Acer computer, the solutions provided in this article will help.

Acer Security Boot Fail error
Use the following fixes if you get the Security Boot Fail error on system startup and you cannot boot into Windows 11 on your Acer computer:
- Reset BIOS
- Update BIOS
- Uninstall the Windows Update
- Rebuild the EFI bootloader
- Recover the Secure Boot Environment
All these fixes are explained in detail below:
1] Reset BIOS
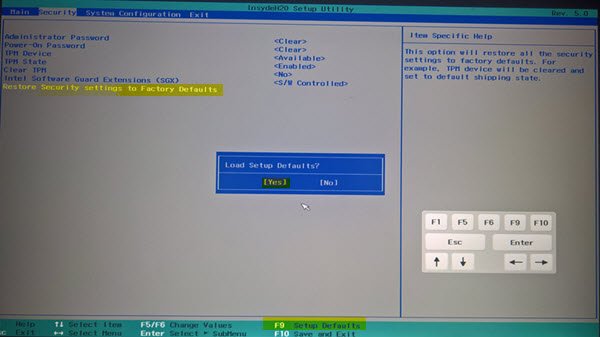
The first step is to reset the BIOS to the factory default settings. Press the correct BIOS key to enter your Acer BIOS, then find the option to restore all BIOS Settings to their defaults. Save and exit the BIOS and see if you can boot into Windows.
On most Acer laptops, the BIOS key is F2, while on Acer desktops it is usually the Del key.
2] Update BIOS

If resetting the BIOS to factory default settings does not work, the next fix you can try is updating your BIOS. Since you cannot boot into Windows 11 because of the Security Boot Fail error, you need to disable Secure Boot. After disabling Secure Boot, save the changes and restart your system. Now, you should be able to boot into Windows. Once you boot into Windows, visit the official Acer website and check if an updated BIOS version is available for your system’s model. If so, download the latest BIOS version and install it.
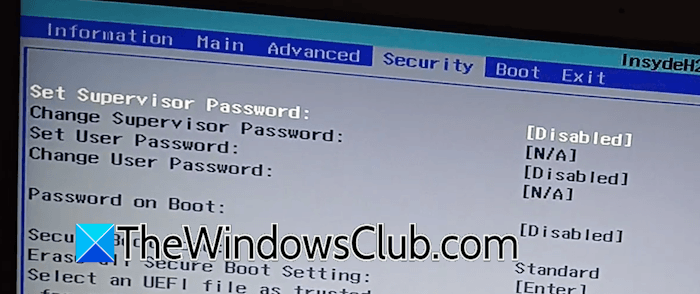
If the Secure Boot option is grayed out or you cannot disable it, set a Supervisor Password first. On most Acer laptops, you can find the Set Supervisor Password option under the Security tab in the BIOS. If you cannot find it there, refer to your laptop’s user manual or explore the other BIOS tabs, as its location may vary depending on your system’s model. Navigate to the Security tab in the BIOS. If the option to set a supervisor password is disabled, select it and press Enter. After that, you will be prompted to enter a new password. Re-enter the same password to confirm it. When you are done, select Save. Now, you should be able to disable Secure Boot. Remember the Supervisor Password, as you will need it whenever you enter the BIOS or change BIOS settings. You can disable it later.
3] Uninstall the Windows Update
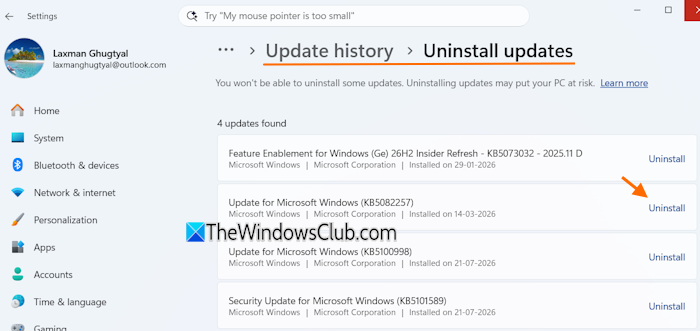
According to reports, this issue occurred after installing the Windows Update. If you have also installed a Windows Update recently, uninstalling that update can help fix this issue. Disable Secure Boot to boot into Windows. Once you boot into Windows 11, open its Settings and navigate to Windows Update > Update history > Uninstall updates. You will see all the installed Windows Updates with their installation date. Now, uninstall the most recent Windows Update.
To verify that uninstalling the Windows update resolved the issue, enter the BIOS, enable Secure Boot, save the changes, and restart your system. If the Security Boot Fail error does not reappear, the issue has been resolved.
4] Rebuild the EFI bootloader
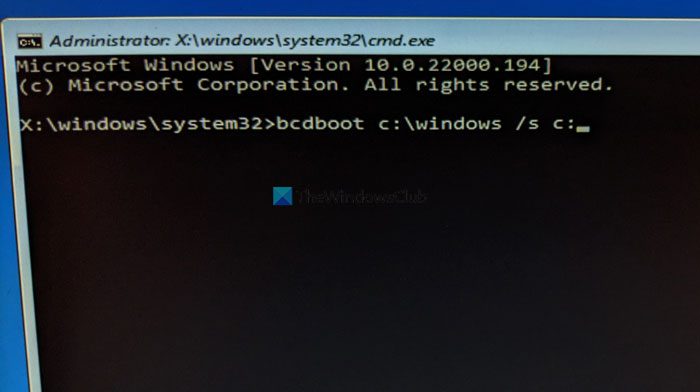
If the error persists, rebuild the EFI bootloader. A corrupted EFI bootloader also causes boot issues. Therefore, rebuilding it can help you.
5] Recover the Secure Boot Environment
If the error persists, the Windows boot-related components might have become corrupted. In such cases, you can use the SecureBootRecovery.efi file to recover the Windows Secure Boot environment. This file is available on all Windows computers and located at the following path:
C:\Windows\Boot\EFI
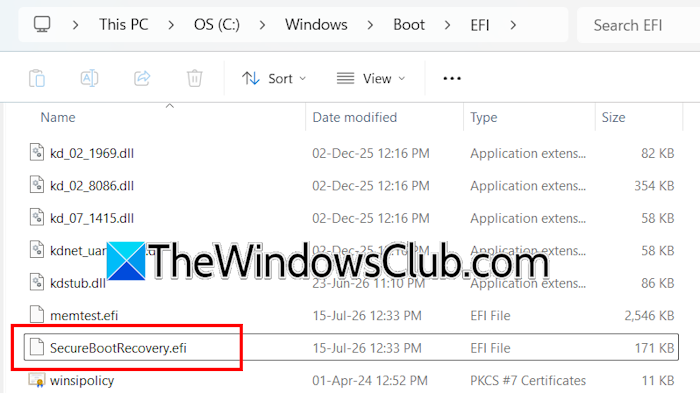
Open File Explorer and navigate to the above path. Now, look for the SecureBootRecovery.efi file. Once you locate the file, follow these steps:
- Connect a USB flash drive to your system and format it to the FAT32 file system.
- Open the USB flash drive and create a new folder. Name it EFI.
- Now, open the EFI folder and create a new folder. Name it BOOT.
- Copy the SecureBootRecovery.efi file and paste it into the BOOT folder that you created in your USB flash drive.
- Rename the SecureBootRecovery.efi file to bootx64.efi.
- Now, boot your system from the USB flash drive.
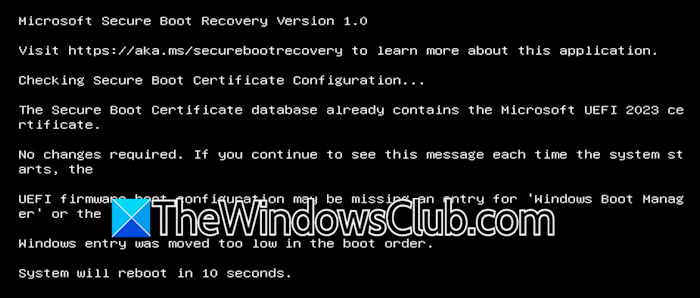
To boot your system from the USB flash drive, you need to change the boot order. Your system will automatically detect the new bootx64.efi file and start recovering the Secure Boot Environment. You may see a message similar to the one in the above screenshot. After the process is completed, your system will reboot automatically. When the system reboots, enter the BIOS and enable Secure Boot.
Connect your charger to your laptop and turn on the switch, even if it is fully charged. Your laptop should not be turned off during this process. If you have a desktop PC, make sure that the power supply is not interrupted during the Secure Boot Recovery process.
That’s it. I hope this helps.
How to fix Acer laptop startup problem?
You may encounter different types of startup problems, such as boot failures, black screen with cursor, etc., on your Windows PC. Though the fix depends on the underlying cause, some solutions can be applied to fix most startup issues, such as Automatic Startup Repair, System Restore in Windows Recovery Environment, etc.
How to enable Secure Boot in Acer?
The process to enable Secure Boot in Acer is the same as other laptops. Enter the Acer BIOS and then find the Secure Boot option. If you cannot locate the Secure Boot option, refer to the user manual. Once you find it, enable it. If the option is disabled, you need to set up a Supervisor Password.
Read next: UEFI2023Status stuck at In Progress or Not Started.
