If Windows Search or Search Indexer is not working properly or will not start in Windows 11/10, then this troubleshooting post may help you fix the problem. You may try the suggestions in any order you wish, but remember to create a system restore point first, before you commence. The error messages you see could be:
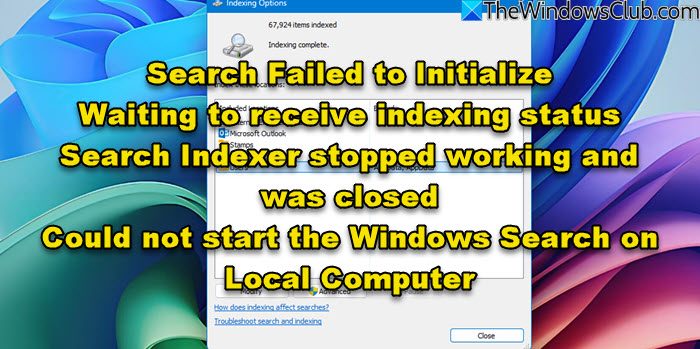
Search Failed to Initialize
Waiting to receive indexing status
Search Indexer stopped working and was closed
Could not start the Windows Search on Local Computer.
Windows Search Indexer stopped working and was closed
If the Search Indexing option or Indexer is not working or running properly and you see messages like Waiting to receive indexing status, Search Indexer stopped working and was closed, Could not start the Windows Search on Local Computer errors, etc, then these suggestions will help you fix the problem:
- Rebuild Search Index
- Check Registry key corruption
- Check Windows Search status
- Reset Windows Search Service
- Run Indexer Diagnostics Tool
- Run the Windows Search Troubleshooter
- Check LocalState folder permissions
- Reset Windows Search
- Restore your computer
- Other suggestions.

1] Rebuild Search Index
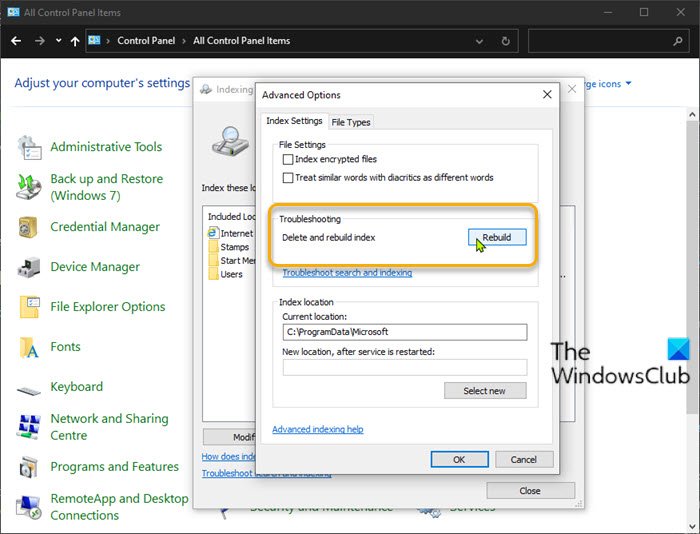
To rebuild search index, Open Control Panel > System & Maintenance > Indexing Options. In the Advanced Options, Click on Restore Defaults and also Rebuild Index. Click OK.
Next, type ‘service’ in your Start Menu Search Bar, and start Services. Scroll down to the ‘Windows Search Service’, and ensure that it is set on Automatic and Running. Restart this Service.
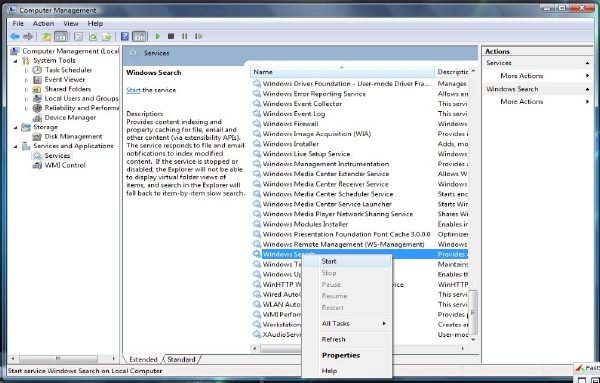
You will also have to ensure that RPC (Remote Procedure Call) is running and set on Automatic.
This will delete the delete Windows.edb file.
2] Advanced Button is grayed out? Check Registry key corruption
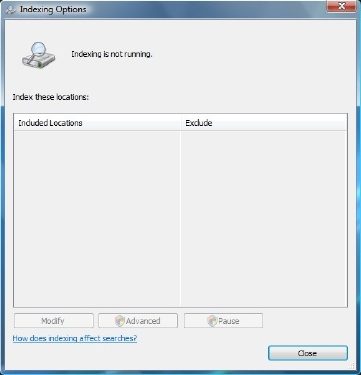
If you find that your Indexing is not running, or that the Advanced Button is grayed out and you get a message, then the chances are that your following Registry key may have been corrupted:
HKEY_LOCAL_MACHINE\SOFTWARE\Microsoft\Windows Search
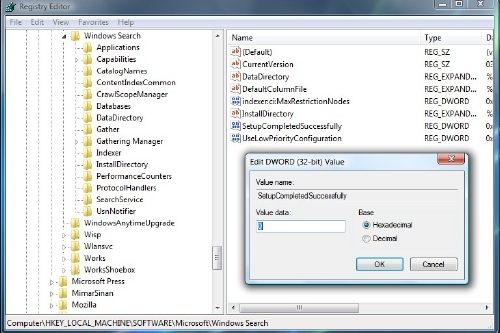
Open Regedit and navigate to the key mentioned above. In the right pane, double click on SetupCompletedSuccessfully. Ensure that the Value Data is 0, that is, zero numeral. Click OK. Reboot.
This procedure will reset your Windows Search completely, rebuild the index and reset your crawl and other indexing settings.

Read: Search Indexer always Resetting & Restarting after reboot.
3] Check Windows Search status
Even if your Windows Search Service is set on Automatic, you are unable to Start the service; but instead, you get the following error message – Windows could not start the Windows Search on Local Computer.
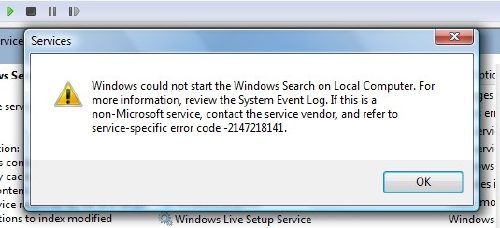
I suggest then that you see the Event Viewer to check for System Logs.
To do so, simply just type event in the Windows start menu search bar and hit enter. On the left side, click on System, to view the logs.
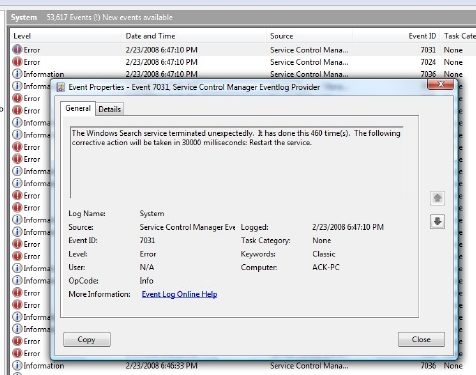
Note the Event ID and seek Event Log Online Help.
Read: Indexing is not running in Windows
4] Reset Windows Search Service
Microsoft’s Fix It Blog has automated this WinVistaClub post dated 7th Oct 2008 on Windows Search not working, into a Fix it MSI package! It resets Windows Search settings to default. It is, incidentally, the first MVP Fix It!
Here’s what the Fix-It package does:
Stops the Windows Search Service
Configures the service to start= auto
Sets the value of the following key to 0:
HKEY_LOCAL_MACHINE\SOFTWARE\Microsoft\Windows Search\SetupCompletedSuccessfully
Starts the Windows Search Service
Go here to download the Fix it MSI package. You may also carry out these instructions manually.
5] Run Indexer Diagnostics Tool
Indexer Diagnostics Tool will help fix Windows Search Indexer problems.
6] Run the Windows Search Troubleshooter
Run the Windows Search Troubleshooter and follow its suggestions.
7] Check LocalState folder permissions
Open File Explorer set it to Show Hidden Files and folders via Folder Options, and then navigate to the following location:
C:\Users\username\AppData\Local\Packages\windows.immersivecontrolpanel_cw5n1h2txyewy\LocalState
Right-click the Indexed folder > Properties > Advanced > Check Allow files in this folder to have indexed in addition to file properties. Click Apply and Exit.
8] Reset Windows Search
Reset Windows Search and see.
9] Restore your computer
Restore your computer to a prior good point, or Reset your Windows PC. Else repair your Windows 7 installation. Boot from your Windows DVD > Select System Recovery Option > Select Repair Computer > Choose your installation of Windows > Select ‘Startup Repair’ > Follow the instructions.
We hope this helps you fix Windows Search not working problems on Windows 11/10.
10] Other suggestions
- If Windows Search Indexer keeps restarting every time you start PC, then remove some large folders like the WinSxS folder and see if it helps.
- See if KB932989 has anything to offer you.
- See this post if you receive an error message: Windows Search service on local computer started and then stopped.
- See this post if you see Search Indexing was turned off message in Windows Start Menu
- This post will help you fix Search Indexer High Disk or CPU usage
- Change the location of Search Index and see if that helps you.
- If nothing works, then you might want to consider using an alternative Search software.
Now read: What is Search Indexing and how does it affect searching in Windows 11/10?