If you find that search results are missing, no longer valid, or incorrect, then the Search Index may not be up to date – in which case, you can manually rebuild the index to force it to update. In this post, we will show you the two ways to rebuild the Search Index if it’s not working as it should or was turned off, on your Windows 11/10 device.
How to rebuild Search Index in Windows 11/10
Windows Search has been significantly improved to limit the number of times the service indexes your files for content that doesn’t have an impact on search experiences and gives you a better experience on Windows 11/10.
You can rebuild the search index in Windows using any one of these methods.
1] Rebuild Search Index via Control Panel

To Rebuild Search Index via Control Panel in Windows, do the following:
- Press Windows key + R to invoke the Run dialog.
- In the Run dialog box, type control and hit Enter to open Control Panel.
- From the top right corner of the window, set the View by option to Large icons or Small icons.
- Click Indexing Options.
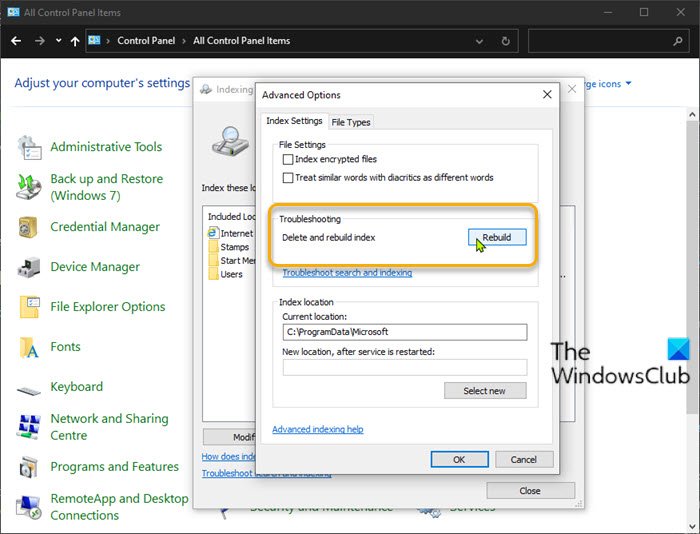
- In the window that opens, click the Advanced button.
- In the Index Settings tab, click the Rebuild button under Troubleshooting.
- Click OK on the prompt to confirm.
- The indexing operation will now commence.
- Click the Close button when the indexing completes & exit Control Panel
Keep in mind that rebuilding the index might take a long time to complete. At any time, you can click the Pause button to stop rebuilding the index.
Read: Windows Search Indexing Tips and Tricks.
2] Rebuild Search Index using Batch (.BAT) file
To rebuild the Search Index using a batch (.bat) file in Windows, do the following:
- Press Windows key + R to invoke the Run dialog.
- In the Run dialog box, type notepad and hit Enter to open Notepad.
- Copy and paste either of the code below into the text editor.
@echo off
net stop wsearch
del "%ProgramData%\Microsoft\Search\Data\Applications\Windows\Windows.edb"
:wsearch
net start wsearch
IF NOT %ERRORLEVEL%==0 (goto :wsearch) ELSE goto :END
:END
OR
@echo off
net stop wsearch
REG ADD "HKLM\SOFTWARE\Microsoft\Windows Search" /v SetupCompletedSuccessfully /t REG_DWORD /d 0 /f
del "%ProgramData%\Microsoft\Search\Data\Applications\Windows\Windows.edb"
:wsearch
net start wsearch
IF NOT %ERRORLEVEL%==0 (goto :wsearch) ELSE goto :END
:END
- Save the file to the desktop with a name and append the .bat file extension – eg, SIRebuild.bat and on the Save as type box select All Files.
- To run the batch file right-click the saved file and select Run as Administrator from the context menu.
- Click Yes on the UAC prompt to approve. The search index will now start to rebuild in the background.
3] Using CMD
Open and elevated command prompt and execute these commands one after the other:
net stop wsearch
net start wsearch
This will restart the Search Service and reset the indexing process.
4] Using PowerShell
Stop-Service -Name WSearch
Remove-Item -Path "C:\ProgramData\Microsoft\Search\Data\Applications\Windows\Windows.edb"
Start-Service -Name WSearch
This will stop the Search service, delete the index database, restart the Search service and consequently reset the Index.
Related post: Windows Search not working or finding files
How long does it take to rebuild Search index in Windows?
Depending on the number of files you have set to index, the data size, the power of your processor, the Read-Write speed of your disk, etc, it may take anywhere from a couple of hours to a day for the search index to be rebuilt completely.
How to reset Windows 11 search?
To Reset Windows Search settings to default, open the Settings app, go to “Apps,” then “Apps & features.” Find “Search” in the list, click on it, and choose “Advanced options.” Select the “Reset” button to restore the search function to default settings, which can help resolve any issues.
How do I fix the search box in Windows 11?
To fix the search box in Windows 11, start by running the Windows Search Troubleshooter found in Settings under System > Troubleshoot. If the issue persists, check for Windows updates, restart the device, and ensure the Windows Search service is active. Rebuilding the search index can also resolve persistent problems.
How do I turn back on search indexing?
To turn search indexing back on in Windows, navigate to Settings > Privacy & Security> Search Windows. Under the “Find My Files” section, select the indexing option you prefer to start indexing again. Restart your device if necessary to apply changes. This helps improve search efficiency and retrieval speed on your system.
Leave a Reply