If you are trying to install Windows 11 and are stuck in a loop of getting the startup screen to start over every time, then this post will help you. It’s not a common issue, but some people have been facing this issue where the PC keeps rebooting from the installation USB every time instead of continuing the setup from the hard drive. In this article, we will walk through some steps to fix the problem and complete the Windows 11 installation successfully. So, if your Windows 11 installation starts all over again after reboot, this guide is for you.

Why does Windows 11 installation keep restarting?
The Windows 11 installation keeps restarting because the device is booting from the installation USB or DVD each time it reboots. This happens when, instead of continuing the setup from the hard drive, it restarts the process. Driver conflicts, faulty hardware, incorrect BIOS settings, and corrupt installation files or USB media can cause this issue to occur.
Windows 11 installation starts all over again after reboot
If Windows 11 installation starts all over again after reboot, execute the solutions mentioned below to resolve it.
- Remove the bootable USB after installation starts
- Change Boot order in BIOS
- Run Startup Repair
- Delete existing partitions and reinstall Windows
- Use Diskpart to clean the drive
- Disable Secure Boot and enable UEFI mode
- Look for Hardware issues
- Create a fresh Installation Media.
Let’s get started with the troubleshooting guide.
1] Remove the bootable USB after installation starts
The installation may restart continuously instead of progressing to the next setup phase if the bootable USB is left connected. In such a case, removing it can help resolve the issue. Start the installation process using the portable USB device, and let Windows set up the copy files. Now, immediately remove the USB drive when the system reboots for the first time. Hopefully, the installation will continue normally
2] Change Boot order in BIOS
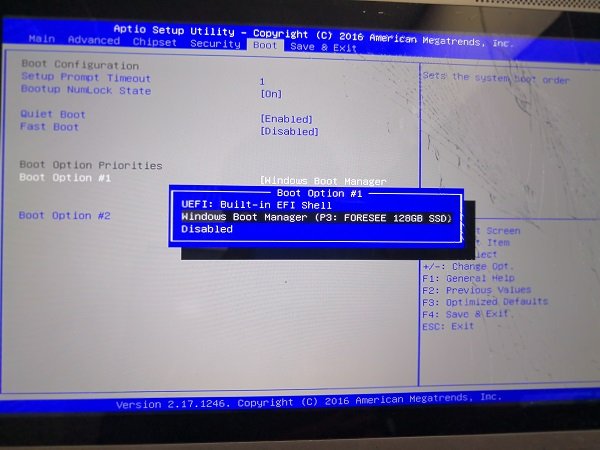
There are higher chances of incorrect boot order settings being the cause of continuous restart after installation. In this solution, we are going to prioritize the internal hard drive or SSD in the boot sequence to ensure the PC continues with the newly installed OS instead of looping back to the installer.
- Restart the PC, and press the designated key to enter BIOS; it’s usually F2, F12, or DEL depending on the manufacturer.
- Scroll down to find the Boot or Startup tab, and then locate the Boot Priority or Boot Sequence settings.
- Select the device you want to boot from, like the hard drive or SSD, as the primary boot device, and exit the tab. Lastly, hit Save and Exit to save the changes.
Restart the PC, and see if you can move past the installation screen.
Read: Computer shuts down when installing Windows 11
3] Run Startup Repair
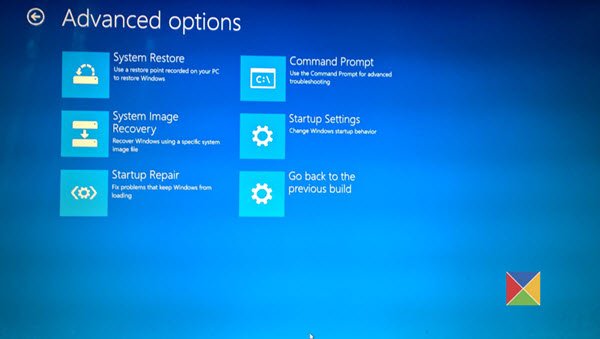
Boot into Windows Recovery and select Startup Repair to fix boot-related issues.

4] Delete existing partitions and reinstall Windows
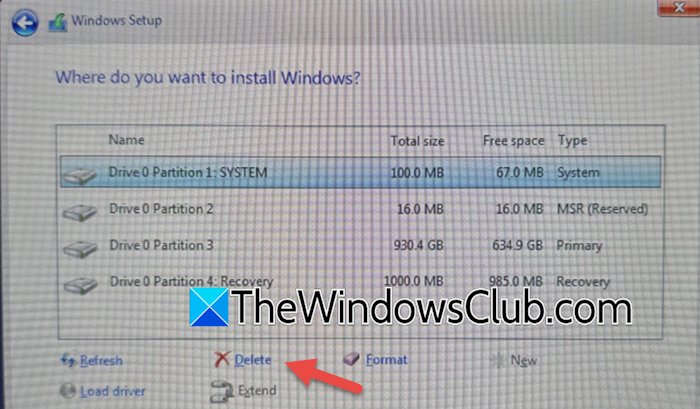
Sometimes, an improperly formatted partition can cause the Windows installation to restart repeatedly. Deleting the old partition and installing Windows on the allocated space is the way to prevent this from happening. Here’s how to do it.
- Insert a bootable USB or DVD, restart the PC, and boot from Windows Installation Media.
- Follow the installation process until you reach the installation screen, where it asks users to select the installation type, and select the Custom: Install Windows Only (Advanced) option.
- Now, select the existing partition, and hit the Delete button. After deletion, choose the unallocated space, click New, and select Next to begin the installation process.
After Windows loads up, go to Settings > Windows Update, and install the necessary updates. Check if the PC has any issues crossing the installation startup screen, and if it does, see the next solution.
5] Use DiskPart to clean the drive
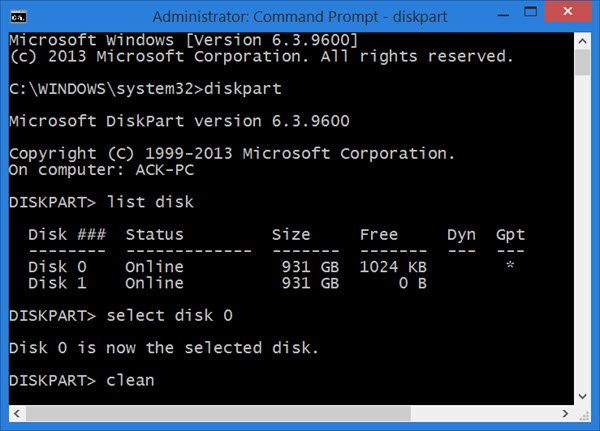
Disk formatting issues can prevent proper installation. We are going to use DiskPart to clean the drive and convert it to GPT. Follow the steps mentioned below to do the same.
- During Windows installation, use the Shift + F10 to launch the Command Prompt.
- Execute the following command to run DiskPart:
diskpart

list disk

select disk X
Note: Replace X with the drive number.
- Run the following command to erase all the partitions and data from the selected disk:
clean
- Now, execute the following command to boot into UEFI mode and exit it.
convert gpt
exit
Restart the installation process and install Windows on the clean drive. This will ensure that the drive is properly formatted for installation; however, if you are still stuck, slide to the next solution.
Read: How to install Windows 11 on unsupported hardware or processor
6] Disable Secure Boot and enable UEFI Mode
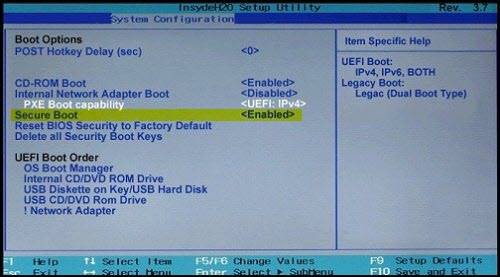
If the system has Secure Boot enabled and is trying to install Windows in Legacy Mode, the setup might not proceed correctly. So, restart the PC, enter BIOS mode, and find and disable Secure Boot.

Go to Boot Settings, enable UEFI mode, and save the changes. Once done, restart the installation. Fingers crossed, you will be able to bypass the installation screen.
7] Look for Hardware issues
Last but not least, if the SSD or hard drive is damaged, then users can expect Windows to install and restart continuously. To ensure this, boot into Windows installation media and run CHKDSK using the command-line to check for disk errors. If errors are found, consider replacing the hard drive.
8] Create a fresh Installation Media
Maybe the installation media is corrupted – so we recommend that you create a new bootable USB using the Windows Media Creation Tool and reinstall Windows.
Hopefully, this will do the job for you.
Read: How to install Windows 11 from USB: Screenshot Tutorial
How do I undo the Windows 11 installation?
To undo Windows 11, go to Settings> System > Recovery > and then select the Go Back option under Previous version of Windows. If the option is not available, users will need to reinstall the previous version using the installation media.
Also Read: Install Windows 11 on unsupported PC without TPM.