In this post, we will show you how to switch or change BIOS Mode from Legacy to UEFI without reinstalling Windows 11/10.

Change BIOS Mode from Legacy to UEFI without reinstall
Some new generation motherboards for PCs and Laptops bring in support for both UEFI or Unified Extensible Firmware Interface as well as BIOS or Basic Input Output System. The main advantage of UEFI over the traditional BIOS is that it supports hard drives with capacities greater than 2 Terabytes. But the downside of UEFI is the fact that only x64 versions of the Windows operating system are supported and the hard drive is supposed to use the GPT structure. If your computer supports UEFI and you want to change BIOS Mode from Legacy to UEFI, we will discuss the steps here.
How to change BIOS mode from Legacy to UEFI in Windows 11
We will be discussing the following two methods by which we can change the BIOS Mode from Legacy to UEFI without reinstalling Windows 11/10:
- Convert MBR to GPT using the Windows built-in utilities.
- Convert MBR to GPT using the Recovery Environment.
Before we proceed further, you need to get the following prerequisites fulfilled-
- Your computer’s motherboard should support both Legacy and UEFI.
- Your computer should be running the latest version of Windows on an MBR Partition.
Please be careful as following the instructions wrongly could make your PC unbootable.
Convert MBR to GPT using Windows Utilities
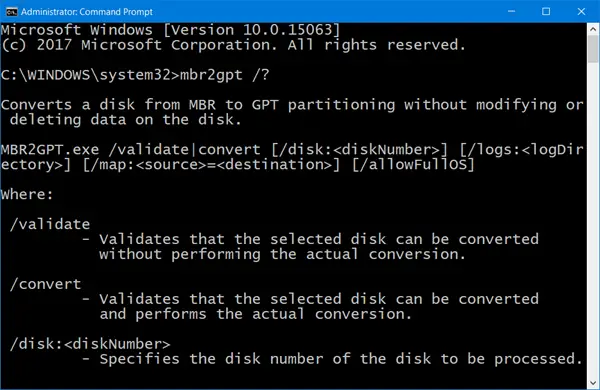
Run CMD as Administrator and execute the following command:
mbr2gpt.exe /convert /allowfullOS
Wait until the process is done. You can track the progress on your screen.
Once it is done, you need to go to your PC’s BIOS.
Go to Settings > Update & Security > Advanced Startup options. When you click on Restart Now, it will reboot your PC, and offer you all these advanced options.
Select Troubleshoot > Advanced Options. This screen offers further options, which include System Restore, Startup Repair, Go back to the previous version, Command Prompt, System Image Recovery, and UEFI Firmware Settings.
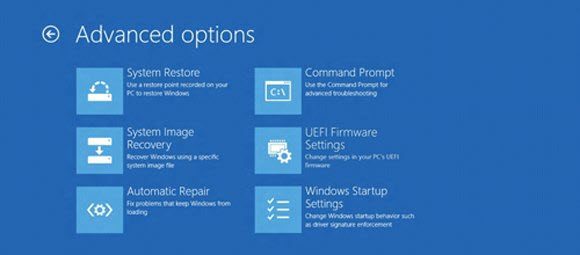
Select UEFI Firmware Settings, and it will take you to the BIOS. Every OEM has their way of implementing the options.
Boot Mode is usually available under Boot > Boot Configuration. Set it to UEFI.
Save changes and exit. The PC will now reboot.
Read: How to boot into legacy Boot Manager & display Startup Settings in Windows 11
Convert MBR to GPT using the Recovery Environment
While running Windows Setup, when the message appears on your screen, press Shift+F10 to open the Command Prompt.
Run Command Prompt as Administrator and execute the following commands one after the other:
mbr2gpt.exe /convert
Wait until the process is complete.
Once it is done, you need to go to your PC’s BIOS.
The Boot Mode is usually available under Boot > Boot Configuration. Set it to UEFI.
Save changes and exit. The PC will now reboot.
Trust this works for you!
Related: Legacy Boot is greyed out in BIOS.
Can Legacy BIOS be changed to UEFI?
Yes, you can change Legacy BIOS to UEFI. First, open Command Prompt with administrator privileges and run commands such as mbr2gpt to convert your disk to GPT. Restart your system and access the BIOS settings. In the BIOS menu, switch from Legacy BIOS mode to UEFI mode to complete the conversion.
Related: Choose UEFI or Legacy BIOS when booting into Windows Setup or Windows PE
How do I switch back to UEFI?
To switch back to UEFI, restart your computer and access the BIOS setup by pressing the appropriate key (often F2, F10, or Delete) during boot. Locate the Boot Mode setting and switch from Legacy to UEFI. Save your changes and exit the BIOS. Your system will now boot using UEFI mode.