
If, after installing a Cumulative Update on Windows 11 or Windows 10, you cannot connect to the Internet or encounter other issues, this post offers some insights on how to resolve them. Although they are expected to fix several bugs and improve performance, it is causing several problems. Some of the problems being mentioned by users after installing this update are:
- Cannot access the Internet after installing
- Lots of programs and apps stopped working, including some Google products.
- Does not recognize WiFi adaptor
- Restart loops
- Bluetooth or Airplane Mode does not work.
Some users have been experiencing problems connecting to the Internet after installing a Windows Cumulative Update. As a troubleshooting step, Microsoft suggested resorting to the old practice of restarting their PCs. Alternatively, it has been advised to try and fix network connection issues.
When they visited the Windows Update History page, most users found the following banner displayed.
If you are experiencing issues connecting to the internet we recommend you restart your PC by going to Start, clicking the Power button, then choosing Restart (not Shut down).

If you have not yet installed this update, you can temporarily block it using the Show or Hide Updates Tool. If you have installed it and are experiencing this issue, the following troubleshooting steps may help you resolve it.
Cannot access Internet after installing Cumulative Update in Windows 11
1] Restart the PC
Try restarting your PC and checking if this fixes your connection problem. For this, click on the ‘Start’ button, choose the ‘Power’ option and then select ‘Restart’.
2] Run the Network Troubleshooter Followed by Networking Commands
The Network Troubleshooter is an essential tool for every network administrator. It can be used to troubleshoot a variety of different network conditions. You can help diagnose and fix common connection problems.
To run the Network troubleshooter, type Network troubleshooter in the search box on the taskbar and select Identify and repair network problems from the results list.
Then, follow the steps in the troubleshooter and see if that fixes the problem.
Read: Windows cannot connect to the Internet.
3] Update the network adapter driver
In most cases, the problem arises from an outdated or incompatible network adapter driver. In many cases, drivers designed for older versions of Windows will work just fine in newer versions. However, depending on the type of device, some hardware devices may require a new driver to function properly on Microsoft’s latest operating system.
If you recently upgraded to Windows 11, it’s possible that the current driver was designed for a previous version of Windows. Just check whether an updated version of the same driver is available.
For this, in the search box on the taskbar, type Device Manager, and then select Device Manager from the results list. Then, under Device Manager, select Network adapters > the network adapter name.
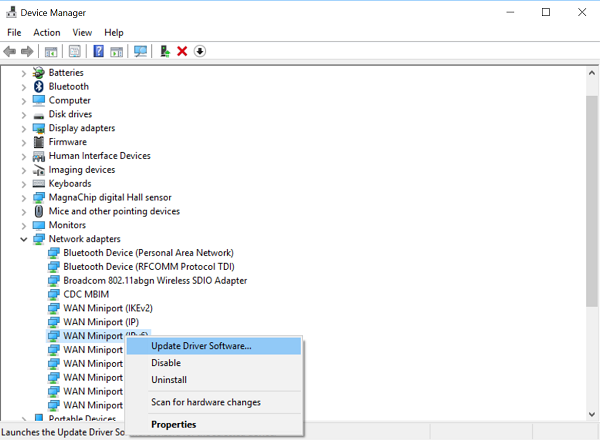
Now, press and hold (or right-click) the network adapter, and then select Update Driver Software > Search automatically for updated driver software. Follow the on-screen steps, then select Close.
Once you have installed an updated driver, select the Start button > Power > Restart if you’re asked to restart, and see if this fixes your problem.
When Windows fails to find a new driver for your network adapter, visit the PC manufacturer’s website and download the latest network adapter driver. If your PC can’t connect to the Internet, try downloading the driver on another PC and saving it to a USB flash drive, so you can manually install it on your PC. Important information you should look for any driver while downloading,
- PC manufacturer
- Model name or number
Read: How to Disable, Uninstall or Roll back Drivers
4] Roll Back the Network Adapter Driver
If you were connected before and recently installed a new network adapter driver, rolling back your driver to a previous version might help. To roll back to the old network adapter driver, type Device Manager in the search box on the taskbar and then select Device Manager from the results list.
In Device Manager, select Network adapters > the network adapter name. Right-click the network adapter, and then select Properties. Select the Driver tab > Roll back driver in Properties, then follow the steps on-screen.
The button indicates that no driver is available to roll back to if it is unavailable.
After rolling back to the previous version of the driver, select the ‘Start’ button, chose the Power option, and select ‘Restart’ when prompted to restart.
5] Uninstall the Network Adapter Driver and Restart
If all of the above steps have failed to yield the desired results, try uninstalling the network adapter driver and then restarting your computer to have Windows automatically install the latest driver. Please note that this method should be used when your network connection stops working correctly after a recent update.
Type Device Manager in the search box on the taskbar and then select Device Manager from the results list.
Then, under the Device Manager category, select Network adapters and look for the network adapter name. When found, select it, right-click it and then select Uninstall option. Put a sign against the ‘Delete the driver software for this device’ checkbox and choose OK to confirm your uninstall.
After uninstalling the driver, select the Start button, select Power, and choose the ‘Restart’ option.
After following the above procedure, Windows will automatically look for and install the network adapter driver when your PC restarts. Check to see if that fixes your connection problem. If Windows doesn’t automatically install a driver, try to install the backup driver you saved earlier before uninstalling.
6] Reset some settings
If this fails, try these as an alternative:
- Reset the TCP/IP stack
- Release the IP address
- Renew the IP address
- Flush and reset the DNS client resolver cache
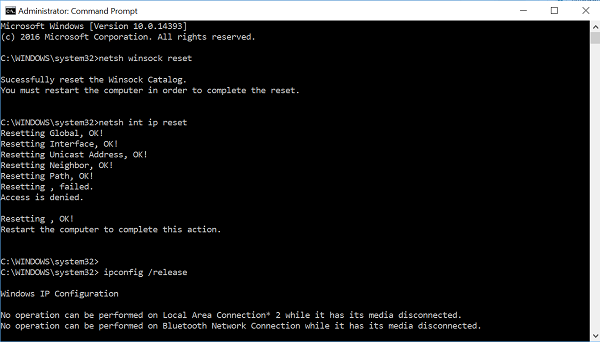
For running these networking commands in a command prompt window, run the following commands in an elevated Command prompt:
netsh winsock reset
netsh int ip reset
ipconfig /release
ipconfig /renew
ipconfig /flushdns
7] Temporarily Turn off Firewall
In many cases, it is observed that firewall software can interfere with Internet connection settings and prevent you from connecting. You can check whether a firewall is causing the connection issue by temporarily turning it off and then trying to visit a website you trust.
The steps required to turn off a Firewall depend on the firewall software you’re using. Not having a firewall enabled makes your PC more vulnerable to hackers, worms, and viruses, so turn it on as soon as you finish checking the firewall settings.
If you face trouble turning off your firewall, in an elevated command prompt, type the following and then press Enter:
netsh advfirewall set allprofiles state off
Open your web browser, visit a website you trust, and see if you can connect to it.
To turn on all firewalls that you might have installed, at the command prompt, type this and press Enter.
netsh advfirewall set allprofiles state on
If you find that the firewall software is causing connection issues, contact the manufacturer or visit their website to check whether updated software is available.
8] Temporarily turn off any antivirus or security software
Although all malware protection software and antivirus systems are designed to prevent unwanted threats, sometimes they might prevent you from connecting. You can verify whether the connection issue is caused by antivirus software by temporarily turning it off and then trying to visit a website you trust.
9] Use Network Reset to reinstall Network Devices
Try the Network Reset feature. This should be used as your last resort. Consider using it when all other methods fail to connect you.
This method can help resolve connection issues you might have encountered after upgrading from a previous version of Windows to the latest version. The method primarily works by removing any installed network adapters and any associated settings. After your PC restarts, any network adapters are reinstalled, and their settings are set to the defaults.
If you need advanced manual troubleshooting suggestions, Microsoft suggests the following:
10] Generate a Wireless Network Report
The report can help you diagnose the problem or at least provide relevant information that might help fix it. To generate a wireless network report, open an elevated CMD type the following and hit Enter:
netsh wlan show wlanreport.
This will generate an HTML file that you can easily open in your web browser from the location listed under the command prompt. You will then have to analyze the problems if any.

11] Check ISP
Make sure that there’s no problem with your cable modem or Internet Service Provider (ISP). If, at all, there is, contact your ISP. You can check this by typing the following in an elevated command prompt and hitting Enter:
ipconfig
Look for the IP address listed next to Default gateway. Type ping <DefaultGateway> and press Enter. For example, type ping 192.168.1.1 and press Enter.
The result should be something like this:
Reply from 192.168.1.1: bytes=32 time=5ms TTL=64
Reply from 192.168.1.1: bytes=32 time=5ms TTL=64
Reply from 192.168.1.1: bytes=32 time=5ms TTL=64
Reply from 192.168.1.1: bytes=32 time=5ms TTL=64
Ping statistics for 192.168.1.1: Packets: Sent = 4, Received = 4, Lost = 0 (0% loss), Approximate round trip times in milli-seconds: Minimum = 4ms, Maximum = 5ms, Average = 4ms
If all appears fine, close the window and exit.
If the ping is high and you see results similar to those above but can’t connect to the Internet on your PC, there may be a problem with your modem or your Internet service provider (ISP).
These posts offer additional troubleshooting suggestions:
- Internet not working after Windows Update
- No Internet Access after installing Feature Update
- Windows cannot connect to the Internet
- Ethernet connection not working
- No internet, secured Windows WiFi error.
Can Windows Update cause internet problems?
Yes, in some cases, Windows Updates can cause internet problems. When a new update is released, it can sometimes cause conflicts with your internet connection, particularly if you have an older version of Windows or outdated drivers. This can result in slow internet speeds, connection errors, or other issues that affect your ability to use the internet.
Is it safe to uninstall a Windows Update?
In general, it’s safe to uninstall a Windows Update as long as you do so correctly. Uninstalling an update will remove it from your system and should not cause any problems with your computer. However, keep the following in mind to avoid uninstalling a security update and check if it caused any compatibility issues with certain programs or hardware.
