Are you frustrated because a file transfer is taking forever since the speed keeps plummeting to zero? The issue is quite common and is characterized by its pattern of high speed followed by complete stalling. The good news is that it is usually resolved by tweaking some settings, and in this post, we will see what you can do if the file transfer speed drops to zero in Windows 11.

Why does my transfer speed keep dropping to 0?
There are several reasons for this. One of the primary reasons is buffering. Windows utilizes a fast RAM cache to accelerate data transfers. If this cache fills faster than the slow destination drive can write the data, the transfer will pause to empty the cache, causing the speed to drop to zero. To learn more, please refer to the article provided below.
File transfer speed drops to zero in Windows 11/10
If the file transfer speed has dropped to zero in Windows 11, try the solutions provided below.
- Update Network drivers, chipset, and USB drivers
- Disable TCP Auto-tuning
- Disable NIC Advanced properties
- Disable Windows cache writing
- Change the USB Selective Suspended setting
- Disable Windows Search Indexing
Let’s get started with the troubleshooting guide.
1] Update the Network driver, chipset, and USB driver
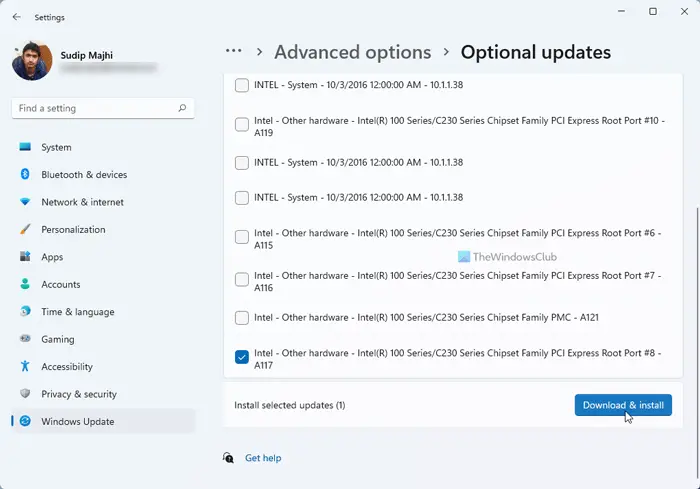
Before diving into complex solutions, it’s essential to update or replace outdated or corrupted drivers, as they are often the leading cause of unstable file transfers. We are going to ensure that the network, chipset, and USB controllers are running on software designed for the components. Use any of the following steps given below to do the same.
- Downloaded the drivers from the Manufacturer’s website.
- Get a driver update software
- Install Driver and optional updates
Once done, try to transfer a file and check the seed. If it remains zero, see the next solution.
2] Disable TCP Auto-tuning
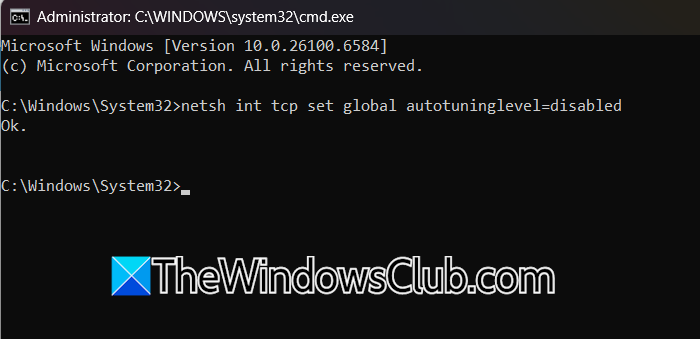
The problem can lie in Windows’ Network protocol handling rather than the hardware itself. TCAuto-Tuning is a feature that optimises network throughput for various connection types. However, it can conflict with certain routers, NAS Drivers, or network drivers, causing packet buffering and timeout issues. Disabling this feature forces Windows to use a more stable data transfer method to eliminate the stall. To do the same, follow the steps mentioned below.
- Go to the Search bar, type cmd, select the Run as administrator option, and hit Yes when prompted.
- Now, run the following command to disable TCP Auto-tuning.
netsh int tcp set global autotuninglevel=disabled
- Close the app, and reboot the device for changes to take full effect.
After restarting, try to transfer the same file that was previously failing. If the speed remains the same, move to the next solution.
3] Disable NIC advanced properties
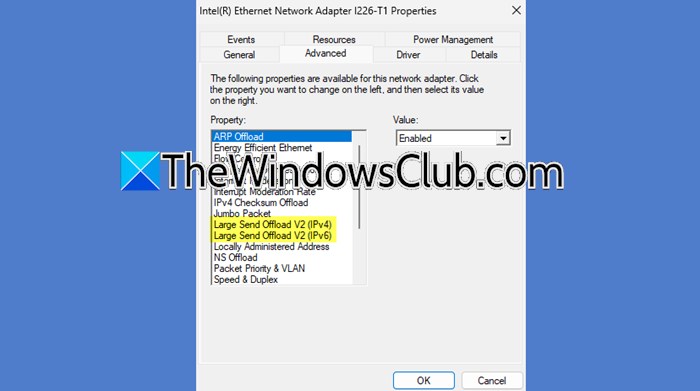
If disabling the software-level TCP Auto-tuning did not work, the core issue may be with how the network interface card (NIC) itself processes data. We are going to disable these specific properties so that they use the CPU to handle the processing and bypass the faulty hardware to restore a stable data flow.

- Click Win + X to open the Quick Link Menu, select and open Device Manager.
- Expand the Network adapters, and identify the main network card. Generally, it’s named after the manufacturer, such as Intel(R) Wi-Fi 6 AX200, Realtek PCIe GbE Family Controller, etc.
- Right-click on it, select Properties, and navigate to the Advanced tab.
- Select Large Send Offload v2 (IPv4), and in the Value drop-down menu, set it to disabled.
- Do the same for Large Send Offload v2 (IPv6), TCP/ UDP Checksum Offload (IPv4), and TCP/ UDP Checksum Offload (IPv6).
- Click Apply and OK to save the changes. and reboot the PC.
Now, verify whether the file transfer is working properly. Proceed with returning the settings to their defaults, and see the next troubleshooting step if the speed is still zero.
4] Disable Windows cache writing
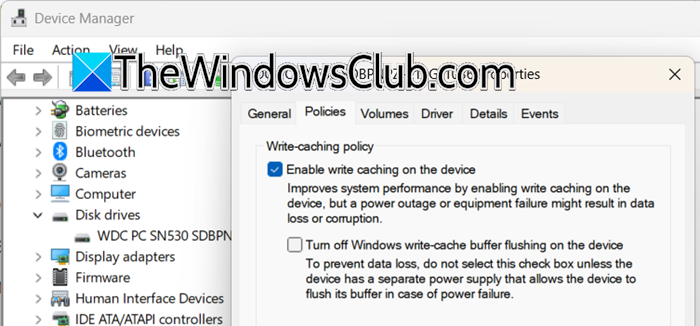
When transferring files to an external drive, the problem is often a fundamental mismatch between the RAM’s high speed and the slower write capabilities of the destination drive. The speed drops to zero when Windows’ RAM cache fills faster than the external drive can write the data. This forces the system to pause and flush the buffer. In the solution, we are going to disable cache writing to direct writes to the drive.
- Click Win + X, select and Open Device Manager.
- In Device Manager, find and expand the Disk drivers section and identify the external drive from the list.
- Right-click on the drive, select Properties, and go to the Policies tab.
- Select the Better Performance option, then uncheck the Enable writing cache on the device box, and ensure that Quick Removal is selected. Lastly, click OK to save the changes.
Transfer the files to the external drive again. It should not drop to zero, but if it does, go to the next solution.
5] Change the USB Selective Suspended setting
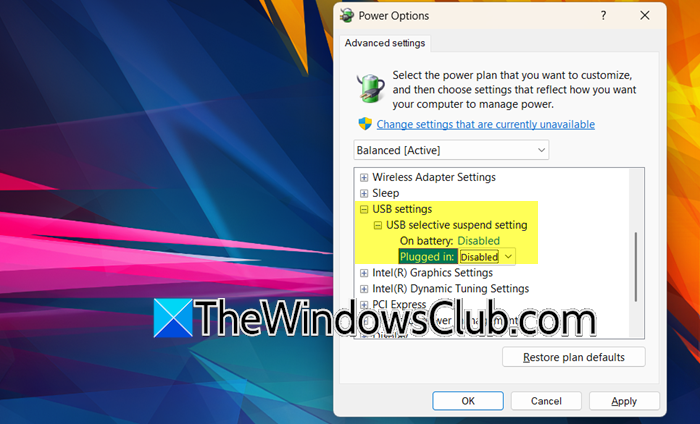
Windows’ power-saving feature can mistakenly put the USB port to sleep during active transfer, which causes the speed to drop to zero. We will disable USB Selective Suspend, as it often misidentifies a busy port as inactive, and ensure that the port remains fully powered during transfers.
- Click Win + R to open the Run dialogue box, and type control.exe powercfg.cpl,,1 and hit Enter to open Power Options.
- In the Advanced settings window, scroll down to find USB Settings, and click + to expand it.
- Expand USB selective suspend settings, and change On Battery and Plugged in settings to Disabled.
- Click Apply and OK for the changes to take place.
After making this change, test the file transfer immediately. Hopefully, there will be consistent speed without interruption. However, if it’s slow, see the next solution.
Read: USB 3.0 External Hard Drive not recognized in Windows
6] Disable Windows Search Indexing
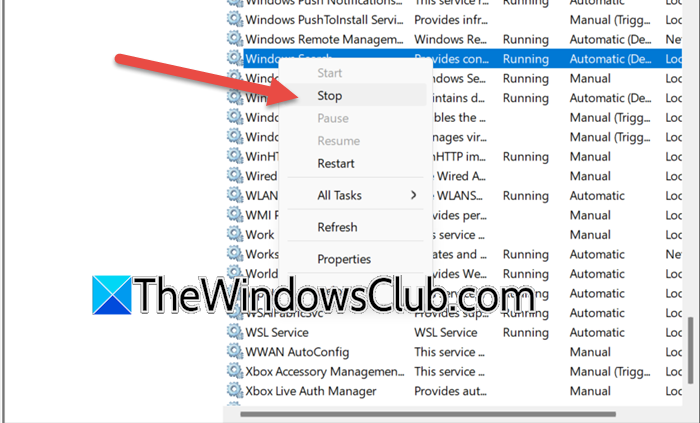
The Windows Search service can interfere with file transfer by aggressively indexing new files as they are written. This competition for disk access stalls the transfer; therefore, it’s necessary to disable it when transferring large files.
- Launch the Run dialogue box, type services.msc and hit Enter to open Services Manager.
- In the Services window, scroll down to find Windows Search, and right-click on it.
- Select Stop from the context menu, and the Status column will show blank.
The Indexing service won’t compete for disk resources, so perform large file transfers. Once done, restart the service by right-clicking the service and selecting Start.
That’s it!
Read: Enable or Disable Drag Tray in Windows 11
Does RAM affect copy speed?
Yes, RAM does affect copy speed, but it does so indirectly. Windows uses available RAM as a high-speed cache to hold data during transfer. More and faster RAM enable a larger and more efficient buffer, which prevents stuttering and maintains higher speeds, especially when handling numerous small files.
Read: Windows stops copying files; File Transfer gets stuck halfway.