Microsoft offers an easy method to recover Windows devices when encountering fatal issues that prevent them from booting up – Quick Machine Recovery. It searches the cloud server for resolutions and resolves booting failures on your device. In this post, we are going to talk more about it and see how you can enable and test Quick Machine Recovery in Windows 11.

What is Quick Machine Recovery?
Quick Machine Recovery (QMR) is a new feature introduced in Windows 11 build 26120.3653 as part of the Windows Resiliency Initiative. Designed to minimize system downtime, QMR automatically detects and resolves critical boot failures by applying targeted fixes from the Windows Recovery Environment (WinRE).
There are two settings of Quick Machine Recovery:
- Cloud remediation will utilize Windows Update to identify and resolve issues on devices. When enabled, devices connect to the network and utilize Windows Update during recovery scenarios
When disabled, Windows uses Startup Repair as a local recovery option. - Auto remediation allows you to automate the recovery process.
When enabled, the computer automatically connects to Windows Update and attempts to find a remediation. When disabled or not configured, the device requires manual intervention to continue the recovery process.
When a device repeatedly fails to boot, the system identifies the issue and initiates a recovery process. The device enters WinRE, establishes a network connection, and scans Windows Update for available fixes. If a remediation is found, it is downloaded and applied, followed by a system reboot. If the fix is successful, the device boots into Windows normally. However, if the issue persists, the system re-enters WinRE and repeats the process until a solution is found or retry limits are reached.
By automating recovery and reducing manual troubleshooting, Quick Machine Recovery enhances system resilience, ensuring Windows devices remain operational with minimal disruption. Microsoft continues to refine QMR based on user feedback, making Windows more reliable and self-healing.
The feature is currently available in Windows Insiders builds but will be rolled out to Stable Windows versions soon. If you want to test the feature right away, you need to join the Windows Insider Program and update your system.
Enable and Configure Machine Recovery in Windows 11
To enable Quick Recovery, follow the steps below.
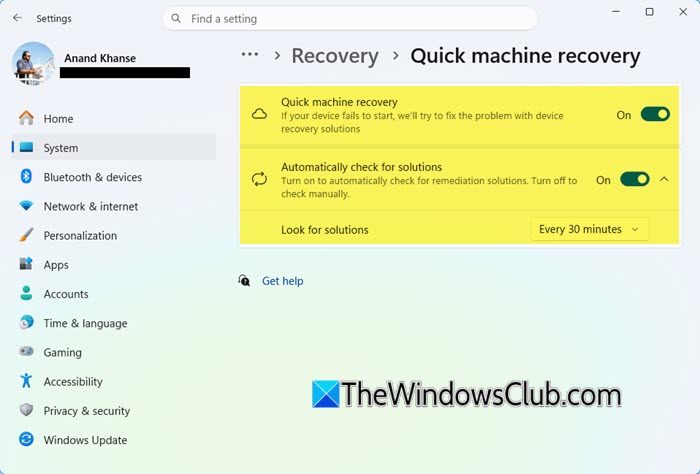
- Open Settings by Win + I.
- Now, you need to click on the System tab on the left section of the screen.
- Now, scroll down and go to the Recovery option.
- You will then see the Quick machine recovery under the Recovery Options section.
- Now, enable the toggle for Quick machine recovery.
- If you want to continue searching for the solution, enable Automatically check for solutions.
- Set the time as per your wish.
Now, every time you boot into WinRE, you will see an option that says Quick Recovery machine. You can select it to initiate the recovery process.
You can also disable the Quick Machine Recovery by just turning off the corresponding toggle.

Test Quick Recovery Machine in Windows 11
Quick machine recovery includes a test mode that lets you verify your settings and the auto-remediation process in a safe, simulated environment. This way, you can ensure everything works correctly without causing a system failure. Use the test mode to verify that the recovery process meets your needs before you apply it to live systems.
We recommend creating a backup of your system image and a system restore point to revert to in the unlikely event that it is needed. You can even use the Windows Backup utility to do the same.
To get started with the Test Mode of the Quick Recovery Machine, run the following command to enable it.
reagentc /SetRecoveryTestmode
Now, set Windows Boot to WinRE, so that the next time your computer boots up, it will go to Windows Recovery.
reagentc /BootToRe
You then have to reboot your computer to start the Test Mode.
However, in case your computer goes to Windows Recovery upon booting instead of the Test Mode, you will have to select Continue to boot Windows normally. Once your computer starts, run the following commands to enable and disable reagentc.exe one by one.
reagentc.exe /Enable
reagentc.exe /Disable
Once you restart the agent, follow the steps mentioned above to boot into the Test Mode.
To confirm if the Quick machine recovery has been applied, go to Settings > Windows Updates > Update History. You will be able to see the remediation under Quality Updates.
Hopefully, with the help of this post, you will know what Quick Machine Recovery is, how to enable it, and how to test it.
Read: How to configure Quick Machine Recovery Settings in Windows 11.
Read: How to enter & use Windows Recovery Environment to fix problems
How do I enable Recovery Environment in Windows 11?
To enable the Recovery Environment, open Settings, go to System > Recovery, find the Recovery Environment option under Advanced startup, and turn its toggle On. Alternatively, we can use Command Prompt. Open Command Prompt as Administrator, type the command reagentc /enable, and press Enter; wait for the “Operation Successful” confirmation message.
Read: How to use Recovery Drive to restore Windows 11
How to do a System Recovery on Windows 11?
If your computer is able to boot, open Settings (Win + I), go to System > Recovery, click “Restart now” under “Advanced startup”; after restarting, select Troubleshoot > Advanced options > System Restore. If your computer won’t boot, you need to force your PC off during startup three times to trigger the automatic recovery environment (WinRE), then choose Troubleshoot > Advanced options > System Restore. In both cases, you need to select your account, enter your password, choose a pre-existing restore point (created when the system worked), click Next, then Finish, and confirm; your PC will reboot and revert to that earlier state, keeping files but potentially removing apps/drivers added after the restore point was made (this requires System Restore to have been enabled beforehand).
Also Read: Turn On and Enable System Restore in Windows 11.