
In this tutorial, we will show you how to check the Windows Recovery Environment (WinRE) version in Windows 11. WinRE helps repair common causes of an unbootable OS, and Windows updates improve the Windows Recovery Environment (WinRE). If you want to verify the WinRE version installed on your Windows 11 PC, this post will help you with three simple ways. No third-party tool is needed to find or confirm the WinRE version.
How to check WinRE version in Windows 11
You can check the Windows Recovery Environment (WinRE) version in Windows 11 using these options:
- Check WinRE version using Command Prompt
- Verify Windows Recovery Environment version using Event Viewer
- Check WinRE version using a PowerShell script.
Let’s check all these options in detail.
1] Check WinRE version using Command Prompt
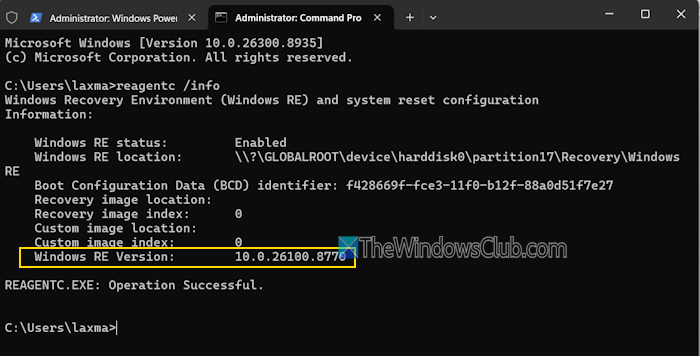
Here are the steps to check WinRE version using Command Prompt in Windows 11:
- Right-click on the Start button and select Terminal (Admin). This will open Windows Terminal as an administrator
- Open a Command Prompt profile using the drop-down icon (next to the + option)
- Type
reagentc /infocommand and press Enter - You will see Windows RE Version (like 10.0.26100.8770), as highlighted in the image above.
Related: Could not find the Recovery Environment in Windows PC
2] Verify Windows Recovery Environment using Event Viewer
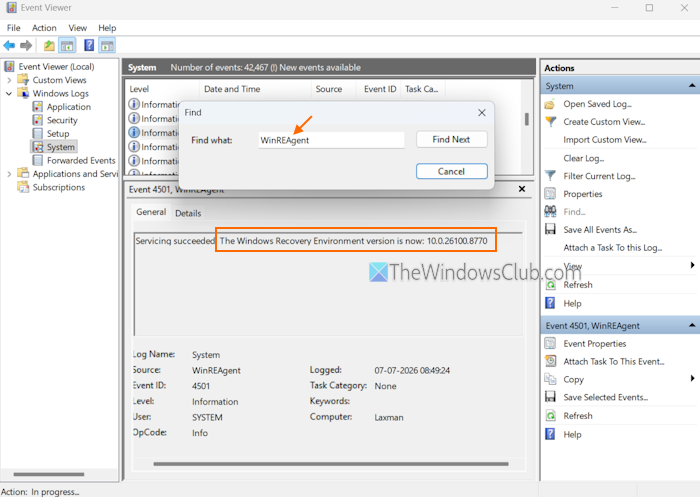
There’s a WinREAgent source event (with Event ID 4501) in Event Viewer that logs events related to WinRE. Whenever Windows Recovery Environment is updated using Windows Update, this event is triggered. It records details such as usage, creation, and modification of the recovery image, and also helps to confirm the installed WinRE version. You can access that event in Event Viewer to verify the Windows Recovery Environment. Here are the steps:
- Use the Search box to open the Event Viewer
- Expand the Windows Logs folder from the navigation pane
- Select System
- Click on Find… in the right section
- In the Find what text field, type WinREAgent, and hit Enter
- Wait for a few seconds until it finds the event. After that, press the Cancel button to close the Find box
- Now you should see a WinREAgent event in the middle section (on the General tab)
- Look for the message saying: Servicing succeeded. The Windows Recovery Environment version is now: 10.0.26100.8770. The version number is just an example here. It should show you the latest WinRE version installed.
Read: Cannot boot into Windows Recovery Environment
3] Check WinRE version using a PowerShell script
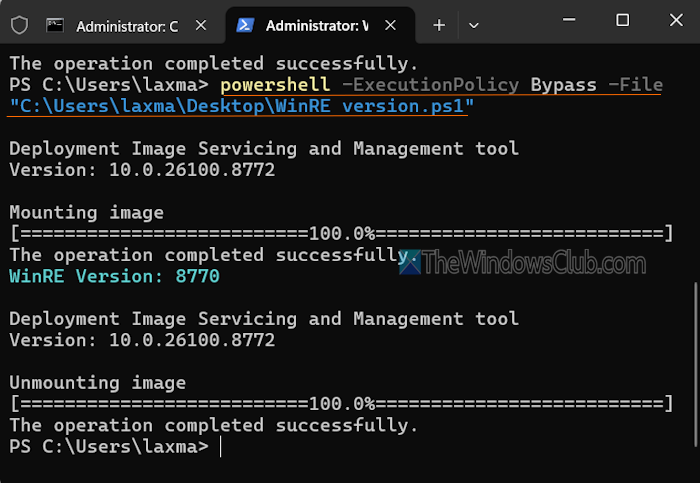
You can also check the Windows Recovery Environment version using a PowerShell script in Windows 11. Here are the steps:
- Open Notepad on your Windows 11 PC
- Copy and paste the following text in Notepad:
# Function to get WinRE path
function GetWinREPath {
      $WinRELocation = (reagentc /info | Select-String "Windows RE location")
      if ($WinRELocation) {
          return $WinRELocation.ToString().Split(':')[-1].Trim()
      } else {
           Write-Host "Failed to find WinRE path" -ForegroundColor Red
           exit 1
      }
}
# Creates and needs to be return the mount directory
function GetMountDir {
       # systemdirve\mnt
       $MountDir = "$env:SystemDrive\mnt"
       if (-not (Test-Path $MountDir)) {
           New-Item -ItemType Directory -Path $MountDir -Force | Out-Null
       }
       return $MountDir
}

# Function to get WinRE version
function GetWinREVersion {
      $mountedPath = GetMountDir
      $filePath = "$mountedPath\Windows\System32\winpeshl.exe"
      $WinREVersion = (Get-Item $filePath).VersionInfo.FileVersionRaw.Revision
      return [int]$WinREVersion
}
# Main Execution
$WinREPath = GetWinREPath
# Make dir C:\mnt if not exists
$TempDir = GetMountDir
# Get the read write permission for this directory
if (-not (Test-Path $TempDir)) {
    New-Item -ItemType Directory -Path $TempDir -Force | Out-Null
}
# Mount WinRE image
dism /Mount-Image /ImageFile:"$WinREPath\winre.wim" /Index:1 /MountDir:"$TempDir"
$WinREVersion = GetWinREVersion
Write-Host "WinRE Version: $WinREVersion" -ForegroundColor Cyan
dism /Unmount-Image /MountDir:"$TempDir" /Discard
Remove-Item -Path $TempDir -Force -Recurse
- Go to File > Save as
- In the Save as window, set Save as type to All files (*.*)
- Select a file name with the file extension (*.ps1). For example, you can set the file name to the WinRE version.ps1
- Press the Save button, and your PowerShell script is ready
- Open PowerShell as administrator. Or else, you can open a PowerShell profile in the Windows Terminal app with admin credentials
- Execute the following command:
powershell -ExecutionPolicy Bypass -File "C:\Users\laxman\Desktop\WinRE version.ps1"
- In the above command, you must replace the file path with the actual file path where your WinRE version.ps1 file is stored
- Now it will highlight and show the WinRE version (like 8770).
That’s all.
Now read: How to increase WinRE partition size in Windows PC
How do I access WinRE on Windows 11?
There are multiple ways to access or enter the Windows Recovery Environment in Windows 11. For example, you can use recovery media to boot into WinRE, or use the Settings app. In the Settings app, navigate to System > Recovery > Advanced startup > Restart now to boot into WinRE.
How do I know which version is my Windows 11?
Open the Run dialog, type winver in the text field, and hit Enter. This will show you the Windows 11 version and the build number (like Version 26H2 (OS Build 26300.8935)) installed on your PC. You can also access the System > About page in the Settings app to find which edition, version, and build of Windows 11 is installed on your PC.
Read next: How to disable Windows Recovery Environment (WinRE).
