The Quick Machine Recovery Settings in Windows 11 allow you to recover your Windows machine when it encounters any critical error that stops it from starting. Earlier, we saw how to enable and test Quick Machine Recovery in Windows 11, but in this post, we will see how to configure Quick Machine Recovery Settings, such as resetting the feature or changing its configuration.
Configure Quick Machine Recovery Settings in Windows 11
QMR is designed to keep devices running by fixing boot problems directly from WinRE. Instead of waiting for manual, in‑person troubleshooting, it automatically identifies and repairs critical startup issues. When multiple machines are hit by the same failure, QMR can connect to the cloud, pull down the right fixes, and restore them at scale. This not only speeds up recovery and gets users back to work faster, but also lifts a huge burden off IT teams who would otherwise spend hours handling widespread boot failures one device at a time.
To configure the Quick Machine Recovery Settings in Windows, you can use one of the following methods.
- Configure Quick Machine Recovery via Windows Settings
- Configure Quick Machine Recovery via Microsoft Intune
- Reset Quick Machine Recovery Settings via Command Prompt
Let us talk about them in detail.
1] Configure Quick Machine Recovery via Windows Settings
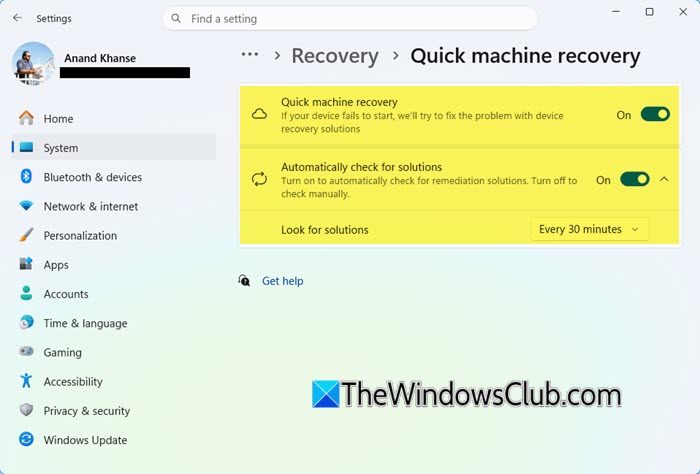
As you may have noticed, when enabling Quick Machine Recovery from Settings, you are presented with a few options to configure this feature.
When you are on the Settings > System > Recovery > Quick Machine Recovery page, you can turn on the Automatically check for solutions toggle switch to enable Auto Remediation, and it reveals additional options.
- Look for solutions every: Sets how long the system waits between scans for a fix (e.g., 120 minutes).
- Restart every: Defines how long the system waits before rebooting to retry the process (e.g., 2400 minutes)
However, the problem with Windows Settings is that its scope is limited, as it only applies to a standalone device.
2] Configure Quick Machine Recovery via Microsoft Intune
To enforce the scope of the alteration to the Quick Machine Recovery Settings, use Microsoft Intune, as it allows us to apply changes across the entire organization.
Follow the steps mentioned below to do the same.
- First of all, log in to your Intune profile.
- Go to Devices > Windows > Manage devices > Configuration.
- Now, click on +Create > +New Policy. Name and create a Quick Machine Recovery Policy (if you have already created one, skip this step).
- To start the configuration, we need to go to the Configuration settings pane, click on +Add settings from the bottom left section.
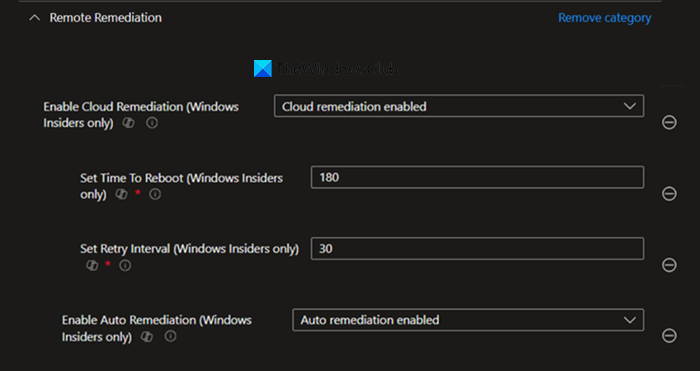
- In the Search bar, type Remote Remediation, and hit Enter.
- Click on Remote Remediation and check the following options.
- Enable Cloud Remediation ( Windows Insiders only)
- Enable Auto Remediation (Windows Insiders only)
- Set Retry Interval (Windows Insiders only)
- Set Time to Reboot (Windows Insiders only)
- In the Remote Remediation Configuration settings, you can now set the values listed below and then click Next.
- Enable Cloud Remediation (Windows Insiders only) – Cloud remediation enabled
- Set Time to Reboot (Windows Insiders only) – 180
- Set Retry Interval (Windows Insiders only) – 30
- Enable Auto Remediation (Windows Insiders only) – Auto Remediation enabled
- On the next page, keep the Scope tags set to Default. If your tenant has custom scope tags, you can choose them based on your policy needs, then click Next.
Finally, assign the newly created policy to a user or to your organization, review it, and build it. Whenever you need to make changes, you can just edit this policy.
Now, let us discuss another method for configuring QMR.
3] Reset Quick Machine Recovery Settings via Command Prompt
![]()
If you need to reset the QMR configuration entirely, perhaps to troubleshoot an issue or start fresh, you can use the Command Prompt. If you are using an XML file to configure the Quick Recovery Machine, it will no longer be required.
That said, to reset Quick Recovery Machine Settings, press Win + R, type cmd, then press Ctrl + Shift + Enter. Then run the following command.
reagentc.exe /clearrecoverysettings
Now, close the Command Prompt and re-configure QMR.
Read: How to use Recovery Drive to restore Windows 11
How to set a recovery point in Windows 11?
To set a recovery point (called a restore point) in Windows 11, open the Start Menu, type Create a restore point, and select the System Properties window that appears. In the System Protection tab, ensure protection is turned on for your drive, then click the Create button, name the point with the current date for easy identification, and Windows will generate a snapshot of your system files and settings at that moment.
Read: How to schedule System Restore Points in Windows 11
How to enable WinRE?
To enable the Windows Recovery Environment (WinRE), you must open a Command Prompt as an administrator and use the reagentc /enable command, which will configure your system to boot into the special recovery partition. If this command fails, it often means the WinRE image is missing or damaged. You may need to use Windows 11 installation media to repair your system, or manually specify the WinRE image location to get the feature working again. Similarly, you can disable Windows Recovery Environment (WinRE).