
MBR2GPT is a command-line utility in Windows computers used to convert an MBR disk into a GPT. The best part of this utility is that it converts an MBR disk into a GPT disk without erasing the data. Some users are getting the error “MBR2GPT Failed to update reagent.xml” while using this tool. This error usually occurs after the conversion process has completed. However, it leaves users confused whether the conversion has been completed properly. If you encounter this error after converting MBR to GPT, the solutions provided in this article will help you.
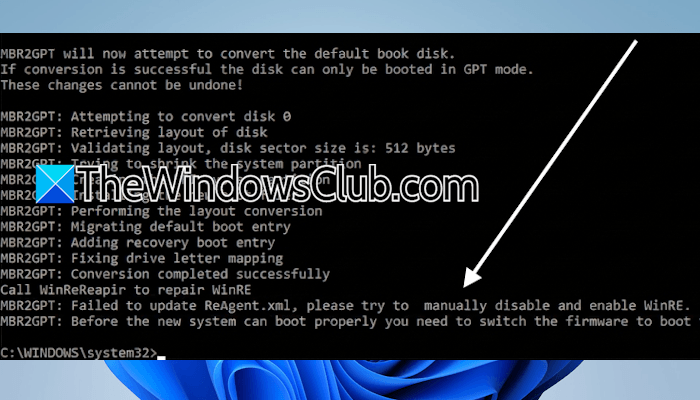
The complete error message is:
MBR2GPT: Failed to update ReAgent.xml, please try to manually disable and enable WinRE.
MBR2GPT Failed to update reagent.xml on Windows computer
While using the MBR2GPT command line utility, it is necessary to follow the correct instructions; otherwise, you may receive an error. If the tool has completed the conversion process, but shows the error “MBR2GPT Failed to update reagent.xml” at the last stage, follow the instructions provided below.
Since the conversion process has already been completed, you no longer need to worry about it. Now, you need to enter the BIOS and make necessary changes. First, close the MBR2GPT window and turn off your system. Now, use the right BIOS key to enter your system’s BIOS. Once you enter the BIOS, make the following changes:
- Disable the CSM support
- Change the BIOS mode from Legacy to UEFI
- Enable the Secure Boot
Now, save the changes and restart your system to boot into Windows. After booting into Windows, check the partition style of your hard disk. Follow these steps:
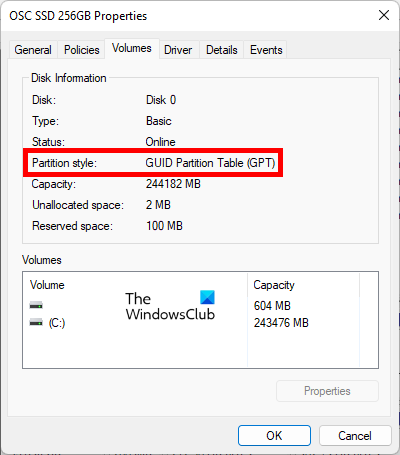
- Open the Disk Management.
- Right-click on your hard disk and select Properties.
- Navigate to the Volumes tab.
- You will see the Partition Style there.

It should show the GPT partition style. Now, the next step is to check the BIOS mode. Open System Information and select System Summary from the left side. You will see the BIOS Mode on the right side. It should show UEFI. If any of these results are incorrect, enter BIOS again and make necessary changes.
Now, open Command Prompt as an Administrator and type the following command:
reagentc /info
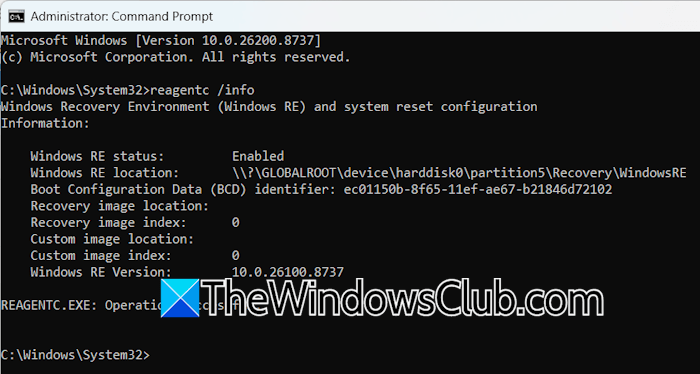
In the result, see the Windows RE Status. If it says Enabled, you do not need to take any action, as the error has been fixed. If the result shows Disabled, enable WinRE by executing the following command in the Command Prompt:
reagentc /enable
The result should show Operation Successful. If this does not fix the issue, disable the Windows Recovery Environment by using the following command:
reagentc /disable
Now, delete the Recovery Partition and then recreate it.
REAGENTC.EXE: Unable to update Boot Configuration Data
This error usually occurs while enabling the Windows Recovery Environment. This error usually occurs due to one of the following reasons:
- The BCD (Boot Configuration Data) store is damaged
- The WinRE image (winre.wim) is missing or not registered
To fix this error, first try rebuilding the BCD file. If this does not work, the next step is to reregister the winre.wim file. For this, you need to know the location of the winre.wim file. If you have multiple hard disks, you need to identify the disk on which Windows is installed. Open the Disk Management and see which disk shows the C drive. Note down the disk number of that drive.
Now, click on Windows Search and type diskpart. Select the DiskPart from the search results. Click Yes in the UAC prompt. In Diskpart, type the following commands and press Enter after entering each command.
list disk

select disk #

list partition
In the above command, replace # with the disk number on which Windows is installed.
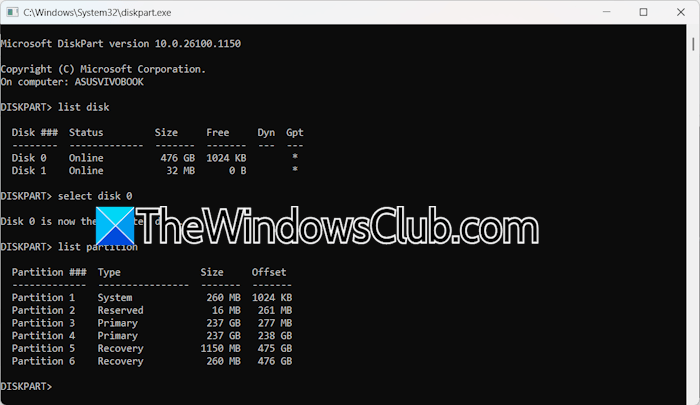
If you see more than one Recovery Partition (as shown in the above image), you need to identify which Recovery Partition is in use. For this, you need to use the reagentc command. Open a separate Command Prompt as an administrator window and type the following command. After that, hit Enter.
reagentc /info
The result will show you the partition number of the Recovery Partition. As you can see in the above screenshot, the partition on which WinRE is located is Partition 5. Now, close the Command Prompt Admin window and go back to the Diskpart window. Type the following command and hit Enter:
select partition #
In the above command, replace # with the correct Recovery Partition number. For example, on my system, the correct number of the Recovery Partition is 5. So, the command for me will be:
select partition 5
Now, assign a drive letter to the selected recovery partition. You can select any drive letter that is not in use. I am using the letter n here. Use the following command:
assign letter=n
After assigning a drive letter to the Recovery Partition, Windows will mount it to the system, and it will be visible in the File Explorer.
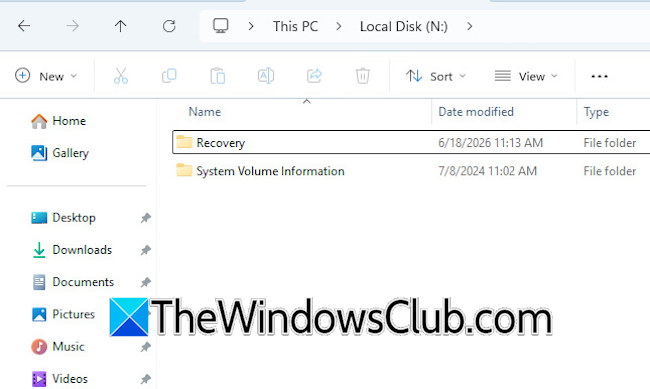
You can view the winre.wim file in the Recovery Partition manually in the File Explorer. Open File Explorer and then open the Recovery Partition. You will see the Recovery folder inside it. Open that folder. You will see a WindowsRE folder there. Open it to view if it contains the winre.wim file. If the file is not visible, enable the Hidden files and folders option and Protected system files. If the winre.wim file is there, copy the path. This path will be used later. If the file is not there, check other folders inside the Recovery folder.
If you get an “Access Denied” message when opening the Recovery folder in File Explorer, use Command Prompt to determine the location of winre.wim file. Open Command Prompt as an Administrator and type the following commands one by one:
n:

cd recovery

cd windowsre
Look for the winre.wim file in the result. In the above command, replace the letter n with the correct letter in your case. If the result shows the winre.wim file, execute the following command:
reagentc /setreimage /path n:\recovery\windowsre /target c:\windows
Now, you should be able to enable the Windows Recovery Environment. Use the following command:
reagentc /enable
The last step is to remove the letter you assigned earlier to the Recovery Partition. Launch Diskpart and use the following commands:
list disk

select disk #

list partitions

select partition #

remove letter=n
In the above commands, replace # and the letter n accordingly.
That’s it. I hope this helps.
Also read: MBR2GPT failed errors and issues on Windows 11
What happens if ReagentC is disabled?
ReagentC is the command used to check the status of, enable, and disable the Windows Recovery Environment. If you disable WinRE, you cannot use it for troubleshooting when your system does not boot into Windows. Windows Recovery Environment is also used to revert to a particular Restore Point.
How to enable Reagentc info?
Reagentc info is a command used to check the status of the Windows Recovery Environment; it does not change any settings by itself. You can use it to check whether the WinRE is enabled or disabled on your system. If it is disabled, you can enable it.
Read next: REAGENTC.EXE Operation failed, An error has occurred.
