Windows 11/10 includes an MBR2GPT Disk Conversion Tool, using which you can safely and non-destructively convert a Windows computer from legacy BIOS to UEFI disk partitioning, as well as automate the conversion as part of your in-place upgrade process. Moreover, unlike Wipe & Load methods, all of this can be achieved without moving your data off the disk.
Things to do before using MBR2GPT
- Confirm your disk is MBR.
- Ensure no more than 3 primary partitions exist.
- Suspend BitLocker if enabled.
- Back up important files.
- Be ready to switch firmware to UEFI after conversion.
How to use MBR2GPT Disk Conversion Tool in Windows 11
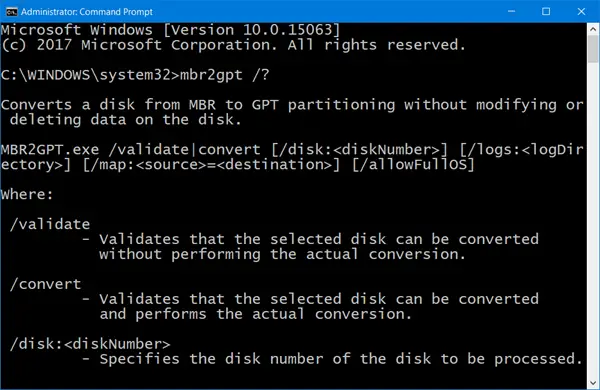
MBR2GPT.exe, located in the System32 folder, is a command-line tool that will help you convert a disk from Master Boot Record (MBR) to GUID Partition Table (GPT) partition style without modifying or deleting data on the disk. You can run the tool from Windows PE (Windows Preinstallation Environment) command prompt, as well as from the Windows 11/10 OS.
You can use MBR2GPT to perform the following:
- [Within the Windows PE environment]: Convert any attached MBR-formatted disk to GPT, including the system disk.
- [From within the currently running OS]: Convert any attached MBR-formatted disk to GPT, including the system disk.
Using MBR2GPT.exe you can convert any attached MBR-formatted disk to GPT, including the system disk, within the Windows PE environment as well as within the operating system. You can also use the tool to convert an MBR disk with BitLocker-encrypted volumes.
Operating system disks running Windows 11/10 can also be converted, provided you perform an offline conversion.
However, offline conversion of system disks with earlier versions of Windows installed, such as Windows 7, Windows 8, and Windows 8.1 are not officially supported – you will have to upgrade to Windows 11/10 first, then perform the MBR to GPT conversion.
To convert MBR to GPT using the built-in MBR2GPT.exe tool:
Boot into Advanced Startup Options screen > Troubleshoot > Advanced options > Command Prompt.
Execute the following command to validate that the drive meets the requirements:

mbr2gpt /validate
Execute the following command to convert the drive from MBR to GPT:
mbr2gpt /convert
Restart your computer.
Do note that MBR2GPT can only be used from the Windows Preinstallation Environment. To use it from your Desktop, you have to use /allowFullOS to override.
You can read all about this new MBR2GPT Disk Conversion Tool, including the syntax to be used here at Microsoft.
PS: See this post if MBR2GPT fails and is causing Privilege Issues. This post will help you if you receive MBR2GPT disk layout validation failed, cannot find OS partition, etc. errors.
Does MBR2GPT delete or erase my data?
No, MBR2GPT is designed to convert a system disk from MBR to GPT without modifying or deleting existing data. The tool validates disk layout before conversion. If requirements aren’t met (e.g., too many partitions, unsupported layouts), the conversion fails safely without altering data. But it is always best to backup your data first.
What must I do after converting to GPT?
After conversion, you must reconfigure your system firmware to boot in UEFI mode. To do so, enter BIOS/firmware settings and switch from Legacy BIOS to UEFI. Next, ensure that Secure Boot is enabled if you’re preparing to install Windows 11. You should also suspend BitLocker before conversion and recreate protectors afterward.