In this post, we will show you how to defer or delay Windows 11 2024 Update or feature upgrades. Microsoft has recently rolled out the Windows 11 2024 Update Version 24H2 and you might already have received it on your Windows 11 PC. If not, you can get the update using the Media Creation Tool or Windows 11 Installation Assistant. However, if you prefer not to upgrade your system to the new features at present, you can defer or delay the Windows 11 2024 Update.
In its early editions, Windows used to offer a built-in option to defer or delay Windows Upgrades for up to 365 days. Later on, the option was removed because users get the liberty to install updates as and when required. However, you can still risk experiencing software or driver issues after installing a fresh update. To prevent this from happening, you might want to choose to Pause an update or delay it until you see how other users are responding to the new update.
How to Defer or Delay Windows 11 24H2 Update
Microsoft removed the Defer feature update setting, which were there in Windows 10. Now you will have to use one of these two methods to defer Windows 11 Upgrades:
- Using the Group Policy Editor
- Using Registry Editor
Let us take a look at each of these in detail.
1] Defer or Delay Windows 11 Feature Upgrades using the Group Policy Editor
Before you proceed, you must know that the Group Policy Editor is available only in the Professional and Enterprise editions. If you have the Windows 11 Home edition, you can follow this workaround to get the Group Policy Editor on your PC.
- Press the Win + R key combination.
- Type gpedit.msc in the Run dialogue box.
- Press the Enter key.
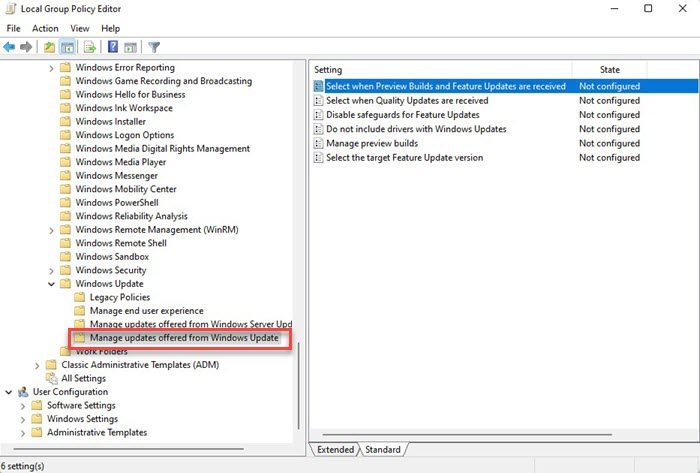
- On the left panel, navigate to the following path:
Computer Configuration\Administrative Templates\Windows Components\Windows Update\Manage updates offered from Windows Updates
- Double click on Select when Preview Builds and Feature Updates are received.
- Select Enabled in the settings window that appears.
- Specify the number of days for which you would like to defer the feature update once it is released. You can simply enter the number or use the up/ down arrows to specify the value. Feature updates can be delayed for up to 365 days. You can also choose to pause updates for up to 35 days if required.
- Click on the OK button.
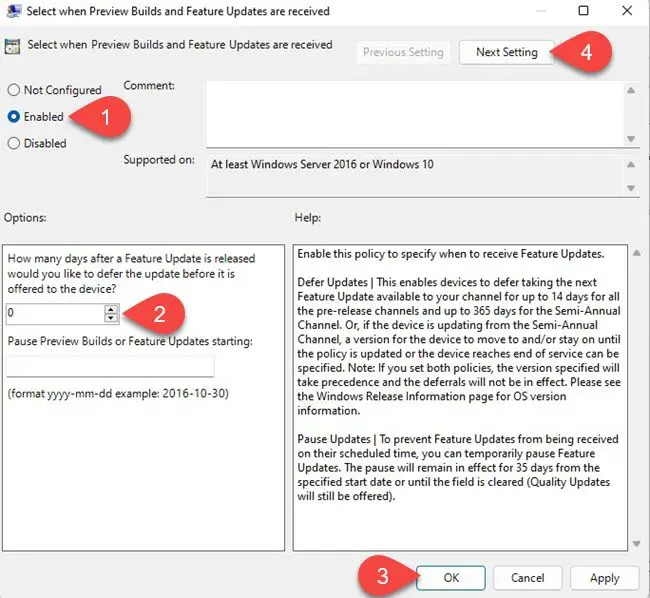
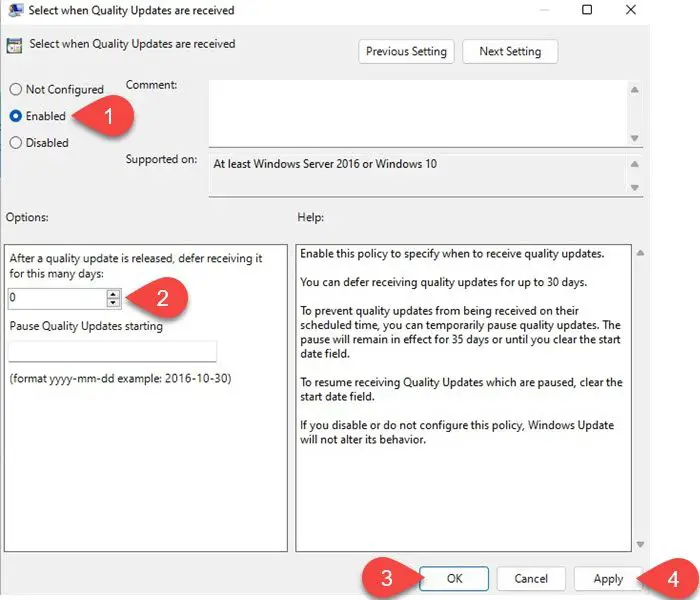
- Click on the Next Setting button on top. The settings window will now show options for Select when Quality Updates are received.
- Select Enabled.
- Enter the number of days for which you wish to delay the quality update after its release. Quality updates can be deferred for up to 30 days. You can also choose to pause the updates for up to 35 days.
- Click on the OK button.
- Click on the Apply button.
When you decide to allow Windows to install the upgrade or feature updates, you can change these settings from Enabled to Not Configured.
Also Read: Feature Updates are not offered while other Windows Updates are.
2] Defer or Delay Windows 11 Feature Upgrades using Registry Editor
Type regedit in the Windows taskbar search box. Registry Editor will show up on top of the search results.
Select Run as administrator on the right panel.
In the Registry Editor window, navigate to the following path:
HKEY_LOCAL_MACHINE\SOFTWARE\Policies\Microsoft\Windows\WindowsUpdate
Tip: If you cannot find the WindowsUpdate folder, right-click on the Windows folder and select New> Key. Then name it as WindowsUpdate.
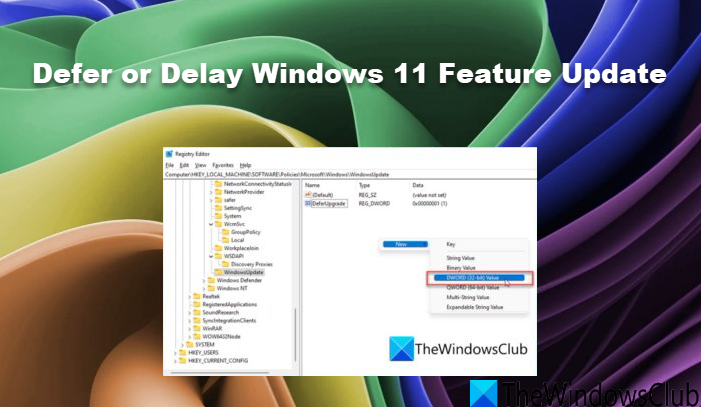
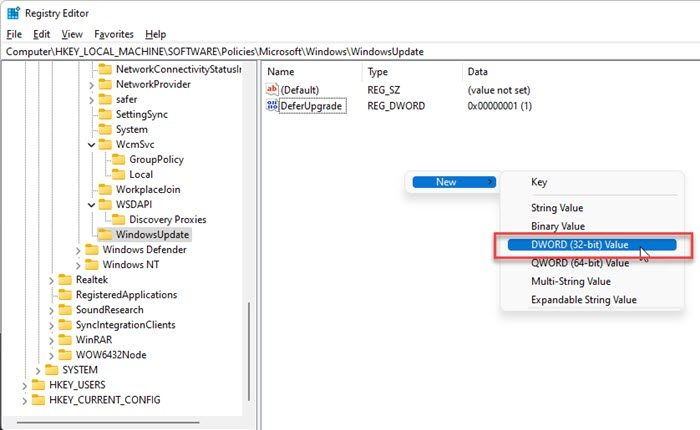
Inside the WindowsUpdate folder, right-click anywhere on the right panel and select New > DWORD (32-bit) Value.
Name it as DeferUpgrade.
Double-click on the key, select Decimal as Base, and set the Value data to 1.
Inside the WindowsUpdate folder, right-click anywhere on the right panel and select New > DWORD (32-bit) Value.
Name the key as DeferUpgradePeriodInDays.
Double-click on the key, select Decimal as Base, and set the Value data to anything between 0 to 365. This value represents the number of days for which you wish to delay the upgrade.
Inside the WindowsUpdate folder, right-click anywhere on the right panel and select New > DWORD (32-bit) Value.
Name the key as DeferUpdatePeriodInDays.
Double-click on the key, select Decimal as Base, and set the Value data to anything between 0 to 30. This value represents the number of days for which you want to delay updates.
When you decide to remove the defer update settings, delete all the DWORDs you have created following the above steps.
Do remember to create a system restore point before tweaking any Registry or Group Policy settings.
Read: How to Disable or Stop automatic downloading of Windows 11 Feature Updates
Related: How to get the Windows 11 Feature Upgrades.
How do I pause Windows Updates?
To pause the Windows updates, select Start > Settings > Windows Updates. Under More options, use the dropdown next to the Pause updates option to specify the period for which you want to pause updates. In Windows 11, you can pause the updates for up to 5 weeks. If your Pause option is greyed out, this post will show you how you can get it back on your Windows PC.
Read Next: Fix 0x800f0806 Error while downloading or installing Windows 11 Updates.