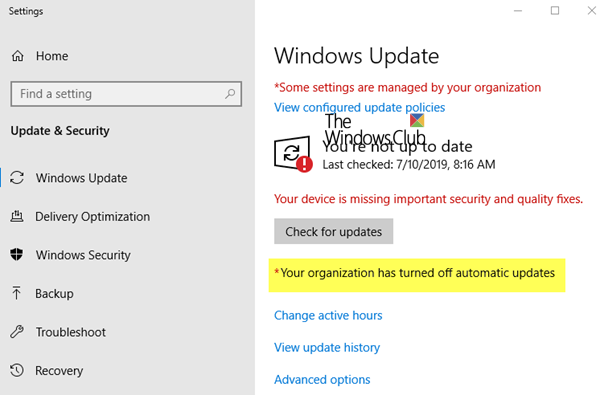
If your administrator has disabled Windows Updates or due to some corruption in Automatic Update settings, you may see an error message—Your organization has turned off automatic updates in Windows Settings. If you see this error message while trying to check for Updates, this post will help you fix the problem.
Windows 11/10 automatically searches for updates and installs them in the background so that users do not miss out on anything while busy with daily work. However, when you see this message, Windows will not automatically download the Updates.

The other messages you see would be:
- Some settings are managed by your organization
- Your device is missing important security and quality fixes
- Your organization has turned off automatic updates
- Your organization has set some policies to manage updates.
Your organization has turned off automatic updates
The reasons why this message could appear are-
- The system administrator has set this policy
- Choosing the wrong automatic update settings in Group Policy
- Setting incorrect Value data of AUOptions in Registry Editor
- Your system could be infected with malware
To resolve Your organization has turned off automatic updates error in Windows 11/10, follow these steps:
- Restore default settings of Configure Automatic Updates in Local Group Policy Editor
- Change Value data of AUOptions in Registry Editor
- Start Background Intelligent Transfer Service
- Turn on Windows Updates from Services
All of these are mentioned below in detail. You need to be signed in with an administrator account to do this.
1] Restore default settings of Configure Automatic Updates
If you use Windows Home Edition, you won’t have the Local Group Policy Editor. You need to add the Local Group Policy Editor to your computer.
This step is essential if you are using other versions, as it might be the primary reason the Windows update process is interrupted. You need to open the Local Group Policy Editor on your computer.
- Press Win+R, type gpedit.msc, and press the Enter button.
- After that, navigate to the following path in the Group policy editor.
Computer Configuration > Administrative Templates > Windows Components > Windows Update
- You should find a setting on your right side called Configure Automatic Updates.
- Double-click on it, select Not Configured, and save your change.

- After that, check if you can get updates.
Related: Your organization manages updates on this PC.
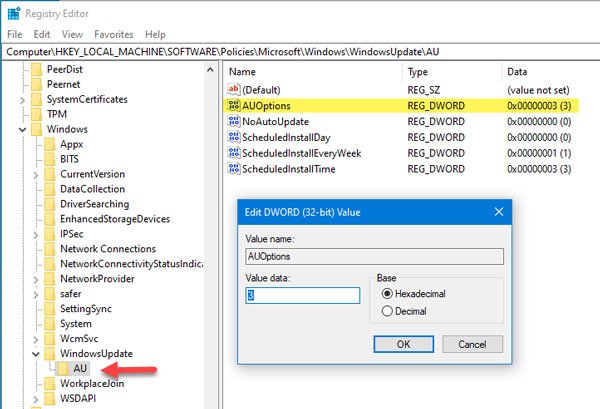
2] Change the Value data of AUOptions in the Registry
AUOptions or Automatic Updates Options is an essential registry key for managing Windows updates. In other words, this Registry key is equivalent to the above-mentioned Group Policy setting. If your OS doesn’t have Local Group Policy Editor, you need to open the Registry Editor and make the necessary changes. Before that, it is recommended to create a system restore point first.
- Press Win+R, type regedit, and press the Enter button.
- You have to click the Yes option in the UAC window. After opening the Registry Editor, navigate to this path-
Computer\HKEY_LOCAL_MACHINE\SOFTWARE\Policies\Microsoft\Windows\WindowsUpdate\AU
- On your right side, you should get a REG_DWORD key named AUOptions. You need to change the Value data for this key.
- 2 – Notify for download and auto-install
- 3 – Auto download and notify for install
- 4 – Auto download and schedule the install
- 5 – Allow local admin to choose the setting
- Double-click the AUOptions key, set the value to 0, and see if it helps.
- If it does not help, delete the WindowsUpdate key from your left side and check for updates.
For your information, the WindowsUpdate key appears when your system changes the default Windows Update settings. In other words, you can restore the default update settings by deleting the WindowsUpdate key from Registry Editor.
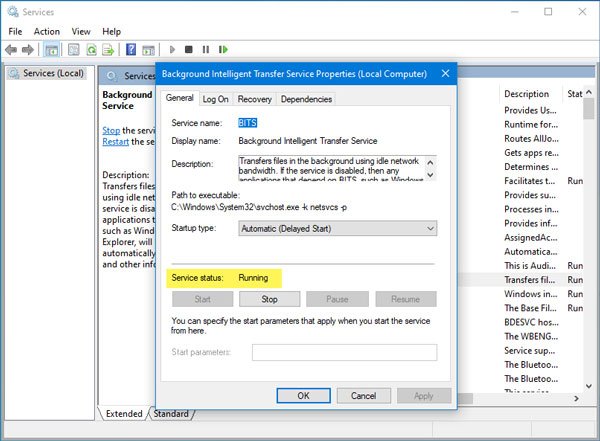
3] Start Background Intelligent Transfer Service
BITS, or Background Intelligent Transfer Service, is critical for running Windows Update, etc. If this service is not running in the background, your system doesn’t move data using idle bandwidth. As a result, the Windows Settings panel shows an error while finding updates. It is recommended that you ensure that BITS is running; if not, you must start it.
- Open Services Manager
- Locate the Background Intelligent Transfer Service under the Name column and double-click.
- Now, make sure that the Service status shows Running. If not, select Automatic or Automatic (Delayed Start) from the Startup type drop-down list and click the Start button.
- Then, you can click the Apply and OK buttons to save the changes.
4] Turn on Windows Updates from Services
Windows Updates are a big headache for many people, even though installing various fixes occasionally is a good practice. Several tools and methods exist to turn off automatic Windows Update. If you use the Services Manager to complete your job, you must ensure the Windows Update service runs in the background.
To do so, follow the steps to open the Services window first. After that, open the Windows Update service and verify if its status is Running. If it indicates anything negative, click the Start button to make it run.
If these solutions do not work, you should run the Windows Update troubleshooter and scan your PC with a trusted antivirus.
How do I remove managed by organization settings?
As an individual Windows user, you cannot remove this message if your business or IT department manages the laptop or PC. It would be best to connect with your support team and ask them to configure it. That said, it is best not to fiddle with the settings as updates are rolled out based on the business policy.
Windows is saying that I’m in an organization when I’m not?
This usually happens when using a Windows activation key that is part of the organization. Microsoft sells volume license keys to organizations where the same key can activate multiple PCs. If the key has been shared without your knowledge, it is time to get a retail key from the Microsoft Store.
Read: How to tell if Windows Product license is OEM, Retail or Volume (MAK/KMS) in Windows