
In this post, we will show you how to effectively and completely block, disable, or turn off Windows Update in Windows 11/10 so you can install it when you want. You will need to disable the Windows Update Service, WaaSMedicSVC, set the Network to a Metered connection, or use a Tool. We will also show you how to stop automatic downloading of Windows Updates.
Some background information before you proceed.
There is no option to stop or turn off Windows Updates using the Control Panel or Settings app in Windows 11/10, as it used to be with earlier versions of Windows. But there is a workaround to disable or turn off Windows Update in Windows 11/10, which we’ll talk about in this post.
First, let us take a look at why people may want to turn off Windows updates.
With Windows 8.1 and earlier versions, we had Windows Update giving us options to:
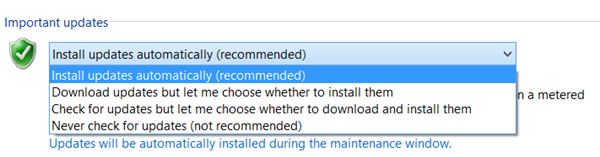
- Install updates automatically (Recommended)
- Download Updates but choose when to install them
- Check for updates but let me choose whether to download and install them
- Never check for updates (Not Recommended)
These options provided a way to defer updates until we had enough time to download and install them or to have them downloaded automatically and then install them at a time we wish. These options are no longer available in Windows 11/10 Update & Security Settings.
Windows 10 users now have the option to pause Windows Updates. Earlier they did not have this option. Windows 10 will also let you defer restart, but that is not enough because a download in the background might slow down your browsing in some cases.
Read: Windows Update enables itself even after turning it Off.
How to disable Automatic Windows Update in Windows 11
It is good to keep your computer up to date, but sometimes you may want to manually update it instead of letting the system install updates automatically. Here are the ways you can stop, defer, or pause automatic updates in Windows 11 via Settings.

Pause or Stop Automatic Updates in Windows 11
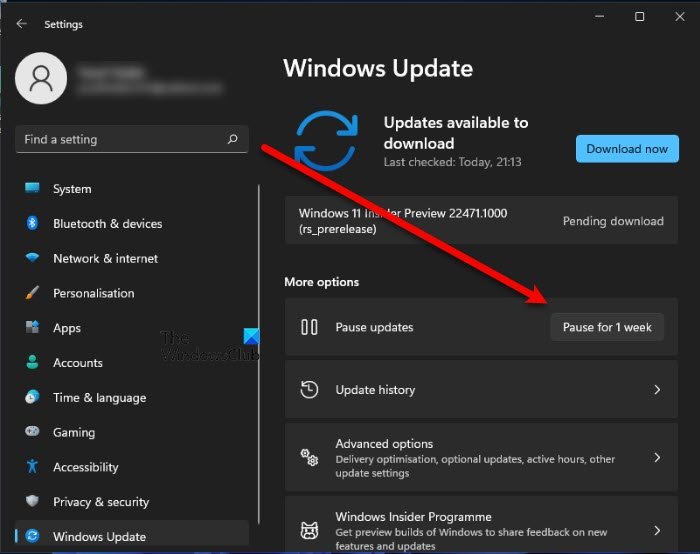
First of all, the easiest way to stop Windows from automatically updating for a few weeks is to change your Windows Settings. In this section, we will see how to do the same.
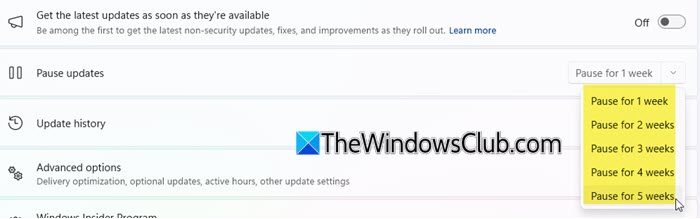
To pause automatic updates from Windows Settings, follow the given steps.
- Open Settings by Win + I.
- Go to Windows Updates.
- Click Pause for 1 week.
You can pause for up to 5 weeks. After this, your computer will not automatically install updates, but in the meantim,e you can manually update it.
Completely Turn off Windows Updates in Windows
To completely stop or disable automatic Windows Updates in Windows 11/10, you will have to:
- Disable Windows Update & Windows Update Medic Services
- Change WU settings using the Group Policy Editor
- Set your network connection to ‘Metered’
- Use a free tool that lets you disable automatic updates.
Now let us see each of these suggestions in detail.
1] Disable Windows Update & Windows Update Medic Services
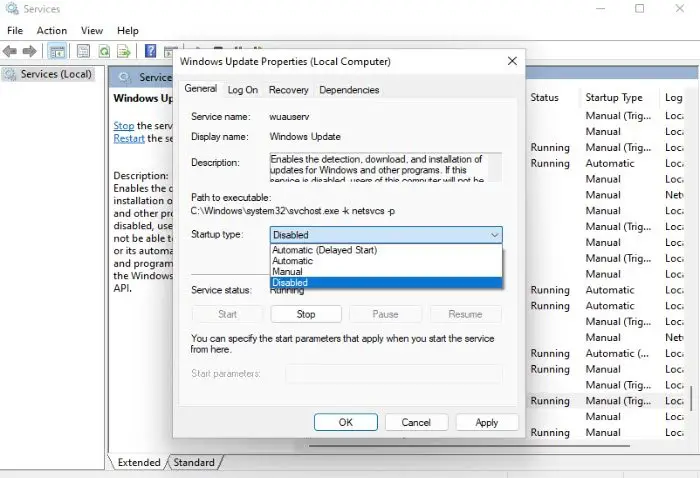
Next up, we have another method for you to turn off automatic updates: stop the Windows Update service.
If you want to stop the Windows Update Service, use the following steps.
- Open Services from the Start Menu.
- Look for the ‘Windows Update’ service.
- Right-click on it and select Properties.
- Change the Startup type to Disabled and click Apply > Ok.
You need to also disable the Windows Update Medic Service or WaaSMedicSVC. The Windows Update Medic Service is a new Windows Service introduced in recent versions of Windows. This Service has been introduced to repair damaged Windows Update components so the computer can continue to receive updates. We recommend you try this method first.
You can disable the Windows Update Medic Service via Windows Services Manager. In the Services window, scroll down to Windows Update Medic Service and turn off the Service. To turn it off, right-click on the process, click on Properties and select Disabled. That will take care of Windows Updates not being installed on your machine.
Now, if you ever want to enable the Service, follow the steps above, but this time set the Startup type to Automatic.
Do remember to install updates though!
Since Windows is a Service now onwards, you have to keep your computer updated. To install the next set of features or a newer build, you will need to install the earlier updates. That’s why, if you use the above workaround, you will have to open the Windows Services Manager and turn it on from time to time to download and update your copy of Windows.
After you turn on the Windows Update Service, when you open Windows Update in Settings, you will see a message that updates were not installed because the computer was stopped. You will need to click Retry to download and install all available updates. This may take two or three “Check for Updates” tries. You will have to keep on clicking “Check for updates” until it says your computer is up to date. Then you can go back and turn off the Windows Update service until the next time you feel you have enough time to update your copy of Windows 11/10.
2] Change Windows Update settings using the Group Policy Editor
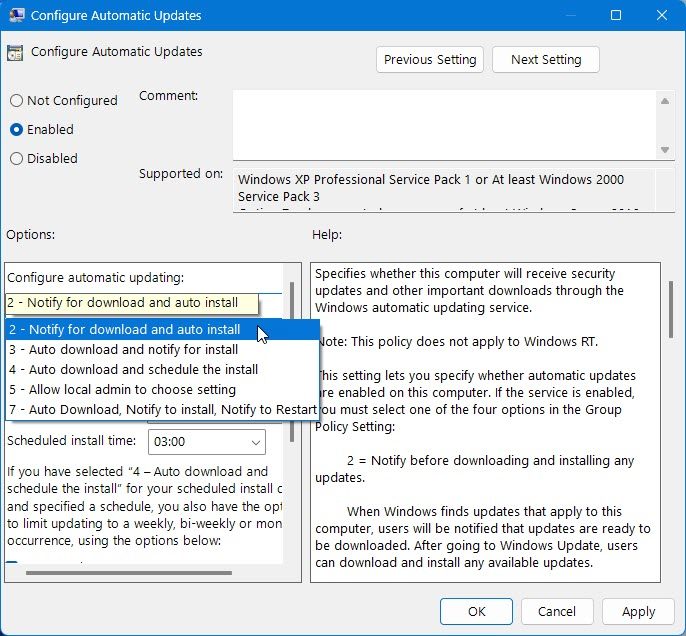
If your version of Windows 11/10 has Group Policy, you can also change some settings using the Group Policy Editor. Run gpedit and navigate to the following policy setting:
Computer Configuration > Administrative Templates > Windows Components > Windows Update > Manage end user experience
On the right side, double-click Configure Automatic Updates and adjust its settings to suit your requirements.
The options you have are:
- Notify for download and auto install
- Auto download and notify for install
- Auto download and schedule the install
- Allow local admin to choose setting
- Auto download, Notify to install, Notify to Restart.
We suggest you select Notify for download and auto install. This way, your PC will inform you when updates are available but not download or install them unless you do so manually.
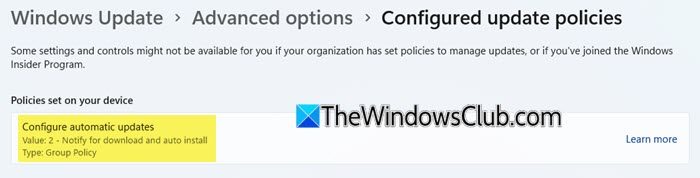
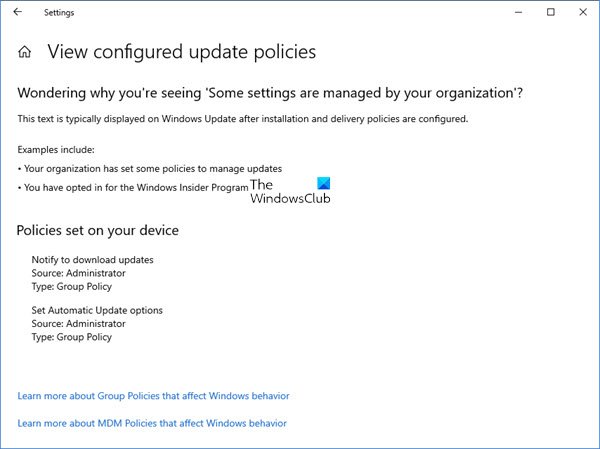
Once you configure the settings, you will see the result in the Settings app as follows:
Windows 11
Windows 10
Read: How to configure Windows Updates using Registry.
We do not recommend disabling automatic Windows Update completely in Windows 11/10. If your computer is fine with downloads running in the background and they don’t affect your work, it is not advisable to run them in the background. But if you experience a slowdown due to updates downloading and installing in the background, the above tip to turn off Windows updates in Windows 10 will be helpful.
3] Set your network connection to ‘Metered’
Setting your network connection to ‘Metered’, can also stop Windows 11/10 from automatically downloading the Updates. You can do it as follows – Settings app > Network & Internet > WiFi > Advanced options. Move the slider to On position for Set as metered connection.
Windows 10 users: This post will show you how to set Metered Connection in Windows.
Windows 11 users: If you enable Metered Connection on a network, your Windows 11 computer won’t automatically download the update when connected to that particular network. Follow the given steps to do the same.
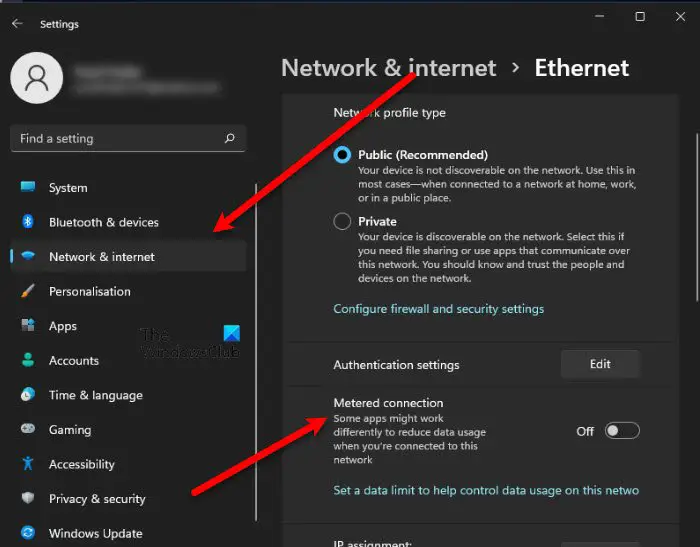
- Open Settings from the Start Menu.
- Click Network & Internet > Properties.
- Now use the toggle to enable Metered connection.
Now, your computer will download updated automatically when you are connected to that network.
4] Tools that help you block automatic Windows Updates
Here is a list of some free Windows Update Blocker tools to Stop Automatic Windows Updates. You might want to take a look at them, as they let you control Windows 11/10 Updates with a single click.
- Windows Update Blocker
- StopUpdates10
- Wu10Man
- Kill-Update
- WuMgr
- Win Update Stop
- GRC InControl
- Win Updates Disabler
- WAU Manager.
Incidentally, Microsoft has released a tool called Show or Hide Updates that allows users to hide or block specific unwanted Windows Updates. Using it, you can stop Windows 11/10 from downloading specific updates.
Is it safe to turn off Windows Update in progress?
No, you should never turn off your computer when installing the update. Doing so can lead to serious issues, such as BSOD or corrupted Windows. If you are not sure whether you want to use the update in question, you can always roll back to the previous version. But stopping the ongoing update should not be an option.
What if I don’t update Windows?
Windows primarily use updates to roll out bug fixes and add new features to the Operating System. However, if you are happy with your OS’s current features and stability, you can skip updates for some time.
But eventually, you have to update as you can’t afford to run an outdated OS. Otherwise, some of the applications will stop working and you will experience other failures. Even some of the games want the latest version of Windows. Therefore, it is always recommended to keep your system up to date.
Related reads:
- How to configure Windows Updates using Registry in Windows Server
- How to stop automatic Driver updates
- Stop Windows 11 from upgrading your computer automatically.
