Windows Update is a very important free service provided by Microsoft. It provides the latest updates like security patches and cumulative updates for the Windows operating system. However, some users recently experienced a known error with Windows Update Error 0x8024a000. This issue can occur for several reasons, such as a faulty MicrosoftStore, Firewall blocking the Windows Update server, etc.
0x8024a000 – WU_E_AU_NOSERVICE, Automatic Updates was unable to service incoming requests
If you receive this error code, this guide will help you fix the issue.
Fix Windows Update Error 0x8024a000
To fix Windows Update Error 0x8024a000 on Windows 11/10, follow these suggestions:
- Check the status of Windows Update Services
- Restart the Windows Update Services
- Register Windows Update related DLLs again
- Clear SoftwareDistribution & Catroot2 folder
- Reset Firewall settings to default
- Temporarily disable your Firewall
- Run Windows Update Troubleshooter
- Run Network Troubleshooter
- Run Windows Store Troubleshooter
- Check if Windows Update is Paused or Not enabled.
Let us see them in detail.
1] Check the status of Windows Update related Services
Open Windows Services Manager and check the Windows Update related Services like Windows Update, Windows Update Medic, Update Orchestrator Services, etc are not disabled.
The default configuration on a standalone Windows PC is as follows:
- Windows Update Service – Manual (Triggered)
- Windows Update Medic Services – Manual
- Cryptographic Services – Automatic
- Background Intelligent Transfer Service – Manual
- Windows Installer – Manual.
This will ensure that the required Services are available.
2] Restart the Windows Update Services
Sometimes, this problematic error can also occur because the Windows Update service appears stuck at a particular point.
According to some users’ reports, they have overcome the issue by restarting every service used by the Windows Update component.

To restart the Windows Update Services, open an elevated command prompt. If UAC prompt appears on the screen, click on the Yes button to give your approval.
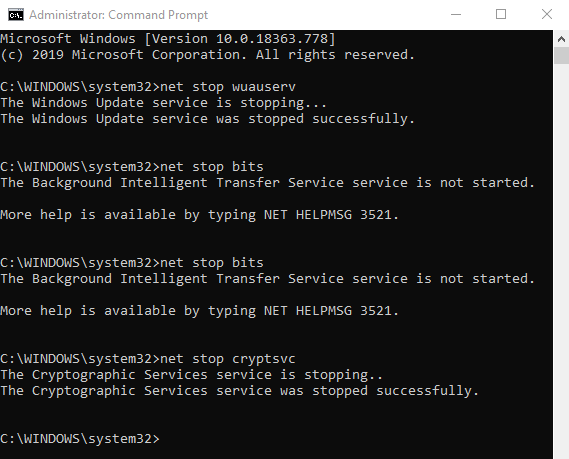
In the elevated command prompt window, type the following commands and press enter after each one –
net stop wuauserv
net stop bits
net stop cryptsvc
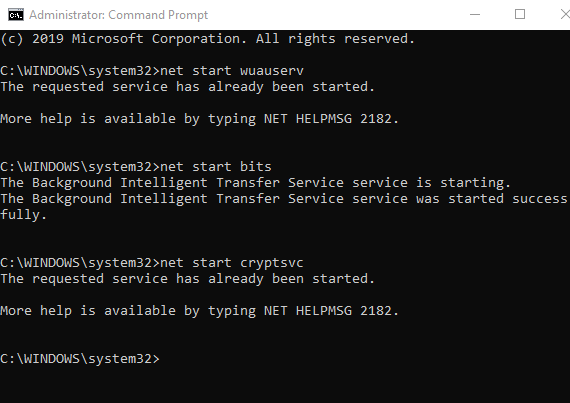
This will stop the Windows Update services. To start these services again, type the following command and hit enter after each one.
net start wuauserv
net start bits
net start cryptsvc
exit
After executing the above commands, restart your device and check if it fixes the issue.
3] Register Windows Update related DLLs again
There is another possibility of occurring the error code 8024A000, that is the DLL file. Maybe it is not registered in the accurate form. By the way, it is mainly reported to have occurred on the older Windows version. If it is related to your current conditions, you need to again register the DLL update.
To do this, click on the Start button and type Notepad.
From the best match list, do a right-click on the result and select Run as administrator.
If UAC prompts on the screen, click on the Yes button to grant the administrative privileges.
Inside the elevated Notepad, copy and paste the following commands –
regsvr32 c:\windows\system32\vbscript.dll /s
regsvr32 c:\windows\system32\mshtml.dll /s
regsvr32 c:\windows\system32\msjava.dll /s
regsvr32 c:\windows\system32\jscript.dll /s
regsvr32 c:\windows\system32\msxml.dll /s
regsvr32 c:\windows\system32\actxprxy.dll /s
regsvr32 c:\windows\system32\shdocvw.dll /s
regsvr32 wuapi.dll /s
regsvr32 wuaueng1.dll /s
regsvr32 wuaueng.dll /s
regsvr32 wucltui.dll /s
regsvr32 wups2.dll /s
regsvr32 wups.dll /s
regsvr32 wuweb.dll /s
regsvr32 Softpub.dll /s
regsvr32 Mssip32.dll /s
regsvr32 Initpki.dll /s
regsvr32 softpub.dll /s
regsvr32 wintrust.dll /s
regsvr32 initpki.dll /s
regsvr32 dssenh.dll /s
regsvr32 rsaenh.dll /s
regsvr32 gpkcsp.dll /s
regsvr32 sccbase.dll /s
regsvr32 slbcsp.dll /s
regsvr32 cryptdlg.dll /s
regsvr32 Urlmon.dll /s
regsvr32 Shdocvw.dll /s
regsvr32 Msjava.dll /s
regsvr32 Actxprxy.dll /s
regsvr32 Oleaut32.dll /s
regsvr32 Mshtml.dll /s
regsvr32 msxml.dll /s
regsvr32 msxml2.dll /s
regsvr32 msxml3.dll /s
regsvr32 Browseui.dll /s
regsvr32 shell32.dll /s
regsvr32 wuapi.dll /s
regsvr32 wuaueng.dll /s
regsvr32 wuaueng1.dll /s
regsvr32 wucltui.dll /s
regsvr32 wups.dll /s
regsvr32 wuweb.dll /s
regsvr32 jscript.dll /s
regsvr32 atl.dll /s
regsvr32 Mssip32.dll /s
Now, click on the File menu and select the Save as option.
On the next screen, choose a suitable location and then save the file as WindowsUpdate.bat. You can change the file name according to your needs, but the extension must be a batch file.
Once you create the batch file, double-click on it, and when UAC prompts you on the screen, click the Yes button.
After that, reboot your device, and once it starts up, check if the error code 8024A000 still persists. If it does, move on to the next effective workaround.
4] Clear SoftwareDistribution & Catroot2 folder
You should clear the contents of the SoftwareDistribution folder & Catoort2 folder and see if it helps.
Open the command prompt in administrative mode. Once it opens, enter the following commands. And, after each command, hit enter.
net stop wuauserv
net stop cryptSvc
net stop bits
net stop msiserver
After executing the above commands properly, type the following commands, and hit enter after each command:
ren %systemroot%\System32\Catroot2 Catroot2.old
ren %systemroot%\SoftwareDistribution SoftwareDistribution.old
Now, in order to start the Windows Update Services, type the following command again. Also, hit enter after each one:
net start wuauserv
net start cryptSvc
net start bits
net start msiserver
Once you complete the above procedure, reboot your PC and check whether it works for this error code.
5] Reset Firewall settings to default
Reset Firewall settings to default and see if it works.
6] Temporarily disable your Firewall
Windows Firewall is undoubtedly a great Windows application that provides your computer powerful protection against cyber attacks and malicious software. But, there is some possible update error that occurs with the anti-virus or firewall as well. So, you could disable your firewall temporarily and check whether it helps to fix the Update Error 0x8024a000.
7] Run Windows Update Troubleshooter
Windows Update Troubleshooter is the easiest method you can try to fix the Update Error code 0x8024a000 on your Windows PC.
8] Run Network Troubleshooter
Run Network Troubleshooter and see if it helps fix any potential problems.
9] Run Windows Store Troubleshooter
Run Windows Store Troubleshooter and see if it helps.
10] Check if Windows Update is Paused or Not enabled
Check if Windows Update is Paused or Not enabled. You may need to tell your admin to do this if you do not have administrative rights.
Once done, reboot your Windows PC.
I hope this guide will help you to fix the Windows Update Error 0x8024a000.
More suggestions here to help you if Windows Update Fail To Install.