If you see a yellow exclamation mark on the Network icon in the system tray and you receive an error message, Windows could not automatically detect this network’s proxy settings, here are some solutions that might work for you. Although restarting the router can solve this issue, many times, it doesn’t work – and in such cases, you need to troubleshoot further.
What is a proxy server?
A proxy server is a machine that provides a gateway between users and the internet. It’s an intermediary server separating end-user clients from the destinations that they browse and translates traffic between networks or protocols. It is essentially a computer on the internet that has an IP address of its own.
Fix Windows could not automatically detect this network’s proxy settings error
The following suggestions will help you fix the Windows could not automatically detect this network’s proxy settings error on your system:
- Check proxy server settings
- Check Proxy settings in Windows Settings
- Obtain DNS server address automatically
- Restart Network Adapter
- Scan PC with adware removal tool
- Install/update the network driver
- Temporarily disable antivirus, firewall software or VPN
- Use Network Troubleshooter
- Use Network Reset.
Let us see these methods in detail.
1] Check proxy server settings

This is probably the best solution to this problem since this issue generally occurs due to a wrong proxy server. Press Win + R, type inetcpl.cpl and hit the Enter button. Alternatively, you can search for Internet Options in the Taskbar search box or Cortana. After opening the Internet Properties window, switch to Connections tab. You should find a button called LAN settings. Click on it. After that, make sure the Use a proxy server for your LAN option is unchecked. If it is checked, remove the check-mark and save your changes.
2] Check Proxy settings in Windows Settings
If you often use a manual proxy, this is when you need to check up. For that, press Win + I to open Windows Settings panel. After opening, go to Network & Internet > Proxy. On your right-hand side, make sure the proxy setting is correctly entered. Also, you can disable the manual proxy and enable only Automatically detect settings option.
3] Obtain DNS server address automatically
This issue often occurs when you use a direct Ethernet connection or use the Ethernet cable through a Wi-Fi router. If you haven’t enabled this Obtain DNS server address automatically option, you may get the error message.
To confirm, press Win + R, type ncpa.cpl and hit the Enter button. You can find Ethernet or any other connected network name. Right-click on it, select Properties > Internet Protocol Version 4 (TCP/IPv4). Next, click on Properties. In the next window, check whether Obtain DNS server address automatically is selected or not. If not, you need to select it along with Obtain an IP address automatically.
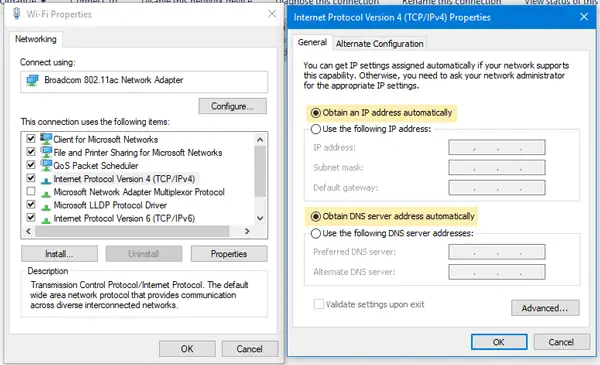
Note: This solution works only when you are using an Ethernet cable through a router. It doesn’t work when you have a direct Ethernet connection.

4] Restart Network Adapter
Every computer has a network adapter that helps users to get an internet connection. You can restart that network adapter and check if it works. To do this, press Win + R, type ncpa.cpl, and hit Enter. Now, right-click on the connected network name and select Disable. After a minute, again right-click on the same and select Enable.
5] Scan PC with adware removal tool
Sometimes, adware and malware can enable the proxy server settings automatically or make some other changes internally. Hence, you might get an error when trying to connect the PC to the internet. Therefore, this is a good idea to scan your full system with a reliable adware removal tool like AdwCleaner. You could also run your antivirus software scan to be doubly safe.
6] Install/update network driver
Although Windows 11/10 detects the network without installing new drivers, you may need to install afresh or update your network driver.
7] Temporarily disable antivirus, firewall software or VPN
If you have recently installed any antivirus, firewall software or VPN app, you should disable it for a short time to check if they are creating an issue or not. Sometimes such software can cause problems related to incoming as well as outgoing connections.
8] Reset TCP/IP
Resetting TCP/IP can fix this issue if the problem is occurring due to corruption.
9] Use Network Troubleshooter
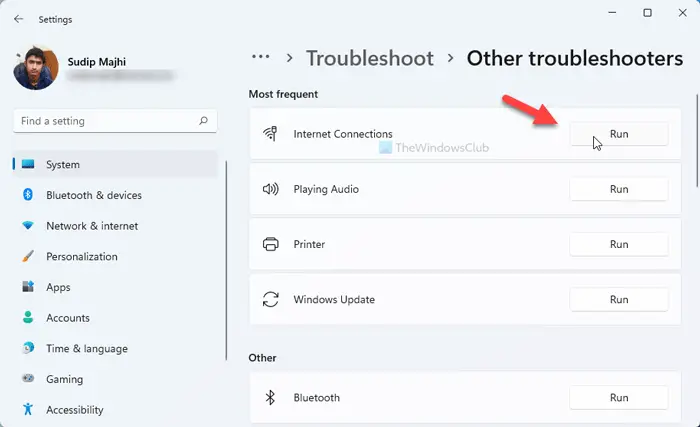
If you are using Windows 11, follow these steps:
- Press Win+I to open Windows Settings.
- Ensure that you are in the System tab.
- Click on the Troubleshoot menu on the right side.
- Click on the Other troubleshooters option.
- Select the Internet Connections Troubleshooter.
- Click the Run button.
- Follow the screen instructions.
However, if you are using Windows 10, follow these steps:
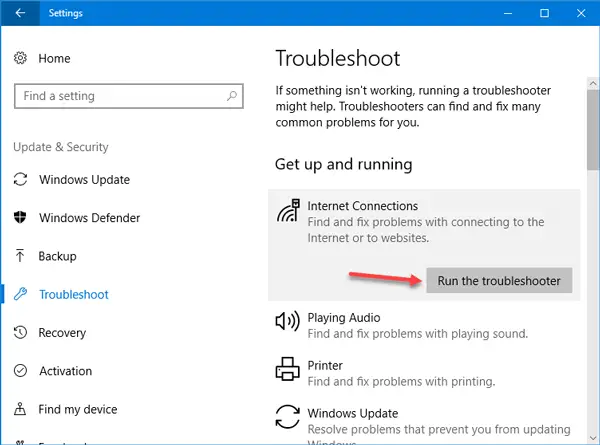
Windows Settings panel comes with a troubleshooter that can fix various internet issues. To use this, press Win + I to open Windows Settings. Then, go to Update & Security > Troubleshoot. On your right-hand side, click on Internet Connections and Run the troubleshooter button and follow the screen instructions.
10] Use Network Reset
If nothing helps, you should consider using the Network reset option. To use the Network Reset feature to reinstall Network adapters, reset Networking Components to default, etc, follow these steps:
- Open Settings
- Click on Network & Internet
- Click on the Status link on the left side
- Scroll down till you see the Network reset link.
- Click on it to start the process.
The Network Reset feature will first remove and then reinstall all your network adapters and set other networking components back to their original settings and default values. To restore the network connections, adapter settings, network proxy settings to default – and to fix proxy issues, network errors, proxy server issues, etc. you may consider using this function.
How do I automatically detect proxy settings?
To automatically detect proxy settings in Windows 11/10, you need to open the Internet Options panel. To do so, you can search for it in the Taskbar search box and click on the individual search result. Once it is opened, switch to the Connections tab and click on the LAN settings button. Then, tick the Use a proxy server for your LAN checkbox and click the OK button.
How do I fix Windows could not automatically detect this network’s proxy settings?
There could be several things you can do to fix this issue on Windows 11/10 computers. For example, you can start by checking the proxy server settings, proxy settings in the Windows Settings panel, restart the Network Adapter, scan your computer with a reliable adware removal tool, etc. However, if nothing works, you can always run the Network Troubleshooter and reset network settings.
Related reads:
- Fix Network & Internet connection problems
- How to fix Unidentified Network
- Windows can’t get the Network Settings from the router
- Windows cannot connect to the Internet
- No Internet Access in Windows
- Fix Windows Connectivity issues with Hotspots and Wi-Fi adapters
- Limited Network Connectivity message.