
If you have recently heard about the GDID tracker in Windows 11 and are wondering whether you should disable it, read this post. We’ll explain what GDID is, how it works, and how to disable it on Windows 11.

Windows already uses several identifiers for different purposes, and not all of them are necessarily a privacy concern. However, GDID recently came into the spotlight after a U.S. federal case revealed how the identifier could connect activity from an associated Windows device across different IP addresses, even when VPNs, proxies, and multiple aliases were used.
What is Global Device Identifier (GDID) in Windows 11?
GDID stands for Global Device Identifier. It is a persistent, device-level identifier that can recognize a Windows installation across different services and connections. Microsoft generates the GDID on its servers when Windows sets up the device identity. Microsoft then sends the identifier back to Windows, which stores it locally on your PC.
Every Windows installation gets a GDID, whether on a physical PC or a virtual machine. The identifier normally remains the same through Windows updates and other system changes. However, reinstalling Windows generates a new GDID. Microsoft may keep the old identifier, along with the information it has already associated with it, on its servers. GDID can also be present even when you use a local account to sign in to Windows.
Should you disable GDID tracker in Windows 11?
No, there is no need to disable GDID on Windows 11. Let it be as it is! GDID has been part of Windows for years, but Microsoft has never fully documented it for users. This lack of transparency has raised privacy concerns and left many users wondering whether they should disable or remove it from their PCs.
You cannot natively disable GDID in Windows 11 because Microsoft embeds it into the operating system’s activation, licensing, and cloud-account infrastructure. There is no toggle switch to enable or disable it. However, you can use a 3rd-party tool to disable it. Doing so could potentially affect telemetry, licensing checks, activation and cross-service recognition.
Before we look at the steps to disable the GDID tracker, it is important to understand how it is stored in Windows and what happens when you try to remove it.
Checking GDID in Windows
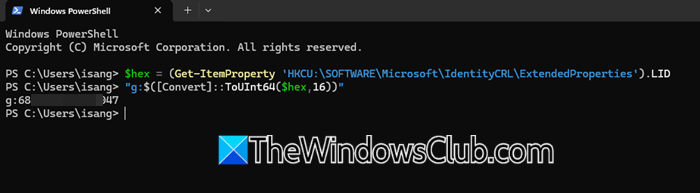
Windows stores GDID-related information in the Registry. You can find it under:
HKEY_CURRENT_USER\SOFTWARE\Microsoft\IdentityCRL\ExtendedProperties
It appears as a hexadecimal LID.
You can also check the GDID stored on your Windows 11 PC using PowerShell. Open Windows Terminal and run the following commands:
$hex = (Get-ItemProperty 'HKCU:\SOFTWARE\Microsoft\IdentityCRL\ExtendedProperties').LID

"g:$([Convert]::ToUInt64($hex,16))"
Windows will display your GUID: a 64-bit number, formatted as g: followed by a long string of digits.
Disable GDID in Windows 11
You can manually delete the LID value from the Windows Registry to remove the GDID stored locally on your PC. However, this only removes the existing identifier; it does not permanently disable GDID. Windows can recreate the related identity information after a restart or when it contacts Microsoft’s servers again.
To prevent Windows from recreating GDID, you need to block the mechanism responsible for recreating it. You can do this using a third-party PowerShell tool called deGDID.
deGDID is specifically designed to remove GDID information from unmanaged personal Windows PCs. It works by doing two main things:
- Removing known local copies of GDID-related information
- Blocking the Windows process used to create a new GDID
Note: Before using the tool, create a backup of your important data.
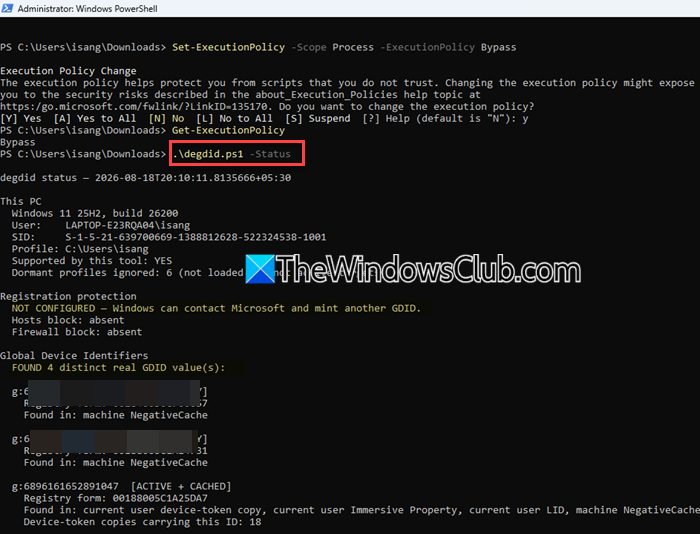
You can get the deGDID script (degdid.ps1) from its GitHub repository using this link. Download the raw file. Then open an elevated PowerShell window and navigate to the folder where you saved the script.
Next, run:
.\degdid.ps1 -Status
The tool will check the available GDID-related information and tell you the current status.
Next, run:
.\degdid.ps1 -Protect
The tool will first check whether your PC is suitable for the operation. It will then apply the required protection, remove known GDID-related information, and block the Windows path used to create a new GDID. If any required check fails, the tool will stop rather than leaving the system partially protected.
Once the process finishes, restart your Windows 11 PC. After restarting, open Windows Terminal as administrator again and run:
.\degdid.ps1 -Status
If protection has been successfully applied, the tool should report ProtectedNoRealGdid. This means the tool checked the supported environment, found no real GDID in the known local stores, and blocked the GDID creation path.
How to undo the GDID protection
Blocking GDID can break or degrade Microsoft features like account sign-in flows, Microsoft Store, Xbox, OneDrive, device sync, passkeys, and Windows Hello sign-in tied to a Microsoft account. If you notice any problems, you can undo the changes by running the -Unblock command.
Open PowerShell as administrator, navigate to the folder containing degdid.ps1, and run:
.\degdid.ps1 -Unblock
This removes the blocking measures applied by deGDID and allows Windows to create a new GDID again.
Should you remove GDID tracker?
Most Windows users don’t need to worry about GDID. If your main concern is Windows privacy, you can start by reviewing the privacy settings already available in Windows 11.
Go to Settings > Privacy & security and review options related to diagnostic data, advertising ID, activity history, and other privacy settings.
I hope you find this useful.
Read: How to find the Security Identifier (SID) of any User in Windows.
Does Windows 11 have tracking?
Windows 11 collects certain diagnostic and usage data to improve Windows, troubleshoot problems, and provide some features. It also uses different identifiers, including GDID, for different purposes. However, that doesn’t mean Windows tracks everything you do on your PC.
Is it good to disable Connected User Experiences and Telemetry?
If you are concerned about privacy, you can choose to limit or disable Telemetry and diagnostic data collection in Windows. However, doing so may reduce the information Microsoft receives to troubleshoot and improve Windows.
Read Next: How to limit Diagnostic Log Collection in Windows 11.
