Windows 11/10 requires some new skills to use with ease, and seniors who may have been accustomed to Windows 7 or Windows XP will need to learn a few new tricks. If you are looking for guidance on how to configure Windows 11/10 for your elderly family members to perform basic tasks such as checking email, browsing, and watching YouTube on a computer, then this guide offers some pointers on setting up a PC for the elderly.
Set up a Windows 11 PC for senior citizens

Unlike young people, older adults often struggle to adapt to technology. It is challenging for seniors to keep pace with technology, and using Windows 11 can exacerbate the issue. Setting up a computer for your elderly people requires your ideas and efforts. Fortunately, Windows provides several features that make the system easier for senior citizens, requiring less effort from elderly users and keeping every process smooth when accessing the computer.
In this article, we outline some tips and tricks to set up a Windows 11/10 computer for senior citizens, easing their system accessibility and ensuring a trouble-free experience using their Windows computer.
- Install a good Antivirus
- Change Ease of Access settings
- Uninstall unwanted apps and disable unwanted programs from running in the background
- Remove Preinstalled Bloatware
- Set up an Internet connection
- Install the necessary software
- Update Windows 11/10 OS & the installed software & Device Drivers
- Remove system password on wake up from sleep mode
- Setup the Mouse Properties to show the location of a pointer
- Install Open Shell.
Let us take a look at these suggestions in detail.
1] Install a good Antivirus
While the default Windows Defender & Firewall are robust enough to protect your PC, some of you may want to consider installing a good free Internet Security Suite or a free Antivirus as it can prevent a system from getting attacked by harmful malware and offers several other protection modules. Since the software is free, it will not require renewal. The elderly are likely to forget! It is recommended that you install an antivirus before handing over the computer to seniors. The anti-virus alerts the user with a pop-up message when the computer has an incoming threat. This data security utility ensures that the elderly can have a stress-free time browsing the internet, checking email, and watching YouTube.
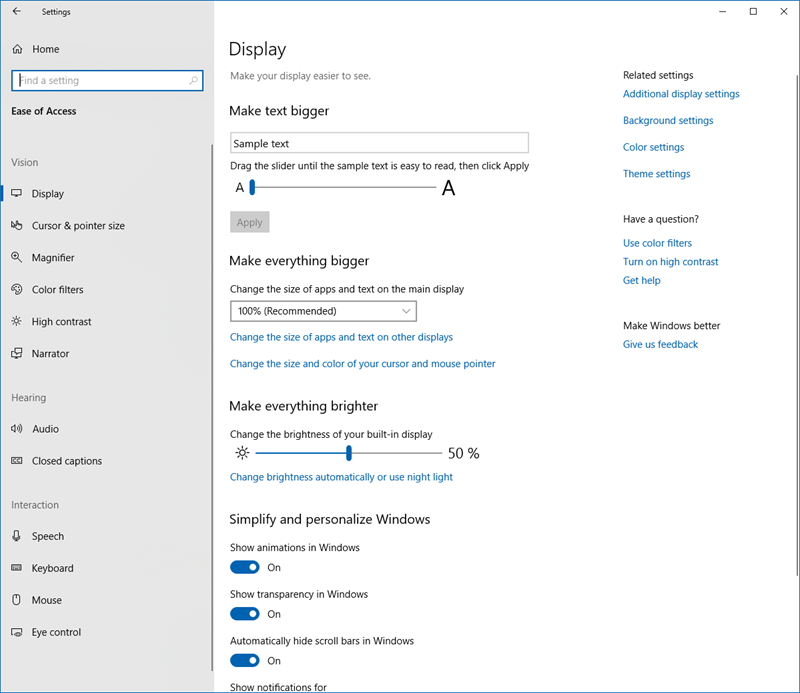
2] Change Ease of Access settings

Ease of Access is now referred to as Accessibility settings in Windows 11, and you can access these settings under System settings > Accessibility as shown above.
Ease of Access oe Accessibility is a feature that provides an option to set up accessibility settings from the login screen. The seniors can utilize these features to use the computer without a display, using a narrator, magnify the content on the screen with a magnifier, and toggle sticky keys, Filter Keys, and on-screen keys using the keyboard. Additionally, it helps users to increase the font size, mouse pointer size, make the screen brighter, and turn on mouse keys to use the keypad.
You will all these options via Windows 10 Settings> Ease of Access section as shown below.
You can also maximize and make effective use of Screen Real Estate if you wish.

3] Uninstall unwanted apps & disable unwanted programs from running in the background
Ensure a trouble-free time for seniors while using a computer by saving battery and data usage. To do this, all you need to do is, stop unwanted programs from running in the background.
- Go to Settings and navigate to Privacy.
- Click on Background Apps.
- Turn off the toggle button for all the apps to prevent apps from running in the background.
You may also remove unwanted Startup programs.
4] Remove Preinstalled Bloatware
If you are setting up a new Windows system for the elderly, it is recommended that you remove all the unnecessary preinstalled software also known as bloatware. Bloatware consumes a lot of memory space and RAM, which can eventually slow down your system. Moreover, the numerous and unnecessary bloatware that are spread all over the place on your desktop can confuse the elderly while using the computer. You may use a Crapware Removal Tool.
5] Set up an Internet connection
You need to set up an internet connection for the PC. Check if it is WiFi or Ethernet and proceed accordingly. Make them aware of some Online Safety Tips Guide for Seniors.
6] Install the necessary software
You might want to consider installing 3rd party software – like maybe a browser like Firefox or Chrome, 7-Zip, Microsoft Office, VLC media player, an email client like Microsoft Outlook, Skype, etc.
7] Update Windows OS & the installed software & Device Drivers
Installing the latest drivers on your PC is always a good idea if you are handing over your system to an elderly person. Running the latest driver updates on your desktop makes your machine safe and ensures that your elderly have a trouble-free time using the computer. It is essential to ensure that your computer’s hardware is compatible with the latest updates, as Outdated and faulty drivers can cause system lag, hardware, and software issues. That being said, performing a full driver update can resolve all the issues with the device and enhance system performance.
8] Remove system password on wake up from sleep mode
As part of our security measures, we typically set the system to require a password every time the computer wakes from sleep mode. This can cause confusion for older adults when the system displays a password prompt every time it resumes from sleep mode. To ease the use for the elderly, configure the options to remove the Sleep password so that one can directly login to Windows after exiting sleep mode.
9] Setup Mouse Properties to show location of pointer on pressing CTRL Key

If your computer screen is large, it is quite possible that a mouse pointer can go missing. In cases like these, it is difficult for seniors to locate the pointer on the computer screen. Thankfully, Windows provide an option that will show the location of the cursor or pointer immediately on pressing CTRL key. Follow the below steps to activate this option.
- Navigate to Control Panel and click Hardware and Sound
- Under the option Devices and Printers, click the Mouse to open the Mouse Properties window.
- Go to Pointer Options tab and select the option Show location of pointer when I press the CTRL key
- Click OK to apply the changes.
10] Install Open Shell
Use Open Shell. It is a free software that can help seniors to quickly access recently used files and applications. Using this software, one can customize the start menu with different styles. Additionally, it enables users to search for documents and programs with ease.
Anything we missed? Do share!
Read next: Basic Windows 11 tutorial & tips for beginners.