While using the Fix problems using Windows Update option in Windows 11, if you encounter an error message saying Repair Version of Windows not found, please try again later, here is how you can fix the problem. As this issue primarily occurs when you encounter problems with the Windows Update files stored on your system, we have compiled all possible solutions to help resolve the issue for you.
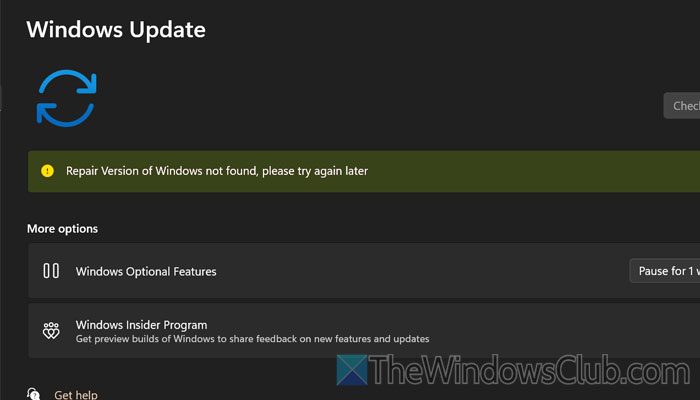
Repair Version of Windows not found in Windows 11
To fix the Repair Version of Windows not found error in Windows 11, follow these solutions:
- Run Windows Update Troubleshooter
- Reset Windows Update cache
- Perform Repair upgrade
- Restart Windows Update service
- Run DISM tool
To learn more about these solutions, continue reading.
1] Run Windows Update Troubleshooter
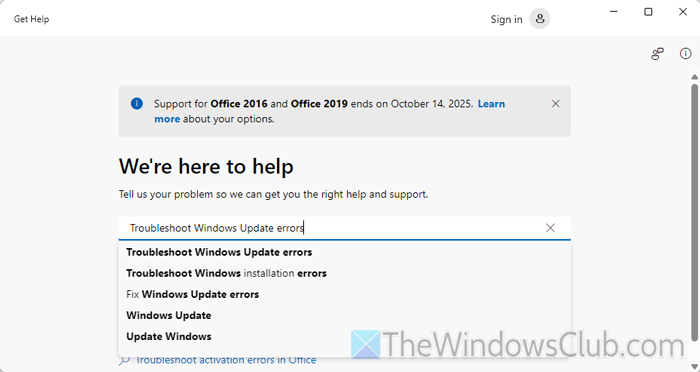
It is the very first thing you need to opt for. Often, running the built-in Windows Update Troubleshooter helps resolve the issue, as this error is primarily related to Windows Update.
To run the Windows Update Troubleshooter in Windows 11, follow these steps:
First, you need to search for the “Get Help” app in the Taskbar search box and open it on your computer. Following that, search for Troubleshoot Windows Update errors and wait for the search result.
Next, follow the screen instructions to complete the task.
Once done, restart your computer and open the Windows Settings panel. Following that, go to System > Recovery and check if you can use the Fix problems using Windows Update option.
2] Reset Windows Update cache
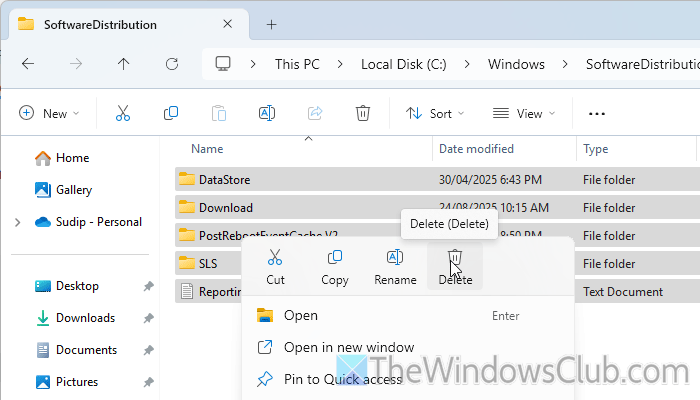
Resetting Windows Update cache and deleting/renaming the SoftwareDistribution folder is more or less the same thing. To delete the SoftwareDistribution folder or reset Windows Update cache, follow these steps:

First, you need to open the Command Prompt instance of Terminal with administrator privileges. Following that, enter these commands one after one:
net stop wuauserv
net stop bits
Then, you need to open the File Explorer and navigate to this path:
C:\Windows\SoftwareDistribution
Next, please select all the contents and delete them. Finally, you need to restart the Windows Update Service and the Background Intelligent Transfer Service by entering these commands:
net start wuauserv
net start bits
3] Perform Repair upgrade
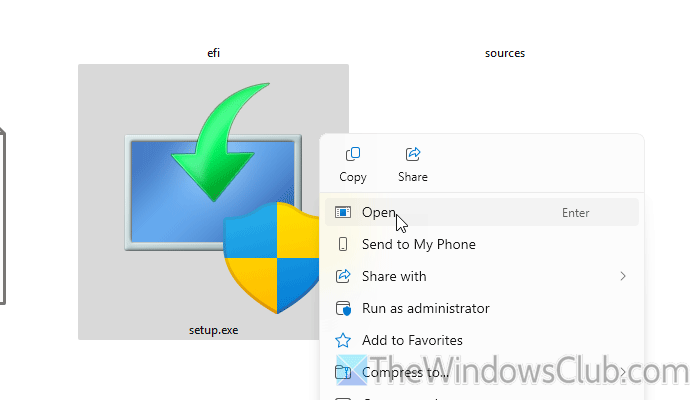
If the automatic method is not working, you need to go through the manual method to perform the repair upgrade. For that, you need to download the official Windows 11 ISO of the same edition that you are using currently on your computer. Having said that, if you are using the Home edition, download the Home edition, and if you are using the Pro edition, download the Pro edition.
Once done, open the ISO file and double-click on the setup.exe file.
Next, click on the Change how Setup downloads updates option and choose the Not right now option.
Once it shows the “Ready to install” window, click the Install button. You can click the Change what to keep option and choose the data you want to retain.
4] Restart Windows Update service
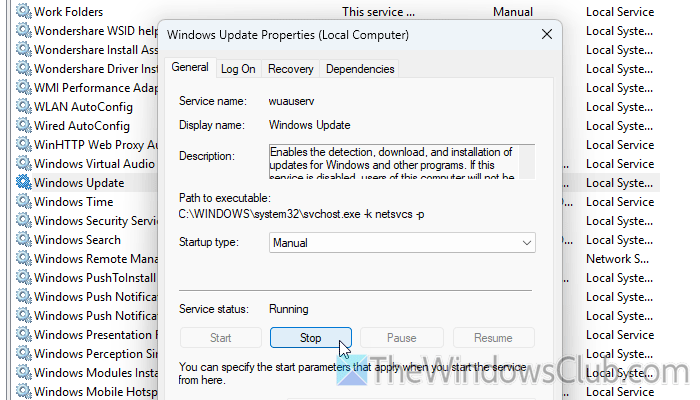
To restart the Windows Update service in Windows 11, follow these steps:
- Open the Services panel on your computer.
- Double-click on the Windows Update
- Click the Stop button.
- Choose Manual as the Startup type option.
- Click the Start button.
- Click the Apply and OK buttons.
Read: Windows Update Service missing in Services.msc
5] Run DISM tool
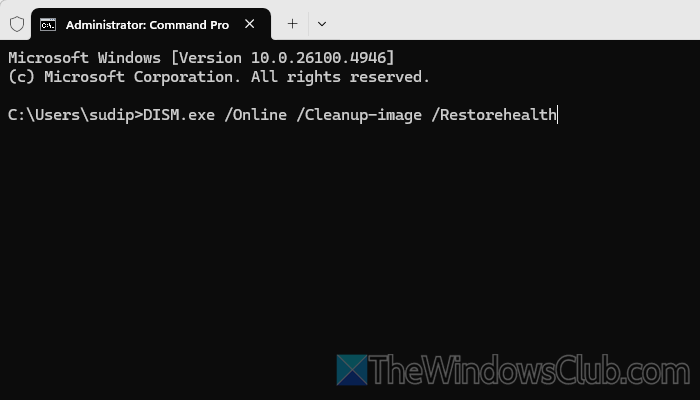
As this error can occur due to a corrupt image of your system, running the DISM tool would be a wise solution for you. To run the DISM or Deployment Imaging and Servicing Management tool in Windows 11, follow the instructions:
First, open the Command Prompt instance in Terminal with administrator privileges and enter this command:
DISM.exe /Online /Cleanup-image /Restorehealth
Next, enter this command:
DISM.exe /Online /Cleanup-Image /RestoreHealth /Source:C:\RepairSource\Windows /LimitAccess
Once done, restart your computer and check if it resolves the issue or not.
Read: An operating system wasn’t found error in Windows 11
How do I download the repair version of Windows 11?
To download the repair version of Windows 11, you need to open the press Win+I to open Windows Settings first. Then, go to System > Recovery. Find the Fix problems using Windows Update and click on the Reinstall now button.
How to fix operating system not found Windows 11?
To fix the operating system not found error in Windows 11, follow these solutions:
- Create a bootable USB and access the command prompt.
- Ensure the disk type (e.g., GPT, MBR).
- If it is MBR, enter this command: bcdboot C:\Windows /S C:
- Then, make sure the C or system drive is active.
- You can also use the automatic system repair option.
Read: Missing Operating System Not Found error in Windows 11.