If you want to prevent MiniTool apps from opening at startup and requesting updates at startup in Windows 11/10, here is how you can do that. Here, you can find multiple ways to prevent MiniTool apps from displaying the automatic update prompt when you start your computer or open any software created by MiniTool.
MiniToo offers some great free software, including Partition Wizard, Power Data Recovery, MovieMaker, and ShadowMaker. However, these software may add themselves to the startup list and prompt you to update when necessary.
Prevent MiniTool apps from starting up & requesting updates in Windows 11/10
To prevent MiniTool apps from starting up and requesting updates in Windows 11/10, use these methods:
- Using Task Manager
- Using Windows Settings
- Using third-party software
- Using File Explorer
- Using Group Policy.
Before you begin, you should check if any of the MiniTool software offer a setting to disable it from running at startup or checking for updates automatically. If so you can use it to run off these functions.
1] Using Task Manager
It is the best and easiest way to stop MiniTool apps from showing the automatic update prompt at startup. When you install any MiniTool app, a new background process gets added automatically. You need to disable it from running at startup.
For that, do the following:
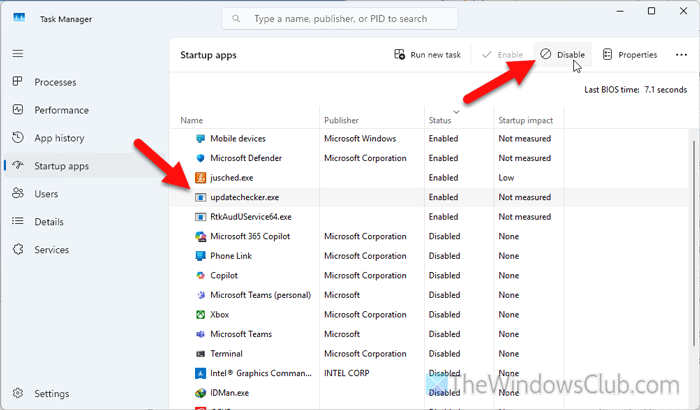
- Right-click on the Taskbar and select Task Manager.
- Go to the Startup apps section.
- Find the updatetechhecker.exe process and select it.
- Click the Disable button.
Read: Remove dead Startup programs or Invalid entries from Task Manager
2] Using Windows Settings
In Windows 11, it is very easy to manage startup programs using Windows Settings. In this case, you need to disable the same updatetechhecker.exe process as you did in the first method. To prevent MiniTool apps from starting up and requesting updates using Windows Settings, follow these steps:
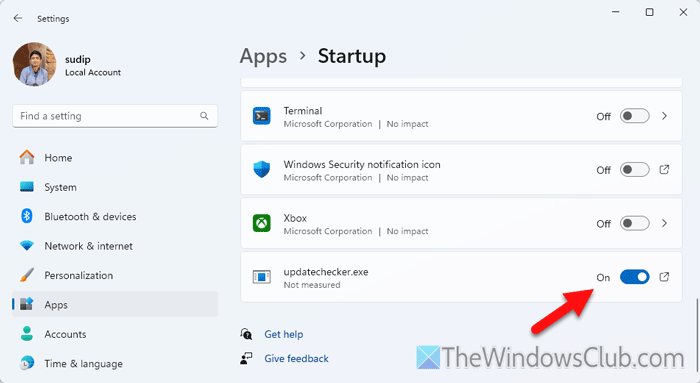
- Press Win+I to open Windows Settings.
- Go to Apps > Startup.
- Find the updatetechhecker.exe process or app.
- Toggle the respective button to turn it OFF.
3] Using third-party software
The approach you took in the first two methods can also be achieved with third-party software. In other words, you can use startup manager software to disable the MiniTool process in Windows 11/10. For that, we have selected two of the best apps, called CCleaner and WhatInStartup. Both are pretty reliable, and you can get your job done within moments.
Using CCleaner:
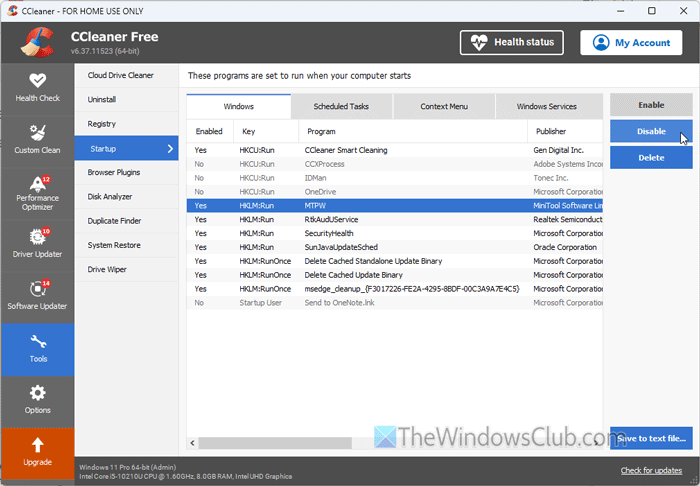
If you already have CCleaner on your computer, you can simply open the wizard and get going. However, if you do not have it, you can download it from ccleaner.com.
After going through the installation process, open it on your computer and go to Tools > Startup. Make sure that you are in the Windows tab.
Here you can find an entry called MTPW. You need to select it and click the Disable button.
Using WhatInStartup:
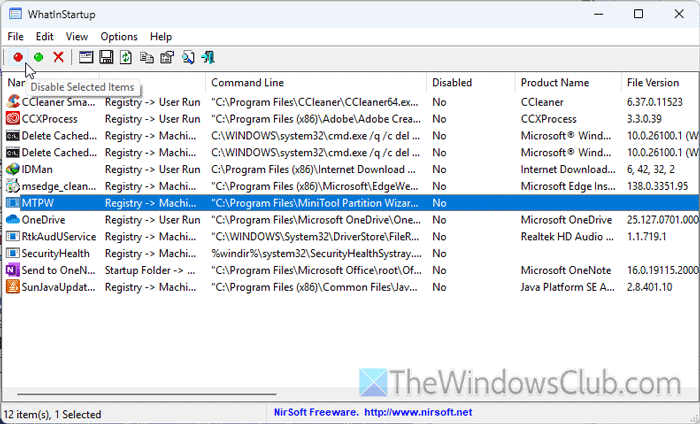
It is even better, as you don’t need to install anything on your computer. As long as you keep the portable software on your computer, you are good to go.
Download the tool from nirsoft.com and open it on your computer. Like CCleaner, you can find an entry called MTPW.
Please select the items and click the Disable Selected Items button or the red dot visible in the ribbon.
4] Using File Explorer
Although this method does the job fairly well, you may encounter issues in the future when attempting to update the MiniTool app. However, if you plan to use the tool for a couple of days and then uninstall it, you can certainly use this method.
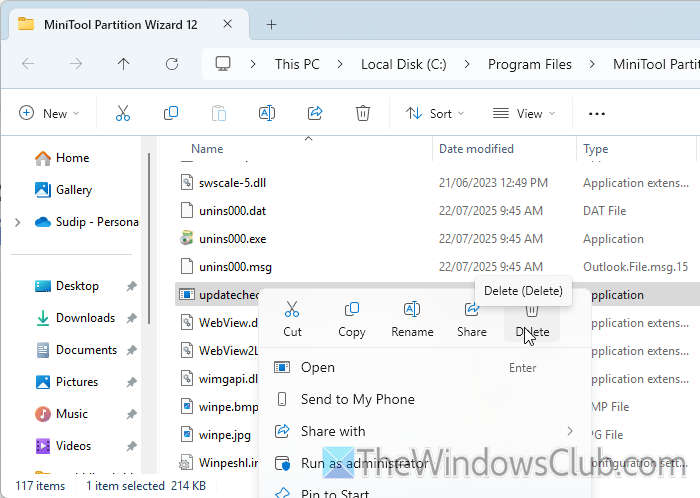
To disable the automatic update wizard for MiniTool apps using File Explorer, you must first open File Explorer.
Then, navigate to the installation folder. In general, you can find the folder here:
C:\Program Files\
In the Program Files, you need to open the folder that is directly related to the MiniTool app. In this case, you can find MiniTool Partition Wizard 12.
Here you can find an executable file called updatechecker.exe. You need to delete this file.
Read: How to find where a Program is installed in Windows 11
5] Using Group Policy
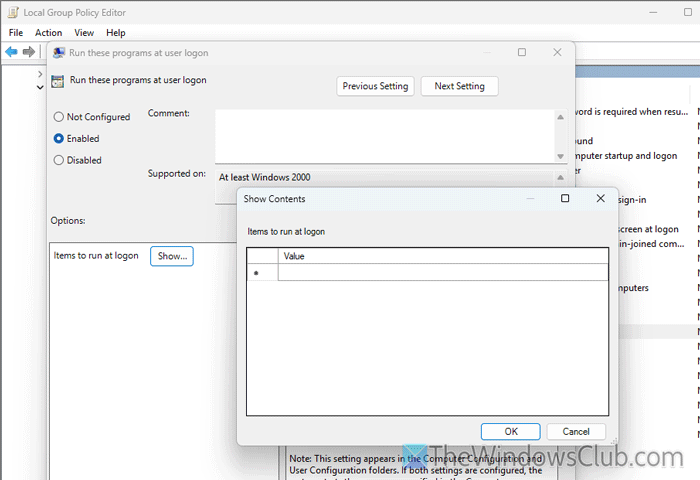
If you want more flexibility over the options and methods, Group Policy could be your companion. With the help of GPEDIT, you can manage startup programs in Windows 11/10. For that, do the following:
- Open the Local Group Policy Editor on your computer.
- Go to Computer Configuration > Administrative Templates > System > Logon
- Double-click on the Run these programs at user logon setting.
- Choose the Enabled option.
- Click the Show button.
- Type the name of the EXE file you want to allow at startup.
- Click the OK button.
Once done, restart your computer to verify.
Read: How to disable Startup programs and apps in Windows 11
How to prevent apps from automatically starting up in Windows?
To prevent apps from automatically starting up in Windows, press Ctrl+Shift+Esc to open the Task Manager. Then, go to the Startup apps section and choose the app you want to disable. Click the Disable button.
How to stop apps from auto-updating in Windows?
If you want to stop apps from auto-updating in Windows 11/10, open the Local Group Policy Editor and go to Computer Configuration > Administrative Templates > Windows Components > Store. Double-click on the Turn off Automatic Download and Install of updates setting and choose the Enabled option. Click the OK button to save the change.
Read: How to find out what startup programs I can disable safely in Windows.