If you use a Dell computer and face Operating system loader failed signature verification error in Windows 11, here is how you can fix the issue. As there could be several reasons why you might encounter this problem, here we have consolidated all the possible and common causes along with the solutions to troubleshoot it within moments.

The entire error message says something like this:
Operating system loader failed signature verification. WARNING: The file may have been tampered with! All bootable devices failed Secure Boot Verification.
Why is Windows 11 showing Operating system loader failed signature verification error?
If Windows 11 shows Operating system loader failed signature verification, one of these could be the reason:
- There are some issues with Secure Boot.
- Your bootloader is no longer working fluently or without any errors. In other words, your bootloader may be corrupt.
- Your computer has firmware that is not digitally signed.
- Your bootloader has failed to fetch the digital signature of the firmware.
- There are some issues with Boot Configuration Data or BCD.
- Ransomware/malware/virus/trojan/adware has removed or damaged critical system files.
- You have Legacy BIOS, but you must have EFI for Secure Boot configuration.
Note: If you do not have a Dell computer but you have got this error, you can still follow the same solutions below.
Operating system loader failed signature verification, The file may have been tampered with
To fix the Operating system loader failed signature verification error in Windows 11/10, follow these solutions:
- Turn off Secure Boot temporarily
- Verify whether you have Legacy BIOS or UEFI
- Update BIOS
- Use Automatic Startup Repair
- Disable BitLocker
- Rebuilt Bootloader
- Use SFC Scan
To learn more about these solutions, continue reading.
1] Turn off Secure Boot temporarily
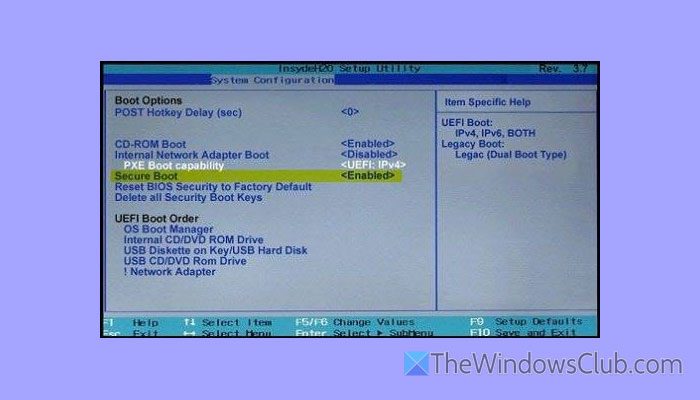
Secure Boot is the main reason why this error arises on your Dell computer. That is why it is suggested to disable Secure Boot temporarily and check whether it resolves the issue.
You can enable or disable Secure Boot using the BIOS. For that, open the BIOS and go to the System Configuration section. Here you can see an option called Secure Boot. Use your mouse or keyboard to disable it.
WARNING: Windows 11 requires Secure Boot. On the other hand, you might not be able to enable Secure Boot once you disable it. Although it happens on most computers, some manufacturers often bypass this restriction. In case you are not able to enable Secure Boot after disabling it, follow this guide.

2] Verify whether you have Legacy BIOS or UEFI

In case you have somehow enabled Legacy BIOS, it is important to opt for UEFI for Windows 11. In case you don’t know, BIOS has been replaced by UEFI – mainly for the newer versions of Windows operating systems.
If you have a Legacy BIOS, there is a chance of getting this problem on a Windows 11 computer. That is why it is suggested to check whether you have Legacy BIOS or UEFI. Although there are so many methods, you can simply open the System Information wizard and check the BIOS Mode section.
To open the System Information wizard, press Win+R to open the Run prompt, type MSInfo32, and hit the Enter button.
Alternatively, you can open the PowerShell instance in Terminal and enter this command:
$env:firmware_type
3] Update BIOS
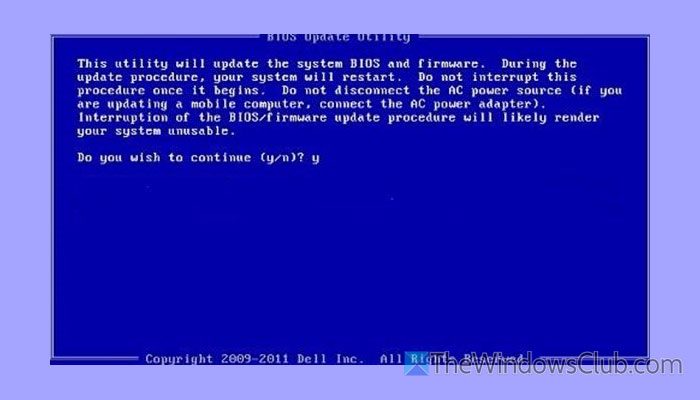
If your computer manufacturer has released an update for BIOS, it is highly recommended to download and install it as soon as possible. At times, manufacturers fix various bugs, glitches, and errors with an update. If the aforementioned update becomes very common among many people, the manufacturer will roll out an update to patch it.
To update BIOS, you can use the Dell Diagnostic Deployment Package. In short, you must create a bootable USB drive and select it from the BIOS.
Then, you can go through the screen instructions to get the job done.
4] Use Automatic Startup Repair
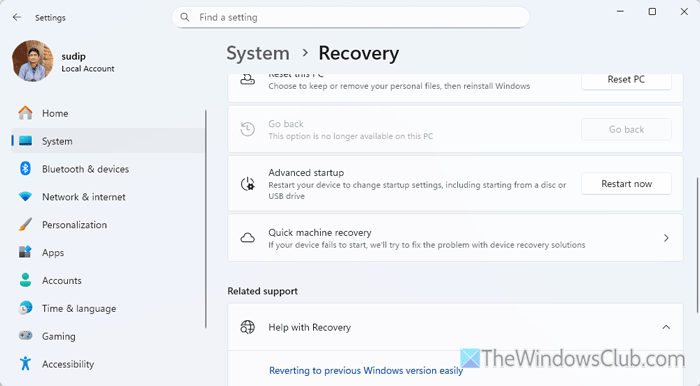
Automatic Startup Repair is one of the best tools that can fix almost all the common startup-related problems within moments. To use the Startup Repair, press Win+I to open the Windows Settings first. Then, go to System > Recovery > Advanced startup.
Click on the Restart now button. Next, go to Troubleshoot > Advanced options. Here you can find Automatic Repair. Choose this option and go through the screen instructions.
Once done, hopefully you will be able to use your computer without any errors.
5] Disable BitLocker
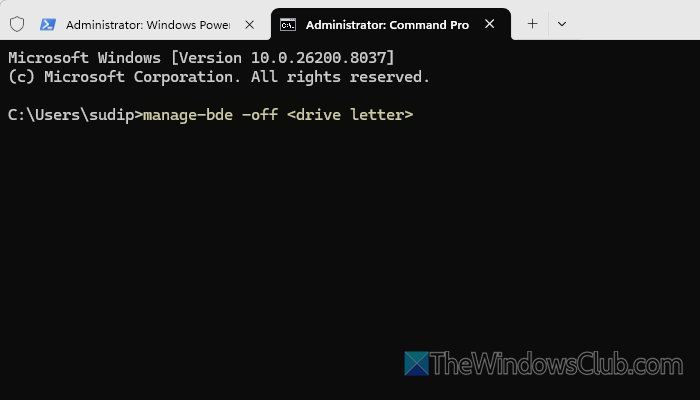
To disable BitLocker, go to Control Panel and select BitLocker Drive Encryption. Here you can find all the drives that are currently BitLocker-enabled. Choose the system drive and click on the Turn off BitLocker option. Next, enter your credentials.
You can also open the File Explorer and right-click on the system drive to find the same option as above. Apart from that, it is possible to disable it using Command Prompt.
6] Rebuilt Bootloader
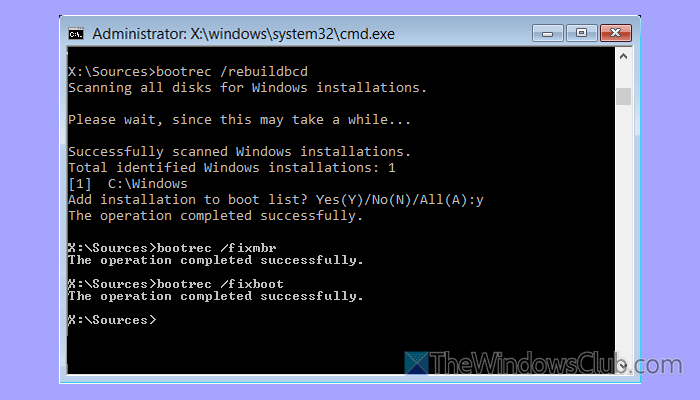
To rebuild the Bootloader or the Boot Configuration Data file, boot your computer into Advanced Recovery Mode and open the Advanced Options. Then, open the Command Prompt and enter this command:
bootrec /rebuildbcd
What it does is that it scans your system for corrupt or missing files and recreate them accordingly. However, at times, this command might not work fluently. In such moments, use this command:
bcdboot c:\windows /s c:
This command helps when your system partition is also corrupt.
7] Use SFC Scan
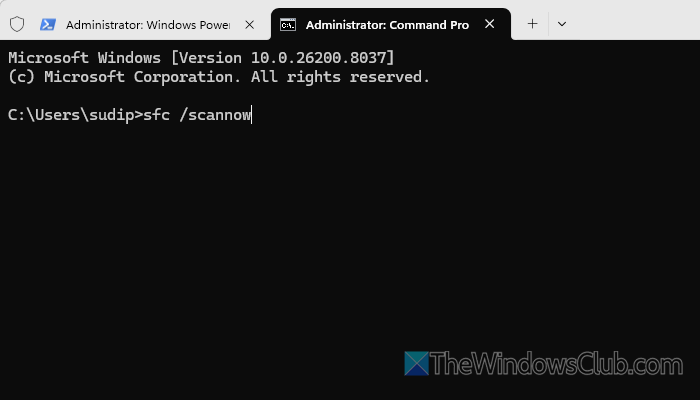
This error may arise when there are some issues with the system files. If so, you can use the System File Checker or SFC scan to get the job done. To run the System File Checker, open a Command Prompt window in Terminal with administrator privileges and enter this command:
sfc /scannow
It takes a few minutes to complete the process.
Operating system loader failed Signature verification Incompatible with Secure Boot
You can fix the “Operating system loader failed Signature verification incompatible with Secure Boot” error by adjusting your system’s boot settings. First, enter your BIOS/UEFI and temporarily disable Secure Boot, which often blocks unsigned or altered boot files. Next, run Startup Repair or use installation media to repair the boot configuration with commands like bootrec /fixboot and bootrec /rebuildbcd.. If the EFI partition is corrupted, recreate it using diskpart and bcdboot tools. You couldalso reset BIOS/UEFI to default settings and see if it helps.
Related: Operating System Loader has no signature, Incompatible with Secure Boot.
How to fix Error Loading in operating system?
To fix the operating system Loading error, you can use the Automatic Startup Repair option first. Then, you can use the CHKDSK tool and run the System File Checker. However, you can also use DISM to repair system images.
How do I fix Secure Boot failure?
To fix the secure boot failure problem in Windows 11, you must rebuild the BCD or Boot Configuration Data file. Before that, make sure that you have set an administrator password, enabled Fast Boot, etc. Finally, you can update the BIOS.
Read: Windows Boot Manager not showing in BIOS in Windows 11.