Hyper-V, or the Windows Hypervisor platform, allows you to create and run virtual machines. However, we noticed that our Mouse and Keyboard were not working in Hyper-V. We were unable to type anything, and moving the cursor physically was not recognized. In this post, we will discuss this issue and explore potential solutions to resolve it.

Why are my mouse and keyboard both not working?
Mouse and keyboard malfunctions in Hyper-V can occur due to several factors, mainly related to Integration Services, driver compatibility, VM configuration, and operating system support. These issues often present as input devices not being recognized, becoming unresponsive, or failing to integrate smoothly between the host and guest environments.
Fix Mouse and Keyboard not working in Hyper-V
If your mouse and keyboard are not working in Hyper-V, follow the solutions mentioned below.
- Install or Update Hyper-V Integration Services
- Check and Update Drivers
- Turn off Enhanced Session mode
- Configure VM Generation and Secure Boot Settings
- Disable Secure Boot
Let us talk about them in detail.
1] Install or Update Hyper-V Integration Services
Integration Services are a special set of drivers and services that act as a translator between your physical computer (the host) and the virtual machine (the guest). Without them installed inside the VM, the VM doesn’t know how to properly talk to your real mouse and keyboard. By installing or updating them, you provide the VM with the exact instructions it needs to understand your input, ensuring that your mouse and keyboard work smoothly. You can follow the steps outlined below to achieve the same result.
- Open Hyper-V Manager.
- Right-click on your virtual machine that has the issue and select Connect. This will open a window showing the VM’s screen.
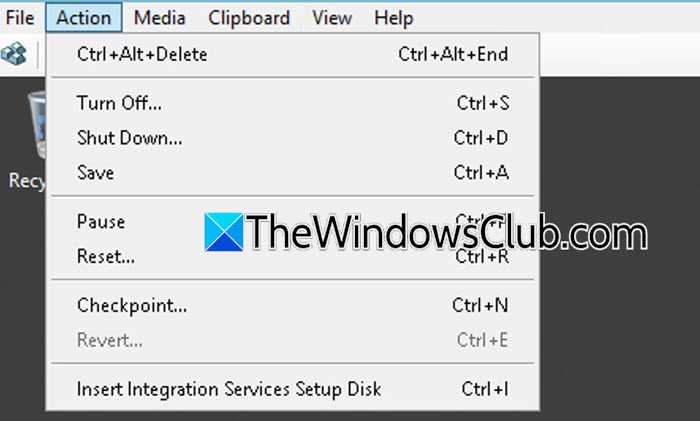
- In the menu bar at the top of this new window, click on Action and then select Insert Integration Services Setup Disk…. It will look like you’ve inserted a CD into the VM.
- Inside the virtual machine, an installation prompt should pop up automatically. If it does, simply follow the prompts to complete the installation.
- If the prompt doesn’t appear, open File Explorer inside the virtual machine, go to the DVD Drive (usually D:), and double-click on the setup.exe file to start the installation manually.
- Once the installation is finished, restart the virtual machine for the changes to take full effect. Your mouse and keyboard should now work.
Hopefully, now your issue will be resolved.
Read: Hyper-V Mouse input not captured in Windows 11
2] Check and Update Drivers
Your physical mouse and keyboard need a translator on your main PC (the host), while the virtual machine requires its own to interpret signals from the host. If either translator is missing, outdated, or incompatible, communication will fail. We need to make sure that both have the correct, up-to-date translators that allow for accurate interpretation of your mouse and keyboard inputs. You need to go ahead and update the driver on the local (host) machine first.
- You can download the Drivers from the manufacturer’s website.
- Download a Driver Updater Software and use it to keep your drivers up to date.
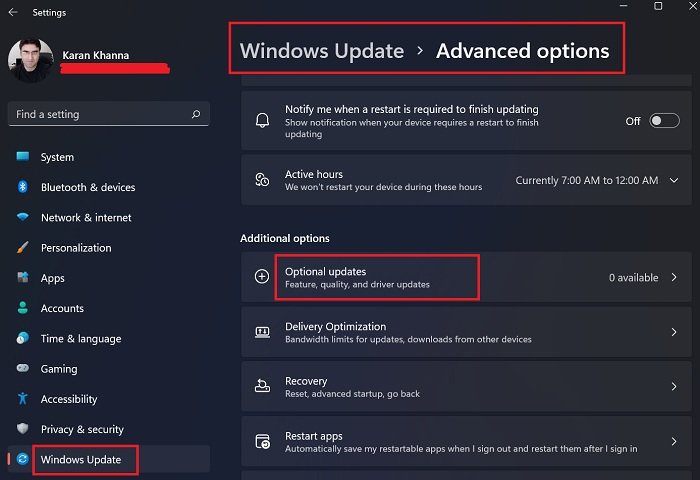
- Go to Drivers and Optional Updates in Windows Settings > Windows Updates.
Finally, check if the issue is resolved.
3] Turn off Enhanced Session mode
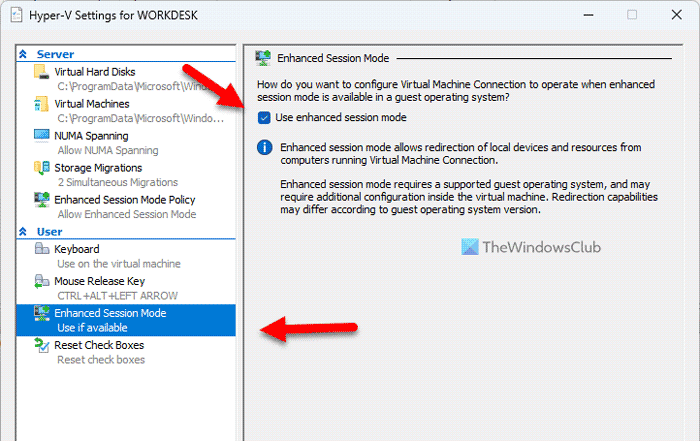
Enhanced Session Mode in Hyper-V is a feature that allows redirection of local devices (like USB drives, printers, and the clipboard) to the virtual machine and provides a richer, resizable connection experience.
To disable it, shut down the virtual machine, then go to Hyper-V Settings. Select the Enhanced Session Mode tab and uncheck Use enhanced session mode.
4] Configure VM Generation and Secure Boot Settings
In this solution, we will eliminate the need for special software drivers. Generation 1 virtual machines emulate older hardware, such as PS/2 input devices. Operating systems can recognize and support these devices without extra tools. Although this method is slower, it works well with different environments, including older systems and recovery modes. Generation 2 virtual machines utilize advanced hardware that enhances performance, but they require Hyper-V drivers in the guest operating system. If these drivers are missing or blocked, often because Secure Boot does not allow unsigned components, the virtual machine cannot receive input. Switching to Generation 1 or turning off Secure Boot changes the virtual hardware back to a type that the operating system can use easily, restoring input without extra requirements.
Follow the steps below to complete the same task.
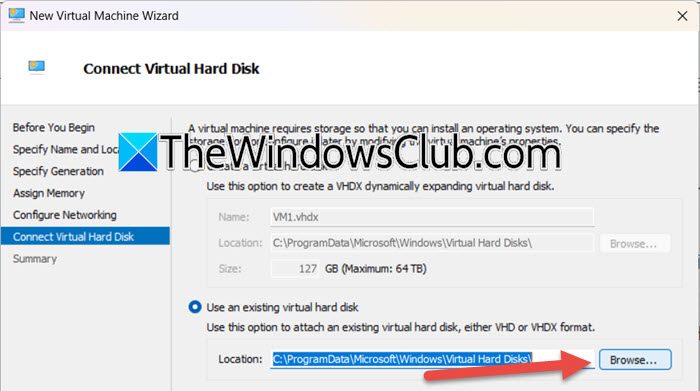
- We can not change the generation of an existing VM, so, create a new virtual machine. In Hyper-V Manager, click on New > Virtual Machine.
- Set Generation 1.
- Assign the hardware similar settings (memory, network connection) to the broken VM.
- When you get to the Connect Virtual Hard Disk step, select Use an existing virtual hard disk and browse to the .vhdx file used by your broken Generation 2 VM. (You can find its path in the broken VM’s Settings > SCSI Controller > Hard Drive).
- Finally, complete the process.
Start this new Generation 1 VM and connect to it. Your mouse and keyboard should now work immediately because the OS now recognizes standard, emulated hardware.
Read: Hyper-V VM Network slow
5] Disable Secure Boot
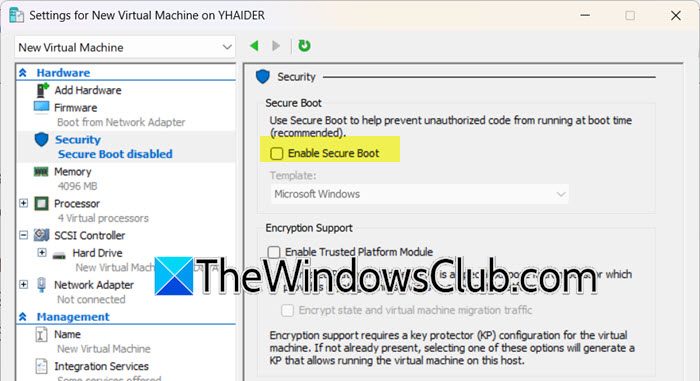
Disabling Secure Boot works because it allows the Hyper-V virtual drivers for the mouse and keyboard to load during the VM’s startup, even if they are not digitally signed with a certificate that the VM’s firmware recognizes. This is often a requirement for older operating systems or during a new OS installation, before the proper drivers are installed. By turning it off, you remove this security check, enabling the essential input drivers to function. Follow the steps mentioned below to disable Secure Boot.
- Right-click on your virtual machine and select Settings.
- Go to the Security tab and untick Enable Secure Boot.
- Click on Apply > Ok.
Finally, check if the issue is resolved.
Hopefully, with the help of these solutions, your issue will be resolved.
Read: How to Enable and Configure Hyper-V Remote Management
How do I release my mouse from Hyper-V?
To release your mouse from a Hyper-V virtual machine, simply press the Ctrl + Alt + Left Arrow keys simultaneously. This keyboard shortcut immediately frees your mouse cursor from the VM window and returns control to your host PC. For seamless mouse movement, ensure Hyper-V Integration Services are installed in the guest OS.
Also Read: Enable and configure Hyper-V Remote Management.