
You restored a Hyper-V virtual machine on Windows 11, but now it refuses to start. This frustrating issue can leave your workloads inaccessible. In this post, we are going to see what you can do if you restore a Hyper-V VM and it does not start.
Restored Hyper-V Virtual Machine not starting
After a restore operation, Hyper-V often cannot start the VM due to missing or mismatched virtual hardware references, broken file permissions, or corrupted configuration data. The restored VM might point to a virtual switch that no longer exists on your current host. File system permissions can also block the Hyper-V management service (VMMS) from accessing the restored virtual hard disk or configuration files. Additionally, if the restore included outdated checkpoints or a different VM generation, the boot process may fail.
If the restored Hyper-V VM is not starting, follow the solutions below.
- Re-import the virtual machine cleanly
- Verify and reattach the virtual switch
- Correct file permissions on the restored VM folder
- Disable Secure Boot or adjust VM generation settings
- Remove orphaned checkpoints or merge the disk
Let us discuss them in detail.
1] Re-import the virtual machine cleanly
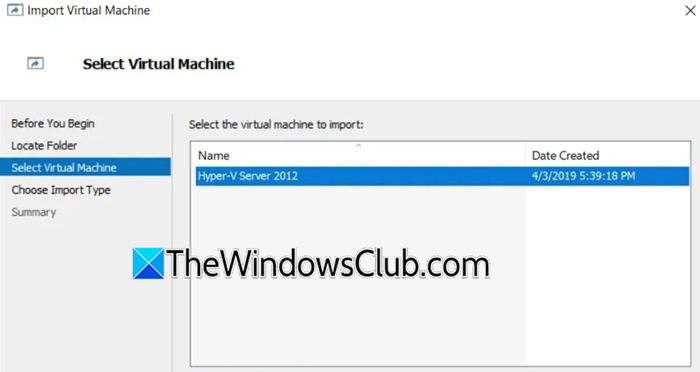
A direct restore sometimes leaves registry or GUID conflicts. Re-importing forces Hyper-V to rebuild the VM configuration from the restored folder, fixing path mismatches and stale references. You need to follow the steps mentioned below to do the same.
- Open Hyper-V Manager.
- Then, right-click on the non-starting VM and select Delete; choose Delete the virtual machine only to keep the VHDX and other files.
- Click Action > Import Virtual Machine.
- Browse to the folder where your restored VM files reside.
- Select Register the virtual machine in-place (or copy if needed) and complete the wizard.
Finally, check if the issue is resolved.
2] Verify and reattach the virtual switch
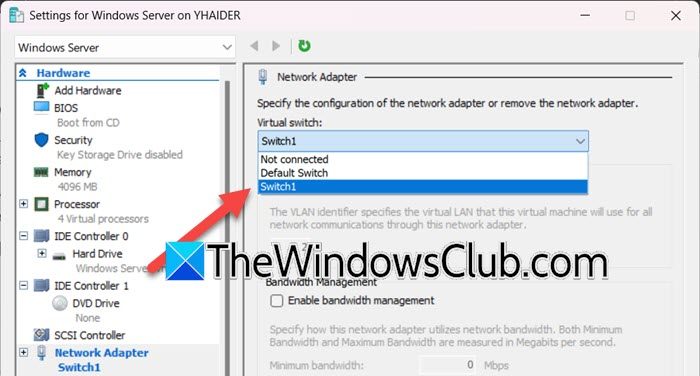
Restored VMs often retain the original virtual switch name. If you renamed or removed that switch, the VM cannot find its network adapter, causing a start failure. Therefore, reassigning an existing switch resolves this. Follow the steps below to verify and reattach the virtual switch.
- In Hyper-V Manager, right-click on the machine and select Settings.
- Then, go to the Network Adapter on the left.
- Under Virtual switch, choose a currently present and working switch (e.g., “Default Switch” or an external switch).
- Click OK and try starting the VM.
Finally, check if the issue is resolved.
3] Correct file permissions on the restored VM folder
Windows 11 may apply restrictive permissions during restore, especially if you copied files from another drive or backup. The Hyper-V management service needs at least Read & Execute permissions on all VM files (configuration, VHDX, checkpoints). You need to follow the steps mentioned below to do the same.
- Navigate to the folder containing your restore VM files.
- Right-click on the folder, click Properties > Security tab.
- Now, go to Edit > Add, enter SYSTEM (then click Check Names), and click on Full Control.
- Repeat for Administrators and CREATOR OWNER.
- Click OK and apply changes to all subfolders and files.
Finally, restart the Hyper-V Virtual Machine Management service from Services.msc, and then start the machine.
4] Disable Secure Boot or adjust VM generation settings
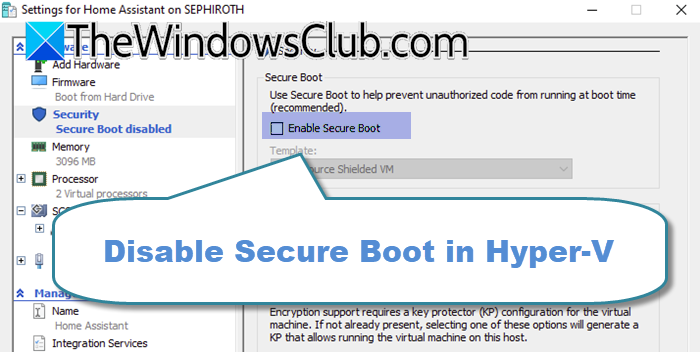
If you restored a Generation 2 VM that expects Secure Boot, but the boot loader is unsigned or missing, the VM will hang. Disabling Secure Boot temporarily allows the VM to boot, after which you can re‑enable it with proper certificates. To do the same, follow the steps mentioned below.
- In the VM Settings, go to the Security section.
- Uncheck Enable Secure Boot.
- Click OK and attempt to start the VM.
If the VM starts, you can later re‑enable Secure Boot and import the necessary Microsoft or UEFI certificates via Template > Microsoft UEFI Certificate Authority.
Read: Hyper-V Virtual Machine stuck in Saved State
5] Remove orphaned checkpoints or merge the disk
A restore might bring back a checkpoint (AVHDX) without its parent VHDX, or the checkpoint chain may be broken. Deleting all checkpoints forces Hyper-V to merge the disks into a single healthy VHDX. You need to follow the steps mentioned below to do the same.
- Go to Hyper-V Manager, right-click the VM, and select Checkpoints.
- If you see any checkpoints, select each one and click Delete Checkpoints to merge the changes back into the parent disk.
- Wait for the merge to complete.
- If the VM still fails, use Edit Disk from the Hyper-V Manager’s Action menu, point to the VHDX file, and choose Reconnect or Merge to fix the disk chain.
Finally, start your machine and see if that helps.
Hopefully, with these solutions, your issue will be resolved.
Read: Virtual machine could not be started because the hypervisor is not running
How do I fix Hyper-V restore errors?
To fix Hyper-V restore errors on Windows 11, first re‑import the VM using Register in‑place, which rebuilds broken GUID references. Second, grant Full Control to SYSTEM and Administrators on the VM folder. Third, remove all checkpoints via Hyper-V Manager to merge the disk chain. Finally, disable Secure Boot temporarily for Generation 2 VMs. Restart the Hyper-V Management service after each fix.
Read: Can’t Connect to Hyper-V Virtual Machine on Windows computer
How do I restore Hyper-V VM?
To restore a Hyper-V VM on Windows 11, first ensure Hyper-V is installed. Then, copy the VM folder (containing .vmcx, .vhdx files) from your backup to the new host. Open Hyper-V Manager, go to Action > Import Virtual Machine, and browse to the folder. Select Copy the virtual machine for a new unique ID, choose your destination folders, and click Finish. This clean import avoids configuration conflicts and reliably brings your VM back online.
Also Read: Hyper-V Virtual Machine stuck in Starting State.
