While creating a virtual machine, if you get Hyper-V encountered an error while configuring the network on New Virtual Machine error, here is how you can fix the issue in Windows 11. Whether you try to install Windows 11, Windows 10, or another version on the virtual machine, you can follow these solutions to fix it.
Why does Hyper-V encountered an error while configuring the network error appear?
If Hyper-V encounters an error while configuring the network, these could be the reasons:
- You have some issues with your network adapter.
- Your external network adapter is not supported by your system.
- You have enabled incorrect security settings for virtualization.
- Some Hyper-V services may not be running on your computer.
- You haven’t selected the Default Switch while configuring your virtual machine.
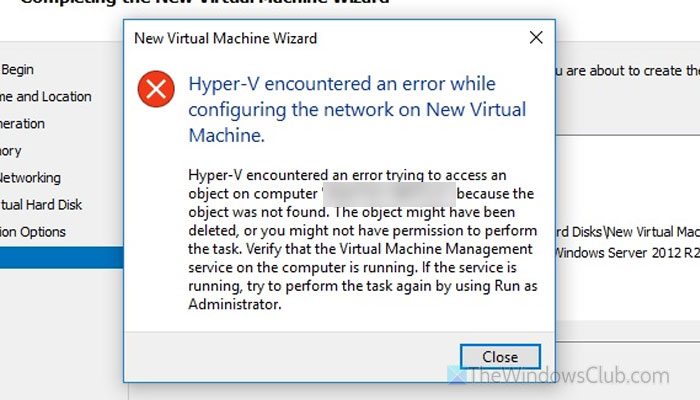
Hyper-V encountered an error while configuring the network on New Virtual Machine
If Hyper-V encountered an error while configuring the network on New Virtual Machine, follow these solutions:
- Verify your network adapter
- Remove additional network adapters
- Check User Rights Assignment
- Check Device Guard settings
- Select the correct switch
- Check Hyper-V services
- Create new virtual switch
To learn more about these solutions, continue reading.
1] Verify your network adapter
It is the first thing you must do since this problem mainly occurs when there are some problems with your network adapter. It doesn’t matter whether you use the built-in adapter or an external one; it is highly recommended to check that your network adapter is working.
- Open the Get Help app and search for network adapter not working. Click on the No button to start the troubleshooting process.
- Check for any error messages or codes in the network adapter settings. If yes, try to fix it first.
- If you use an external network adapter, try it with another computer to check whether it works properly.
- Uninstall the existing network adapter and reinstall the driver.
Read: Network Adapter missing or not showing in Windows 11
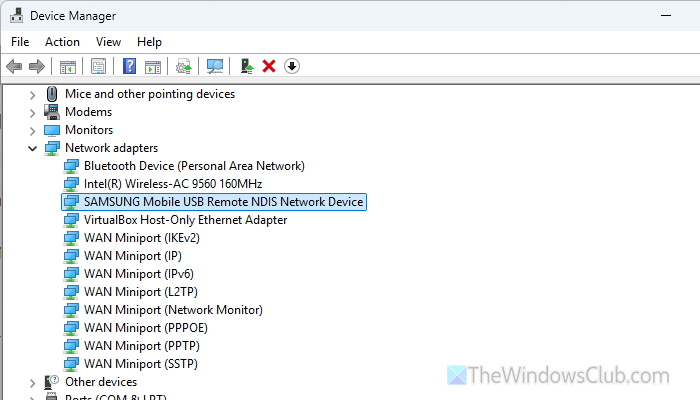
2] Remove additional network adapters

If you have used several external network adapters recently, your computer has stored information about them. As a result, you might encounter issues with a specific adapter. That is why it is suggested to remove all additional network adapters that are not in use or that you haven’t used in the past 1 week or so.
To do that, open Device Manager, expand the Network adapters section, right-click the network adapter you want to remove, and select Uninstall device.
Read: Windows could not find a driver for your Network Adapter

3] Check User Rights Assignment
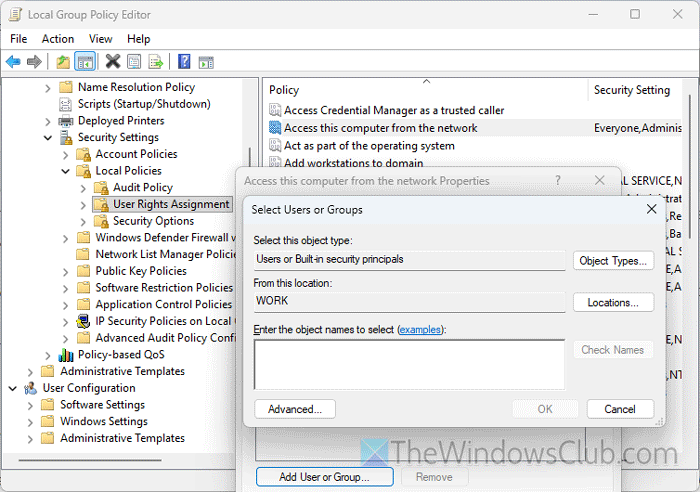
To check the User Rights Assignment settings, open the Local Group Policy Editor, and go to this path:
Computer Configuration > Windows Settings > Security Settings > Local Policies > User Rights Assignment
Double-click on the Access this computer from the network setting and check if your user account is listed or not. If not, click the Add User or Group button, enter your username, and click the OK button.
4] Check Device Guard settings
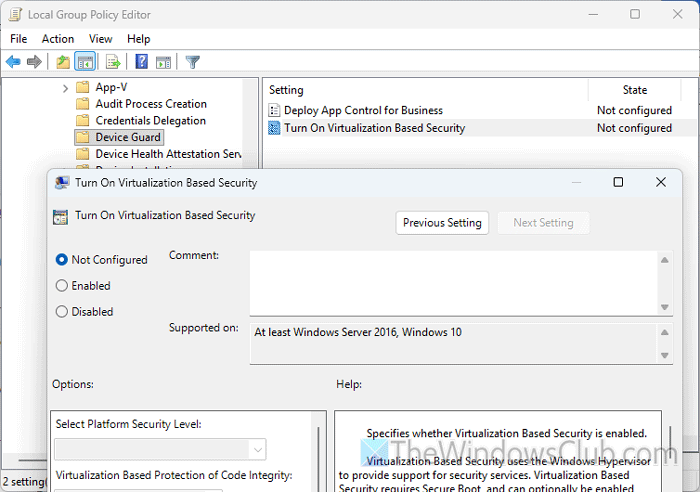
If you have enabled virtualization-based security through the Local Group Policy Editor and the settings do not match your current virtual machine, you will encounter issues with various features, including network adapters. That is why it is suggested to disable the custom settings and try again.
For that, do the following:
Open the Local Group Policy Editor on your computer and navigate to this path:
Computer Configuration > Administrative Templates > System > Device Guard
Double-click on the Turn On Virtualization Based Security setting and choose the Not Configured option.
Click the OK button to save the change. Once done, close all windows and restart your computer.
However, if you want to do the same via Registry Editor, open the Registry Editor and navigate to this path:
HKEY_LOCAL_MACHINE\SYSTEM\CurrentControlSet\Control\DeviceGuard\Scenarios
Create a new key named HypervisorEnforcedCodeIntegrity. Under this, create a new DWORD (32-bit) Value named Enabled. Double-click on it to set the Value data to 0.
Save the changes and restart your computer.
Alternatively, you can delete this REG_DWORD value as well.
Read: Virtualization-based Security not enabled
5] Select the correct switch
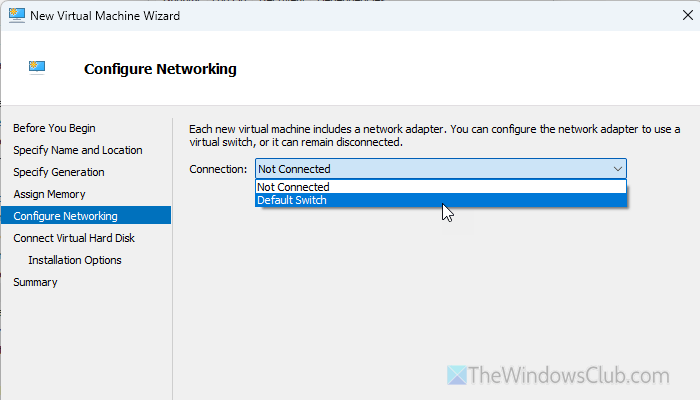
While creating a virtual machine, if you select the wrong virtual switch, you will certainly find this problem with network adapters. That said, you must take a second look at the Configure Networking tab. Here you can find an option called Connection. Expand this drop-down menu and choose the correct network switch.
In case you don’t know what to do, just select the Default Switch option. However, if you have created separate switches for different virtual machines, you must select the appropriate one from the list.
Read: Error applying Virtual Switch Properties changes in Hyper-V
6] Check Hyper-V services
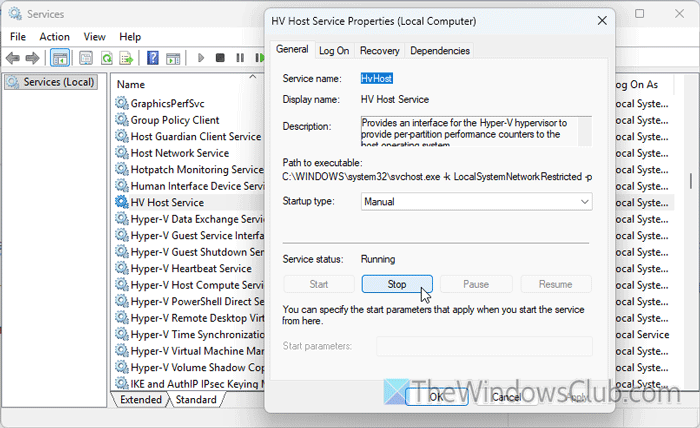
There are certain settings or services that must run in the background at all times. Otherwise, certain features won’t be working in Hyper-V.
Having said that, search for services in the Taskbar search box and click on the individual search result to open the Services panel. Next, find these services and check the status:
- Hyper-V Virtual Machine Management
- Hyper-V Host Computer Service
- HV Host Service
To check the status, double-click on it and find the Service status. If it is not running, click the Start button.
You can also restart the running service. For that, click the Stop button first. Then, expand the Startup type menu, select the Manual option, and click the Start button. Finally, click on the OK button to save the change.
Read: Hyper-V VM Network slow [Fix]
7] Create new virtual switch

To create a new virtual switch, open the Hyper-V Manager and click on the Virtual Switch Manager option. Then, choose the External option and click the Create Virtual Switch button.
Next, give it a name, description, etc. Then, expand the drop-down menu and choose the correct internet source. Finally, click the OK button to save the change.
After creating the new switch, you must follow the 5th solution to select it while creating a virtual machine.
Read: Network adapter not working after importing virtual machine
How to fix network configuration error in Hyper-V?
To fix the network configuration error in Hyper-V, you must first check the network adapter settings. Then check the aforementioned Group Policy settings and Hyper-V services, and finally create a new switch.
Why is my computer saying error configuring network?
If you get the “Error configuring network” error in Windows 11, it indicates there are issues with your network adapter. It could arise even when there are some problems with the network you are trying to connect to.
Read: Hyper-V The application encountered an error while attempting to change the state.