In this post, we’ll show you how to enable and configure Hyper-V Remote Management for headless Hyper-V hosts (Windows Server Core or Microsoft Hyper-V Server) from a Windows workstation, all in a non-domain workgroup environment. You’ll learn how to bypass Kerberos limitations and configure secure remote access using Hyper-V Manager’s GUI, even without Active Directory.

Enable and configure Hyper-V Remote Management
If you want to enable and configure Hyper-V Remote Management, you can follow the steps mentioned below.
- Meet the prerequisites
- Configure the Hyper-V Host
- Configure the management workstation
- Enable NTML Authentication
Let us talk about them in detail.
1] Meet the prerequisites
First of all, you need to make sure to meet the following prerequisites.
- First of all, make sure that the Hyper-V Host is Windows Server 2022/2019/2016 Core or Hyper-V Server.
- The management workstation would have to be Windows 11/10 Pro/Enterprise.
- Both devices should belong to the same workstation.
Once you’ve met the prerequisites, go ahead with the configuration.
2] Configure the Hyper-V Host
Now, let’s go ahead and configure Windows Server Core/Hyper-V Server in Workgroup. To do so, let’s go ahead and start the configuration. If you are on a Server core, run sconfig.cmd, and select Option 4 to enable Remote Management. On a GUI-based system, go to Server Manager > Local Server > Remote Management > Enable Remote management of this server.
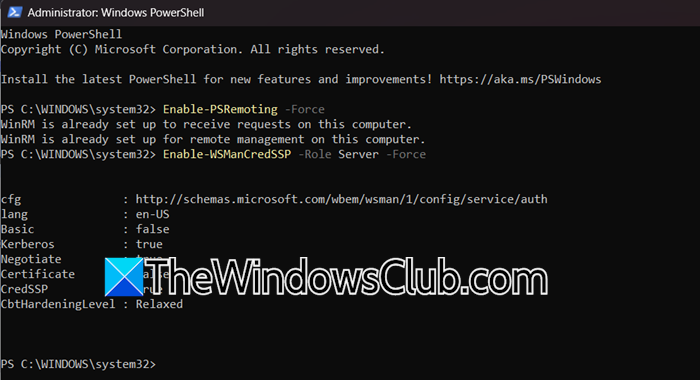
Now, open PowerShell and run the following commands.
# Enable PowerShell Remoting (opens TCP 5985)
Enable-PSRemoting -Force
# Allow this host to delegate client credentials
Enable-WSManCredSSP -Role Server -Force
Now, run the following command to ensure Windows Defender Firewall isn’t blocking WinRM traffic (TCP 5985).
Test-NetConnection -ComputerName localhost -Port 5985
Your result would be something like – TcpTestSucceeded : True.
However, if the result says “False”, run the following command.
Enable-NetFirewallRule -Name "WINRM-HTTP-In-TCP"
Finally, if you need to add an Admin User to the Hyper-V Administrators Group, to grant your workstation user permissions to manage Hyper-V remotely.
Add-LocalGroupMember -Group "Hyper-V Administrators" -Member "Administrator"
Replace Administrator with your management username. To confirm the membership, you need to run the following command.
Get-LocalGroupMember -Group "Hyper-V Administrators"
That’s how we can configure the Hyper-V Host.
3] Configure the management workstation
On the workstation, you first need to enable the Hyper-V Management Tool. For that, open Run, type “optionalfeatures.exe”, and click Ok. Now, expand Hyper-V, tick Hyper-V Management Tools, and click Ok.
Or, you can run the following command in PowerShell.
Enable-WindowsOptionalFeature -Online -FeatureName Microsoft-Hyper-V-Management-Clients
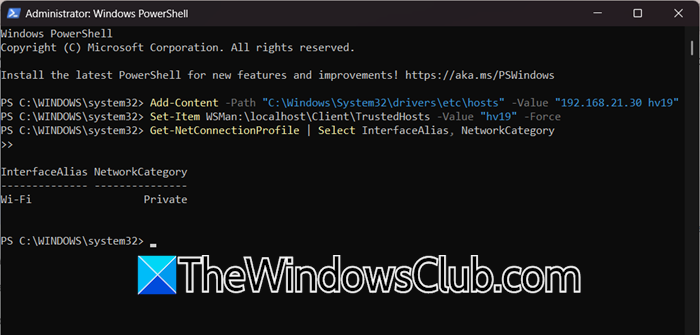
Now, you need to map the Hyper-V host IP to a hostname using the following command.
Add-Content -Path "C:\Windows\System32\drivers\etc\hosts" -Value "192.168.21.30 hv19"
Note: Replace 192.168.21.30 with your Hyper-V host IP and hv19 with its hostname.
Run the following command to configure trusted hosts.
Set-Item WSMan:\localhost\Client\TrustedHosts -Value "hv19" -Force
Now, open the Command Prompt, run the following command to store Hyper-V host credentials.
cmdkey /add:hv19 /user:Administrator /pass:HypVpaSS22
Note: Replace credentials as needed.
Now, run the following command to check the current profile.
Get-NetConnectionProfile | Select InterfaceAlias, NetworkCategory
We need to make sure that it is Private; if it’s not, run the following command.
Set-NetConnectionProfile -InterfaceAlias "EthernetLAN2" -NetworkCategory Private
Finally, run the following command to enable CredSSP on the client.
Enable-WSManCredSSP -Role Client -DelegateComputer "hv19" -Force
4] Enable NTLM Authentication
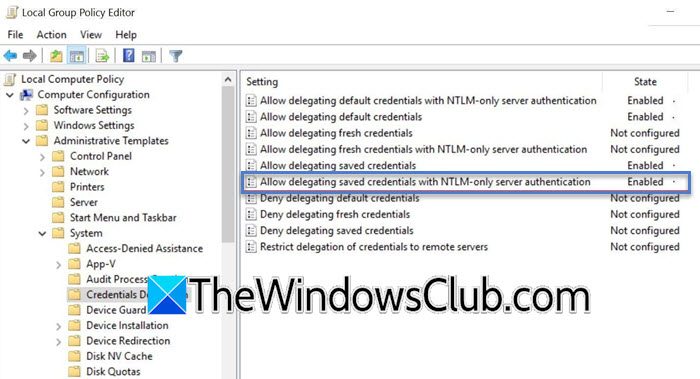
NTLM Authentication via GPO refers to using Group Policy Objects to manage, audit, or restrict the use of the NT LAN Manager (NTLM) protocol across a Windows domain. You can follow the steps mentioned below to enable NTLM Authentication.
- Open Group Policy Editor.
- Now, go to the following location.
Computer Configuration > Administrative Templates > System > Credentials Delegation
- Look for Allow Delegating Fresh Credentials with NTLM-only Server Authentication and set it to Enabled.
- Click Show and add – wsman/hv19 and wsman/hv19.local.
- To apply policies, run gpupdate /force.
Now, move on to the next and final step.
4] Connect to Hyper-V Host
That’s how you can set up the Hyper-V Host in your workspace. Once done, you need to go ahead and try connecting to the Hyper-V Host. For that, open Run (Win + R), type virtmgmt.msc, and click Ok.
Right-click Hyper-V Manager in the left pane and connect to the Server. You need to enter the hostname you configured (e.g., hv19).
That’s it!
Read: How to install Hyper-V in Windows Server
How do I enable Hyper-V remote management?
To enable Hyper-V remote management, you can follow the aforementioned steps. Just make sure that the Hyper-V Host is Windows Server 2022/2019/2016 Core or Hyper-V Server, and devices belong to the same network workstation. Once done, just follow the guide, and you will be good to go.
Read: How to install Hyper-V on Windows 11 Home
How to configure Hyper-V manager?
Hyper-V Manager is a built-in tool to access virtual machines on Windows. To enable it, you can go to Run (Win + R), type optionalfeatures.exe, and click Ok. Then, expand Hyper-V and tick Hyper-V Manager. Finally, reboot your computer and access Hyper-V Manager from the Start Menu.
Also Read: Configure Hyper-V Port Mirroring.