The default mouse pointer in Windows 11/10 operating system is white with a black border – like in the earlier versions of Windows. While most are cool with it, some may find it difficult to notice – especially those who may be differently-abled. Sure you can always change the Windows Cursor thickness & Blinking Rate to make it more visible or you can press CTRL key to locate the mouse pointer. However, Windows 11/10 allows you to easily change the Mouse Pointer color to red, solid black, or any other color you prefer.
Change Mouse Pointer color in Windows 11

For Windows 11 users, here are the steps to change mouse pointer color using the Settings app:
- Right-click on the Start button
- Click on the Settings option
- In the Settings app, click on the Accessibility category
- Access the Mouse pointer and touch Settings page from the right section
- Expand Mouse pointer style section
- You will see Inverted, Black, White (or default), and Custom color pointer styles. Click on the Custom pointer style
- It will show 7 different Recommended colors which are Turquoise, Gold, Lime, Purple, Yellow, Green, and Pink. Click on any option to change your mouse pointer color
- If you don’t want to use the recommended colors, then you can also set a custom color of your choice for your mouse pointer. For this, click on Choose another color icon available just below the Recommended colors
- A Choose another color box will open showing you a color palette. Select any color from that color palette. In addition to that, you can also set RGB value, Hue level, or simply add a color code in the given field to select your favorite color
- After that, click on the Done button.
Change Mouse Pointer color in Windows 10
To make your mouse pointer sold black, click on the Start Button to open Start.
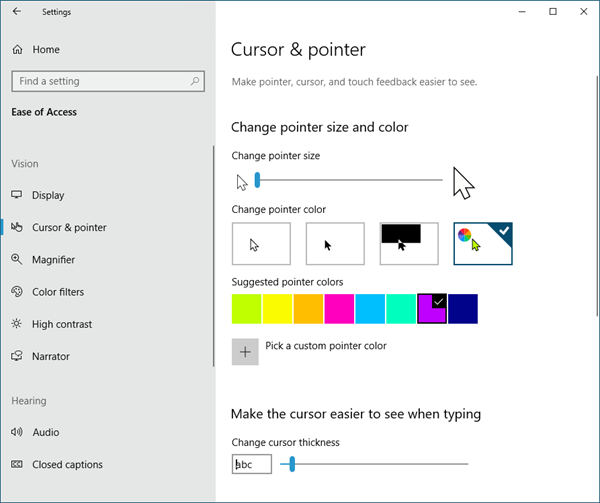
Next, click open Settings > Ease of Access > Vision > Cursor & pointer.
You will see the settings that let you:
- Change the Pointer and Cursor size
- Change the cursor thickness and
- Change the pointer colors.
You can change the pointer and cursor size. You can also change the Pointer color.
The first one is the default, and it is white inside, as mentioned.
Choose the second option and it becomes solid black.
If you select the 3rd option under Pointer color, when you move your pointer over a black background, that part of the cursor or pointer will automatically become white.
The fourth option allows you to completely change the color of the pointer.
Try each of them and see which suits you the best and then set it.
You can also adjust Text Cursor Indicator size, color & thickness or change Mouse Cursor size, color & scheme for better visibility.
This will improve the visibility of your mouse pointer and cursor.
If you liked this tip, I am sure you will enjoy reading this Computer Mouse Tips and Tricks post.
How do I change the cursor color in Windows 11?
If you want to customize Mouse Buttons, Pointer, and Cursor, the Settings app lets you do that. Both operating systems have simple steps for changing the cursor color. In Windows 10, you can do that using the Cursor & pointer page. And, in Windows 11, you can change cursor color using the Mouse pointer and touch Settings page. The post above covers the steps to change cursor color in Windows 11 and Windows 10 separately that will be helpful to you.
Apart from changing the cursor color, the Settings app in Windows 11/10 also lets you set other options related to the mouse pointer and text cursor. For example, you can set mouse pointer speed, change cursor size and scheme, set cursor indicator size, mouse pointer size, cursor thickness, and more.
Can you change the mouse pointer on Windows?
Yes, definitely. Both Windows 11 and Windows 10 have this native feature to change the mouse pointer. For this, you need to:
- Open Mouse Properties box
- Go to the Pointers tab.
In that tab, you will see pre-added mouse pointers like Help Select, Horizontal Resize, Person Select, Link Select, Handwriting, and more. If you want, you can also add *.cur files to the required place or folder, and use custom mouse pointers on your Windows 11/10 computer.