
In this post, we will show you how to use the COPILOT feature in Excel on a Windows 11/10 PC. Microsoft has introduced a new COPILOT function that brings AI directly into the Excel worksheet. Unlike the Copilot chat experience that works through a sidebar, this function is built directly into Excel’s calculation engine. It allows you to enter natural language prompts directly into cells to generate outputs such as summaries, classifications, text content, and more. Designed especially for professionals, Microsoft 365 Copilot has caused quite a stir since its release. Whether it’s the AI chatbots like ChatGPT or Microsoft Copilot, the entire purpose of these tools is to boost your overall productivity.
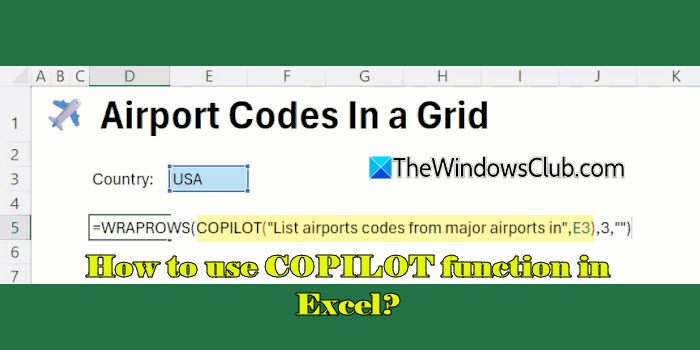
Copilot in Excel is not available to everyone by default. It requires a qualifying Microsoft 365 subscription. If you’re on Excel for Microsoft 365 (desktop, Mac, iPad, or web), you may see Copilot, but only if your license includes Copilot access (such as Microsoft 365 Premium, Copilot add-on, or certain enterprise/business subscriptions).
What is Microsoft Copilot?
Microsoft 365 Copilot is designed to help you with your mundane tasks, thus saving your overall work time. It comes built-in with the Microsoft 365 Office apps and more of their other products like email. This next-gen AI chatbot was created by OpenAI and is based on a multi-modal Large Language Model (LLM). It’s especially useful for organizations looking to enhance productivity.
However, at this moment, Microsoft Copilot is not available for general Windows users. That said, you can enable its preview version in MS Word and Excel. We have created a short guide for beginners on how to enable and use Copilot in Excel.
How to use COPILOT in Excel?
To use the COPILOT function in Excel on a Windows 11/10 PC, follow these steps:
- Open Excel and choose the output cell
- Enter the COPILOT formula
- Review and refine the output
Let us see this in detail.
1] Open Excel and choose the output cell
Open your Excel workbook and click into the cell where you want the AI-generated output to appear.
2] Enter the COPILOT formula
To start using the feature, create a new workbook or open the current one you have been working on. Click on the Home tab in the toolbar, press the Copilot button, and a sidebar will open on the right side of the screen.
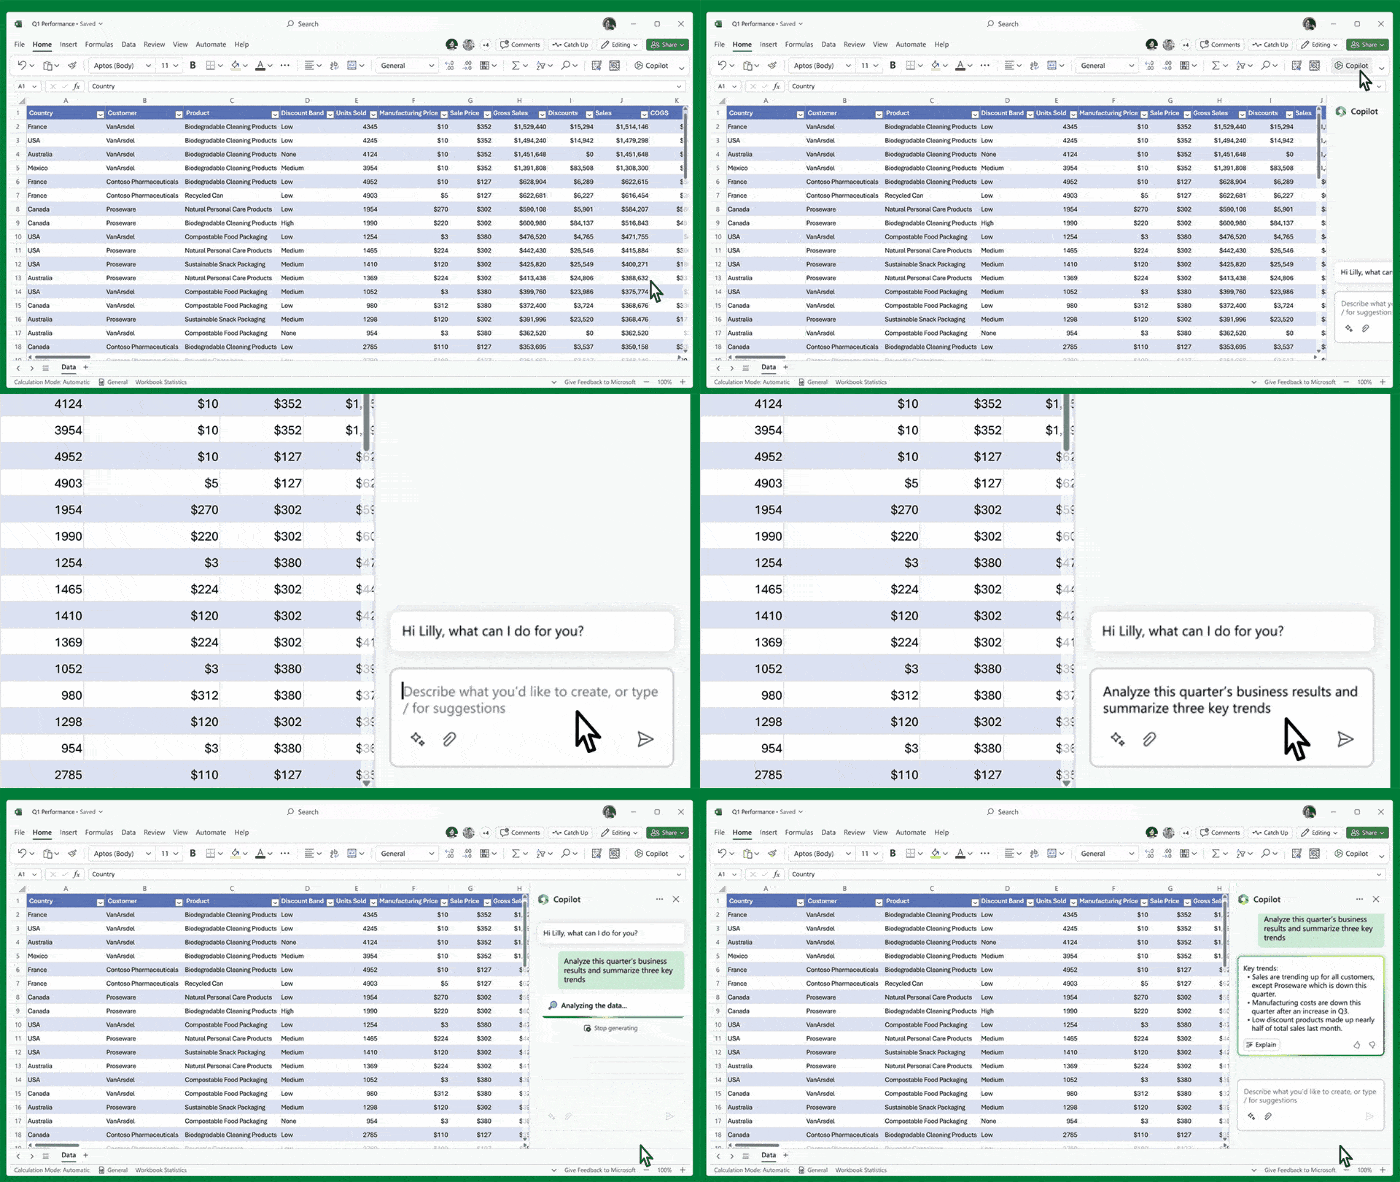
Here, you will see suggestions and insights about your current data. Moreover, you can do a lot more using natural language queries, financial modeling & scenario analysis, create intense visualizations, and streamline the financial process. Here’s how:
- You can ask a question about your data set or type in a cell, and Copilot will recommend formulas and functions based on the current data on your worksheet.
- Use prompts like “Create a financial model on how a shift in the growth rate for [variable] would affect my gross margin.“
- Generate visuals to present your results using prompts like “Project the impact of [a variable change] and generate a chart to help visualize“.
- Ask Copilot to assist you with certain processes and request recommendations. This will help you make your daily financial tasks like budgeting, forecasting, etc., more efficient.
Type in the formula and press Enter. The COPILOT function will call its AI model directly from the cell formula and return a response in the grid (the model—currently gpt-4.1-mini — is hosted on Microsoft’s Azure cloud platform).
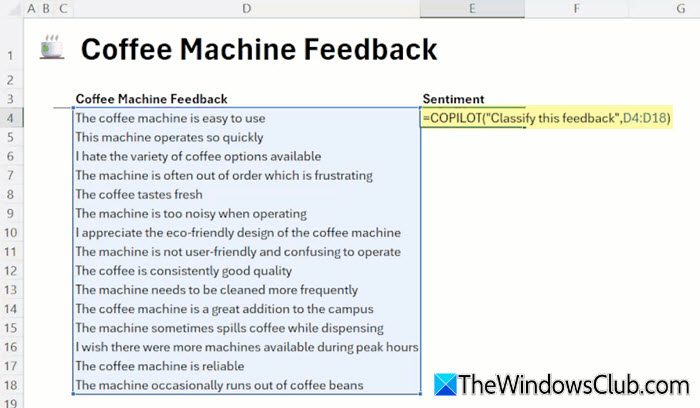
The COPILOT function has the following syntax:
=COPILOT(prompt_part1, [context1], [prompt_part2], [context2], ...)
where,
- Prompt_part is the task or question you give to the AI in plain language. Each prompt_part (+ context) is merged in sequence to build the full instruction.
- Context (optional) is the actual data in your worksheet that you want the AI to work on. It can be a single cell or a range of cells. If you don’t provide context, the AI responds to the prompt alone.
For example, if you enter the following formula:
=COPILOT("Summarize the feedback from these comments", C2:C10)
Excel will generate a short summary based on the text in cells C2 to C10.
3] Review and refine the output
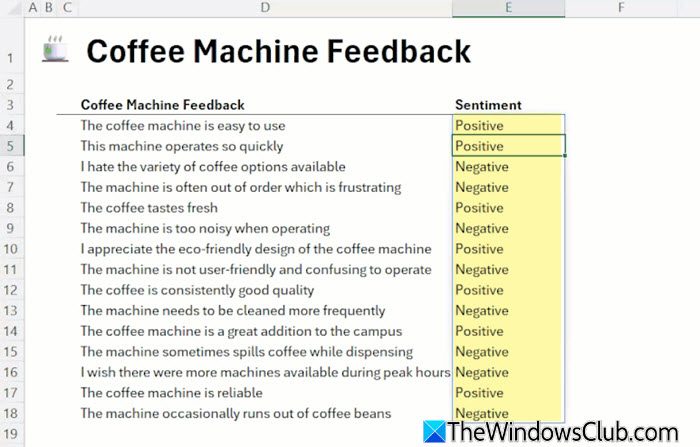
Review the results you receive. The AI’s answer might need small edits to fit your exact needs.
Also, based on your prompt and the data you reference, the function may sometimes generate multiple results that automatically spill into the surrounding cells in your worksheet.
When to use and when not to use the COPILOT function
Microsoft recommends using the COPILOT function selectively. Here are the scenarios where it works best, and where it should be avoided:
When to use the COPILOT function
- Summarizing or condensing text
- Generating sample or placeholder data
- Classifying or tagging content
- Brainstorming and creating simple text
When not to use the COPILOT function
- Performing numerical calculations
- Lookups based on data in your workbook
- Tasks with legal, compliance, or regulatory impact
- Relying on recent or real-time data
- Any task that requires accuracy
Note:
- The function requires an active internet connection to access the AI model.
- It does not work in workbooks labeled as ‘Confidential’ or ‘Highly Confidential’.
- It dynamically calls the AI model and updates in real time based on changes in your referenced data. This ensures that the AI’s output stays aligned with your dataset.
- Your data remains private and is only processed temporarily to generate the output you requested. Microsoft does not collect or reuse your data to train or improve its AI models.
- You can calculate up to 100 COPILOT functions every 10 minutes.
I hope you find this useful.
Read: How to use Copilot in Outlook
BONUS TIP:
You can disable or enable Microsoft 365 Copilot in Excel using the Registry as follows.
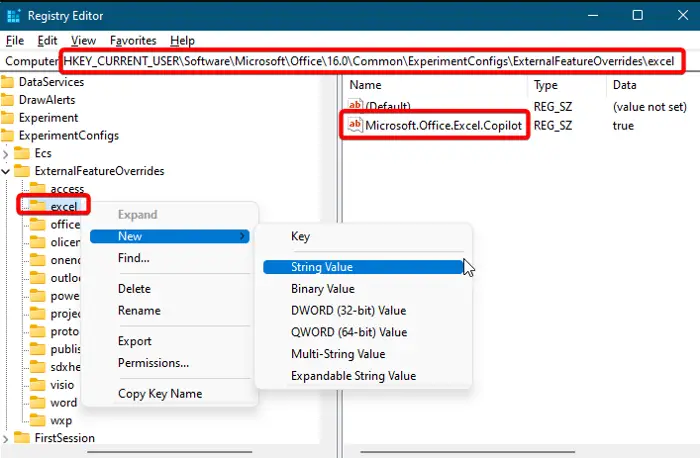
Open the Registry Editor, and navigate to the below path:
HKEY_CURRENT_USER\Software\Microsoft\Office\16.0\Common\ExperimentConfigs\ExternalFeatureOverrides\excel
Next, right-click on the Excel key, select New, and click on String Value. Now, rename the new String Value as Microsoft.Office.Excel.Copilot. Double-click on it, set the value as true, and press OK to save the changes. Once done, exit the Registry Editor and restart your PC for the changes to be effective.
To undo the changes, delete Microsoft.Office.Excel.Copilot string that you created under the Excel key.
Read: 10 Copilot prompts for Excel.
How can I use Copilot in Excel?
You can use Copilot in Excel in two different ways. First, through the built-in Copilot feature, which opens in a side panel and provides a chatbot-like experience where you type questions in natural language and get instant answers. Second, through the COPILOT function, which works like any other Excel function, except that it lets you pass instructions and data as arguments. The AI processes these instructions and data to generate results.
Read: How to use Copilot in PowerPoint
How do I add Copilot to Microsoft Office?
Copilot is the AI chatbot service that will come embedded with all Microsoft apps and its other products. So, to enable the service, you need to click on the Copilot button in the app. You can then start using it by typing in commands, like insert a table, please group the sales records by location, etc.
Read: How to use Copilot in Word
Is Microsoft Copilot free?
Microsoft will promote its chat-based AI assistant, the Copilot, as a licensed add-on subscription which will cost $30 per user per month. According to reports, it will be a Premium subscription that you should use along with Microsoft 365 E3 or E5 licenses which cost 36$ and 57$.
Read: How to use Copilot in Windows 11.
Why don’t I see Copilot in Excel?
If you don’t see Copilot in Excel on your Windows PC, you might not have the appropriate license for your Microsoft 365 subscription, or your organization’s admin hasn’t enabled it yet. Also, it may be possible that you’re not on the latest version of Excel where Copilot is supported, or you have not enabled Connected Experiences in your account settings.
Read Next: Top 5 Best AI tools for Excel.
