
Google Chrome’s algorithm kills background processes on some inactive tabs to improve RAM management. The more tabs running in the background, the more strain it will put on your RAM. It is a cool concept, but sometimes, it can be annoying. Therefore, in this article, we will show you how to disable Sleeping Tabs and stop Chrome from reloading tabs automatically, using the Memory Saver feature.
How to disable Sleeping Tabs in Chrome on Windows 11
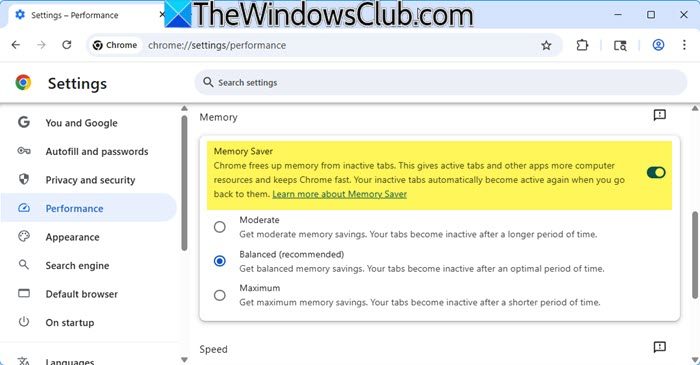
To disable Sleeping Tabs in Chrome browser on Windows 11/10:
- Click on the 3-dots in the top-right corner of Chrome
- Select Settings
- On the left side, click on Performance
- On the right side, locate Memory Saver and turn it OFF
- This will turn off Sleeping Tabs in Chrome
- Restart Chrome.
You can also use Chrome extensions to disable Sleeping Tabs and stop Chrome from refreshing Tabs.
Use The Great Suspender extension
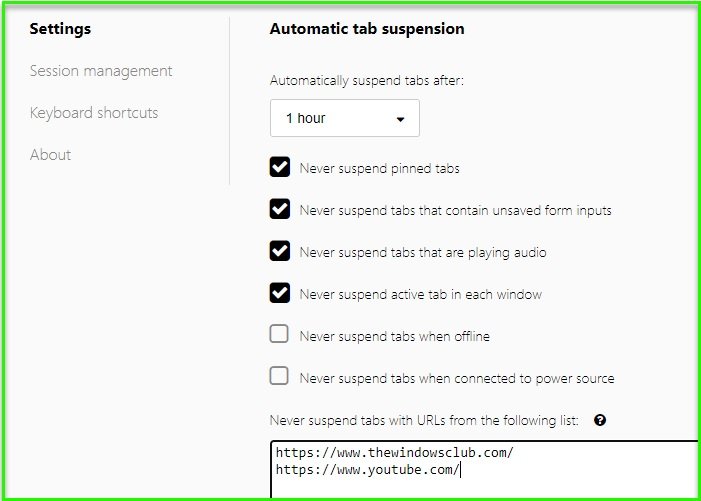
The Great Suspender is one of the best extensions for someone who wants to control their Chrome browser. It allows you to control the sleeping tabs; you can set a time after which your tabs will be automatically suspended. You can prevent some tabs from suspending. To do that, just type the URL of the tabs you don’t want Chrome to suspend in the box saying “Never suspend tabs with URLs from the following list”.
It is one of the best and simplest ways to disable Sleeping Tabs and stop Chrome from refreshing Tabs. So, if you want to stop Chrome from suspending a tab, download “The Great Suspender” a Chrome extension from here.
Read Next: Reduce Chrome memory usage & make it use less RAM.
Use Disable automatic tab discarding extension
If you don’t want the level of control that something like “The Great Suspender” gives and just want a simple solution that will forbid Chrome from suspending all your current tabs then go for the “Disable automatic tab discarding” extension. It is a simple tool that requires no configuration and starts working the moment you add it to your browser.
However, it is not a foolproof solution and if a tab running in the background is taking a toll on your RAM, it will be suspended. But if you want the simplest method to disable Sleeping Tabs and stop Chrome from refreshing Tabs try Disable automatic tab discarding from here.
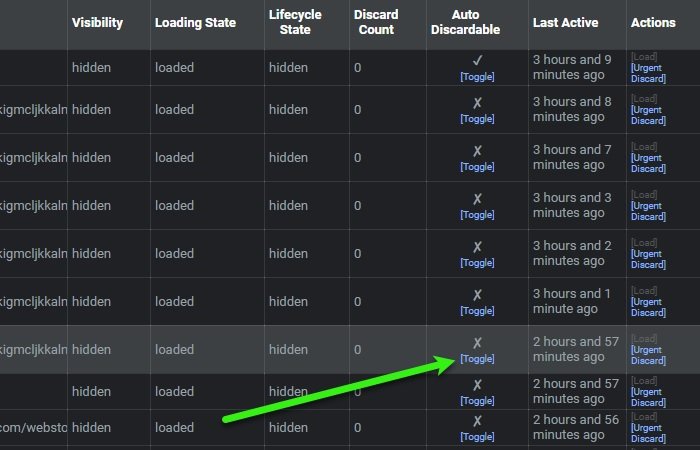
If you still want to suspend a tab, go to the following location.
chrome://discards/
There, you can use the Toggle for “Auto Discardable” to disable that running tab. You will still be able to have control over tabs.
How to turn on and configure Sleeping Tabs in Chrome
To turn Sleeping Tabs in Chrome browser on Windows 11/10, we have to use the Memory Saver feature:
- Click on the 3-dots in the top-right corner of Chrome
- Select Settings
- On the left side, click on Performance
- On the right side, locate Memory Saver and turn it ON
- This will enable Sleeping Tabs in Chrome.
- Now select the Memory Saver tab deactivation level that you want:
- Moderate: Your tabs become inactive after a longer period of time.
- Balanced (recommended): Get balanced memory savings. Your tabs become inactive after an optimal period.
- Maximum: Your tabs become inactive after a shorter period of time.
- Restart Chrome.
How to stop Chrome from reloading tabs automatically
To stop Chrome from reloading tabs automatically, we have to use the Memory Saver feature:
- Open Chrome Settings
- On the left side, click on Performance
- On the right side, locate Memory Saver and turn it OFF
- This will stop Chrome from reloading tabs automatically
- Restart Chrome.
I hope the post helps you.
Related reads:
- Enable or Disable Sleeping Tabs and automatically suspend tabs in Microsoft Edge
- How to enable or disable Tab Snoozing in the Opera
- Enable or Disable Tab Sleep feature in Firefox browser.
