This article lists some solutions that may help you fix the Printer Configuration problem 0x80040003. The printer configuration errors’ main cause is the printer driver’s malfunction. A driver is software that helps an operating system recognize the type of device connected to the machine. When the driver malfunctions, the communication between the operating system and the connected device breaks, causing the user to be unable to use the hardware device. The complete error message that Windows displays is given below
Your printer has experienced an unexpected configuration problem, 0x80004003

Fix 0x80040003, Unexpected Printer Configuration problem
If you are unable to use your printer due to the unexpected printer configuration problem 0x80040003, the solutions provided below may help you fix it.
- Run Printer Troubleshooter
- Run HP Print and Scan Doctor
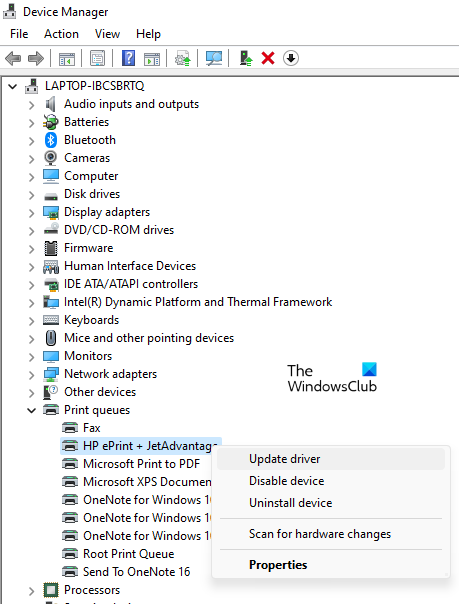
- Update your printer driver
- Uninstall and reinstall your printer driver
- Delete and add the printer again
- Clear Print Spooler
Let’s see all these solutions in detail.
1] Run Printer Troubleshooter

First, you should run Windows 11/10 built-in troubleshooter. Microsoft has provided Printer Troubleshooter to resolve the errors that occur while using a printer. After running the Printer Troubleshooter check if the problem persists.
2] Run HP Print and Scan Doctor
If you are getting the printer configuration problem 0x80040003 with your HP printer, in addition to the Windows built-in Printer Troubleshooter, we suggest you run HP Print and Scan Doctor. You can download it from the official website of HP. Install HP Print and Scan Doctor and run it. If it finds any problem with your printer, it will give you the instructions to fix it. Follow the instructions to get the issue resolved.
3] Update your printer driver
The printer driver installed on your system might have malfunctioned or is outdated, so you are facing this problem. One way to fix the outdated or corrupted printer drivers is to update them. When it comes to updating a driver, the following options are available:

- Windows Optional Updates: When a manufacturer releases updates for a particular driver, you will see it in Windows Optional Updates. If Windows Optional Updates is showing you the pending updates for your printer driver, you can install it from there.
- Driver Updater Software: You can also use driver updater software to update your printer driver.
- Device Manager: The Device Manager lets you update, disable, roll back, and uninstall the device drivers. You can also update your printer driver from there.
4] Uninstall and reinstall your printer driver
If updating the printer driver by using the methods described in the previous fix did not resolve the issue, download the latest version of your printer driver from the official website of your printer manufacturer and install it. The steps are as follows:

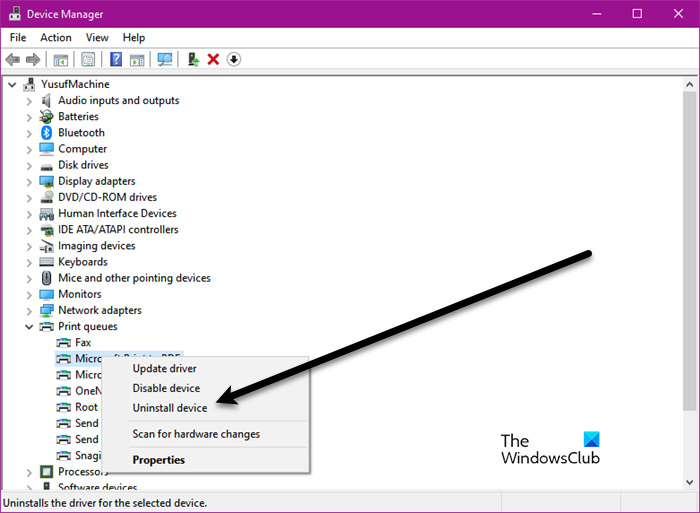
- Press the Win + X keys and select Device Manager.
- When the Device Manager opens up, expand the Print queues node and right-click on your printer driver.
- Select Uninstall device.
- After uninstalling the printer driver, visit the official website of your printer manufacturer and download the latest printer driver from there.
- After downloading the printer driver, extract it (if required). Now, right-click on it and select Run as administrator.
- Click Yes in the UAC prompt and follow the instructions to install the printer driver.
5] Delete and add the printer again
If the issue still persists, completely delete or uninstall the printer from your Windows 11/10 device and add the printer again. Follow the steps below:
- Disconnect your printer from your Windows device and turn the printer off.
- Completely delete the printer from your Windows computer.
- Restart your computer.
- Turn on your printer and connect it to your computer.
- Add your printer to your computer.
It should fix the problem. If not, try the next solution.
6] Clear Print Spooler
Print Spooler is a Windows Service that manages the print jobs sent to a printer from a Windows computer. In some cases, clearing the Print Spooler data fixes the printing issues. Follow the steps to clear the Print Spooler.
- Open the Windows Services Manager.
- Scroll down and locate the Print Spooler service.
- Right-click on it and select Stop.
- After stopping the Print Spooler service, open the Run command box and type
%windir%. Click OK. - Now, open the System32 folder and then open the Spool folder.
- Open the PRINTERS folder and delete all the files inside it. Do not delete the PRINTERS folder.
- Return to the Windows Services Manager and right-click on the Print Spooler service.
- Click Start.
This should fix the problem.
Read: Fix Printer Error 0x00000077, Operation could not be completed
How do I fix the Printer configuration problem?
When you experience Your printer has experienced an unexpected configuration problem, first, you should run the built-in Printer Troubleshooter. If it does not fix the problem, update your printer driver from the Device Manager or you can try downloading the printer driver from the manufacturer’s website and installing it manually.
How do I fix Printer configuration error 0x8007007e?
The printer configuration error 0x8007007e occurs when the printconfig.dll file is not available at the following location:
C:\Windows\System32\spool\drivers\x64\3
To fix this problem, go to the following location and search for the printconfig.dll file.

C:\Windows\System32\DriverStore\FileRepository
Now, copy the printconfig.dll file and paste it to the location from where it is missing (we have mentioned the complete path above).
I hope this helps.
Related posts: Fix Printer Configuration problem: 0x8007007 | 0x800706b5.
Leave a Reply