The Universal Print failed to get the auth header with 0x8086000c error is a common issue faced by users while using Microsoft’s Universal Print service. However, there are various effective solutions to overcome this obstacle. In this article, we are going to see what you can do if Universal Print fails to get auth header with the 0x8086000c error.
Failed to get auth header with 0x8086000c

Universal Print Failed to get auth header with 0x8086000c error
When trying to set up or use Universal Printer, you may see Event ID 1, Failed to get auth header with 0x8086000c error in Event Viewer of Windows 11/10. Execute the solutions mentioned below to resolve the issue.
- Disable the service
- Replace the faulty McpManagementService.dll file
- Verify the Azure AD account
- Reset Universal Print Connector
- Clear Cached Credentials
Let’s get started with the troubleshooting guide.
1] Restart the service
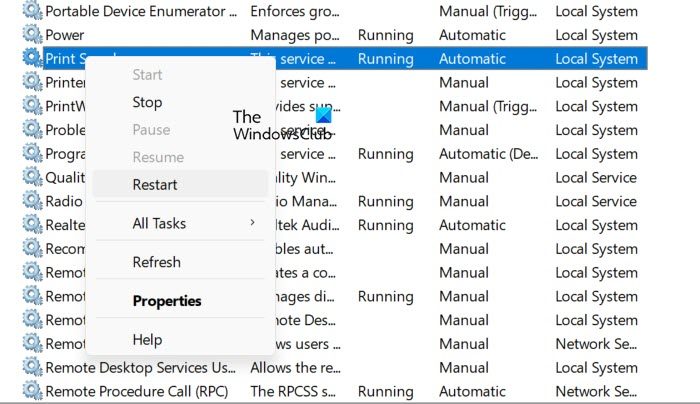
This issue can be nothing but a glitch that can be resolved by restarting the associated service. However, if you don’t need to use Universal Printer, you can even disable it completely. We will go over both the methods here.
- Click Win + R to open the Run dialog box, type services. msc, and hit the Enter button to open Services Manager.
- First, look for Print Spooler, right-click on it, and select Restart.
- If you want to disable it, look for the Universal Print, Print Connector Service or the McpManagement service, and right-click on it.
- Click on Properties, set Startup Type to Disabled, and select the Stop button.
Finally, check if the issue is resolved.
2] Replace the faulty McpManagementService.dll file
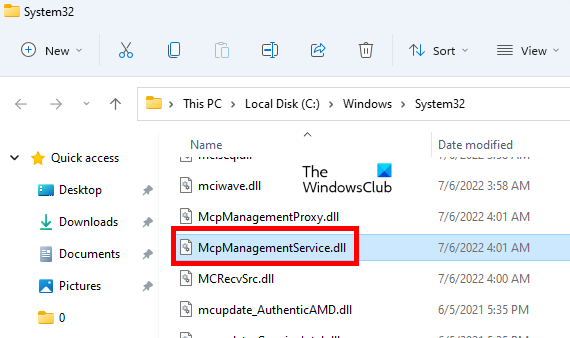
The McpManagementService.dll file is important for Modern Device Management and Azure AD. If corrupted or missing, it can disrupt services like Universal Paints, hence, it’s necessary to replace the corrupted ones with freshly installed non-corrupted files.
- First and foremost, run SFC and DISM as this scans and repairs any corrupted system files automatically, including the McpManagementService.dll file.
- If none of the above could do any help, then only if you must replace it, make sure to find a healthy copy of the file, same version and build of Windows from the official site.
- Now, navigate to the location mentioned below, locate McpManagemenService.dll, and rename it to whatever you like.
C:\Windows\System32
- Now, copy the freshly installed file to the renamed file, and run the following command in Command Prompt to register the DLL:
regsvr32 McpManagementService.dll
Once done, reboot the PC to apply the changes, and check if you are still encountering the error.
3] Verify the Azure AD account
If Windows is not able to verify or fetch a valid authorized token from Azure AD, users can expect to face the issue at hand. And this happens if the account is not properly registered, licensed, or signed in, leading to the Universal Paint service failing to connect.
- Navigate to the Azure Portal, log in with your credentials, and then go to the Azure Active Directory.
- Select Users, confirm if the account is active, and then go to Settings.
- Here, check if MFA is enabled under the Authentication Methods.
- Now, go to Azure AD > custom domains, and check if the domain is verified.
Lastly, ensure that the printer and connector are registered properly. Sign out and back in to renew authenticated credentials.
4] Reset Universal Print Connector
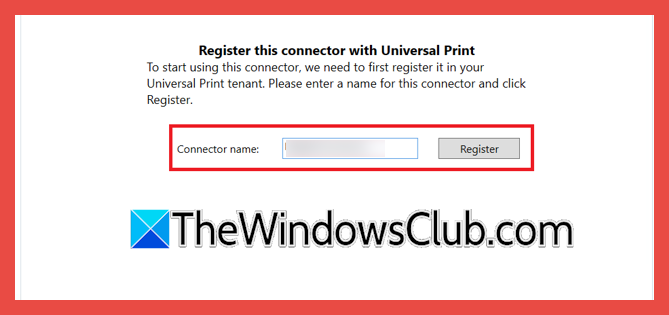
Resetting or re-registering he connector forces a fresh authentication handshake with Azure AD and the Universal Print services, and is mostly done to resolve token-related issues. However, users must have admin rights on the connector host machine.
- Open Universal Print Connector on the machine where the connector is installed, and go to Settings.
- Click on the Remove Connector option, and confirm the removal to unregister the connector from Azure.
- Relaunch the app, click on Login, sign in with an Azure AD account, and then provide a name for the connector, or you can enter your Device ID and click on Register
Complete the setup to reauthenticate and reconnect it. Move to the next solution if the error persists.
5] Clear Cached credentials

A corrupted or outdated authentication token can be one of the reasons why Universal Print failed to get authentication. The cached credentials prevent proper Azure AD authentication. In this solution, we are going to clear the cache, and here’s how to do it.
- Open Control Panel, select User Accounts, and then click on Credential Manager.
- Click on Windows Credential, and look for entries starting with MicrosoftOffice_Data:SSO:, AzureAD\, or anything related to Universal Print, or Microsoft Graph.
- Click Remove for those entries. Restart the PC once again, and sign in again.
This forces Windows to prompt for a fresh sign-in, and a new authentication will be fetched from Azure AD, eradicating the token issue.
We hope that you are able to resolve the issue using the solutions mentioned in this post.
Read: Windows cannot find printmanagement.msc
How do I disable Universal Print?
Users can disable Universal Print from the Server Manager via services.msc, or uninstall the Universal Print Connector app to disable it. You can open the Services app to disable Print Connector Service or open Settings to uninstall Universal Print Connector.
Read: Unable to install printer – The handle is invalid
How do I clear my Print cache?
To clear the Print cache, open File Explorer, and navigate to C:\Windows\System32\spool\PRINTERS. Delete all the files there, and then restart the Print Spooler service. To do so, open Services, find Print Spooler, right-click on it, and select the Restart option. This will clear out the Print cache and resolve any issues arising from this.
Read: Fix Printer is in Error State on Windows 11.
How do I fix Microsoft Store error 0x8086000c?
Microsoft Store error 0x8086000c occurs when you try to purchase or download apps. It can be caused by issues like corrupted cache, system file errors, or account-related problems. To fix this error, sign out and sign back in to the Store, run the Windows Store Troubleshooter and clear the Microsoft Store cache. If it does not help, reset the Microsoft Store.