Connecting to Wi-Fi can be a hassle sometimes. You may not have access to it at work, school, or home. The internet might go down at exactly the time you need it. So what do you do? Get your mobile device connected to your laptop! Windows lets you create a hotspot that shares your data connection with other devices. In this post, we will show you how to create a mobile hotspot on Windows 11/10.
Windows 11/10 makes it easy for you to create a Mobile Hotspot, and change the Mobile Hotspot Name & Hotspot Password as well, easily via its Settings. We have already seen how to turn on Internet Connection Sharing & create a WiFi hotspot in Windows using the netsh wlan utility, command prompt, and Wireless Hosted Network, and we have also seen a bunch of free WiFi Hotspot creator software to create a WiFi hotspot. Now let us see how to do it via the Windows Settings app in Windows 11 or Windows 10.
How to create a Mobile Hotspot on Windows 11

With the growing number of people using Wi-Fi-enabled devices, maintaining a strong signal in some homes can be challenging. Wireless repeaters and extenders are good temporary solutions, but they don’t work for all wireless routers. Thanks to the new Windows 11 mobile hotspot feature, you can create one with a few tweaks.
To create a mobile hotspot on Windows 11, use the following method:
- Open the Windows Settings.
- Choose Network & internet from the sidebar of the Settings App.
- On the right side of the screen, select Mobile Hotspot.
- Next to the Share my internet connection from, click on the drop-down menu and select one of your connections to use for the hotspot.
- You will then need to select Wi-Fi from the Share over drop-down menu.
- Now expand the Properties section and click on Edit.
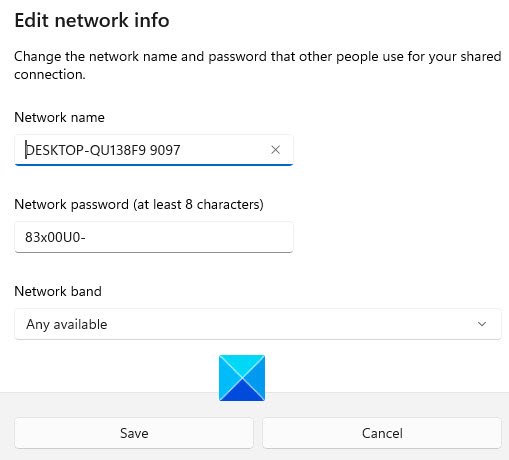
- In the pop-up box, set a network name and password for your shared connection.
- Then click the Save button.
- Now click the switch next to Mobile Hotspot to make a connection with your other device.
Now let’s look at them in more detail:
If you have two network interfaces, one of which is connected to the internet, you can easily create a hotspot in Windows 11. To do that, go to System settings.
Most of Windows 11’s settings can be found in a single place. The System Settings module allows you to perform many tasks, such as configuring the system, creating users, and updating Windows.
System Settings can be accessed via the Windows+I keyboard shortcut or by right-clicking on Start and selecting Settings. To access the Settings menu, you can also open the Windows search box by pressing Windows+S and typing Settings in the box to find it, then click the result to open it.
Click on Network & internet from the left pane of your Windows Settings, and then open the Mobile hotspot.

As of now, you’re likely to have a mobile or wired adapter connected to the internet.
Change Hotspot Name & Password in Windows 11
When connected, go to the Share my Internet connection from drop-down menu and select a Wi-Fi or wired adapter.
Now go to the Properties section and click the Edit button. After that, you must specify your shared connection’s network name and password and click Save.
To connect it to another computer, go to the Wi-Fi settings and find your network name. When you have found it, click it and enter your password to connect. Your computer hotspot should now be accessible to others.
Create Mobile Hotspot in Windows 10
Open the Start Menu and click on the Settings icon to open the Windows 10 Settings window. Now click on Network & Internet settings and then from the left side, select Mobile hotspot.
To create a WiFi or a Mobile Hotspot, connect your PC to a WiFi Network or Ethernet, and then toggle the Share my Internet connection with other devices setting to the On position.
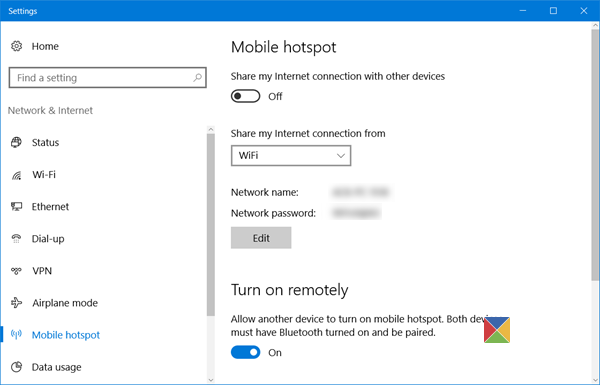
From the drop-down menu, you may select WiFi, Ethernet or Cellular Data connection.
You will also see the Network name and the Network password below that, which you can share with the others.
Read: How to Disable or Enable Mobile Hotspot in Windows.
Change Hotspot Name & Password in Windows 10
If you wish, you can change the Hotspot Name & Hotspot Password.
To do this, click on the Edit button to open the following panel.
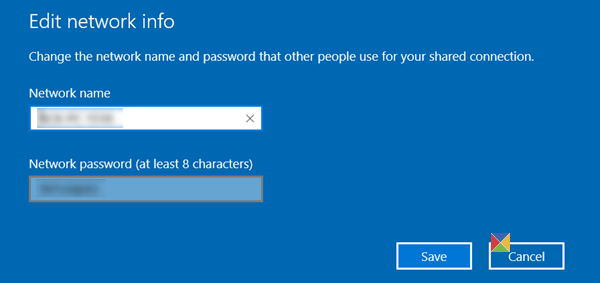
Here you can change the Network name and the Network password – which has to be at least 8 characters. Once you have made the changes, click on Save.
The settings also allow you to let another device turn on the mobile hotspot—but for this, both devices have to have Bluetooth turned ‘On’ and be paired.
Is a mobile hotspot as good as Wi-Fi?
You can use your phone as a hotspot to connect to the internet wherever you are, and it’s much safer than using free public WiFi. However, you may not be getting the top speeds if you are using an Android device. You can usually get a good connection in places and situations where you can’t get home internet.
Difference between WiFi and HotSpot
The WiFi network is used to connect wireless devices and access points. However, a hotspot is created using an access point device that provides internet access through Wi-Fi local area networking.