When trying to connect to a WiFi network, either managed by your company, school, or some other organization, using the provided credentials, we failed to make the connection. According to the error message, our device and the network aren’t compatible. This can be due to a security mishap or a policy conflict. In this post, we are going to talk about this issue and see what you can do if you encounter the following error message.
Can’t connect because the sign-in requirements for your device and the network aren’t compatible. Contact your IT support person.

Fix Can’t connect because the sign-in requirements for your device and the Network aren’t compatible
If you can’t connect to WiFi because the sign-in requirements for your device and the Network aren’t compatible, follow the solutions mentioned below.
- Manually re-enter your credentials
- Check for Windows and driver updates
- Manually configure the Wi-Fi Network
- Install the required certificate
Let us talk about them in detail.
1] Manually re-enter your credentials
In this solution, we are going to force your device to start the connection process from scratch. Forgetting the network clears out any cached, outdated, or corrupted security settings that are causing the compatibility conflict. Re-entering your credentials ensures the correct username format and password are used, triggering a fresh and proper authentication handshake with the network’s servers.
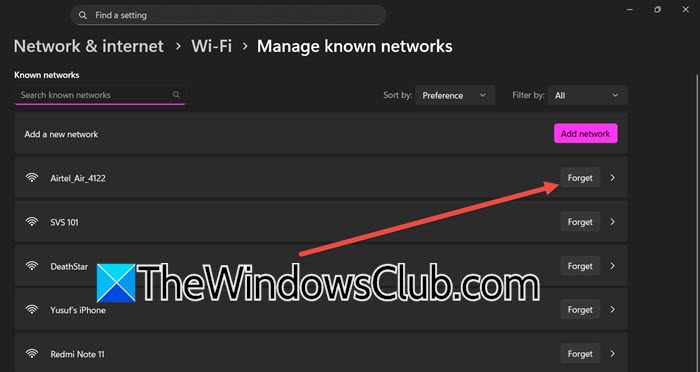
- On your device, go to WiFi settings.
- Click on Managed known networks and find the network causing the issue.
- If you are already connected, click on Forget or Remove.
- Select the network again to reconnect. You will be prompted for a username and password.
- You need to enter the username; it often needs to be in a specific format (e.g., username, DOMAIN\username, or [email protected]). Check with your IT department for the exact format.
- Finally, enter the password.
- If prompted to trust a certificate, accept it.
Finally, check if the issue is resolved.
2] Check for Windows and driver updates
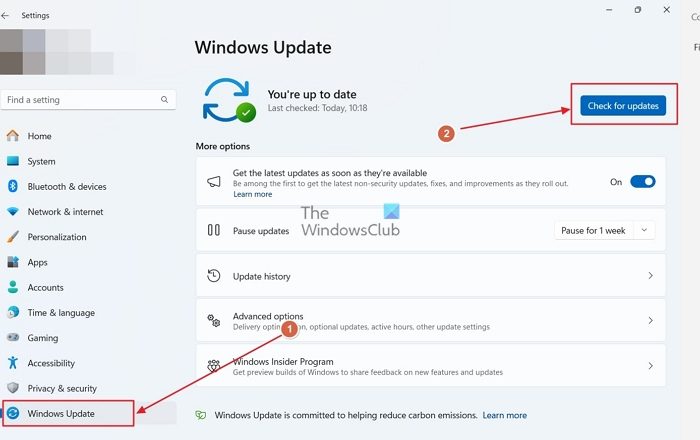
If you are trying to sign into an organization’s WiFi, there must be some security compliances that your device must adhere to. One of the most common ones is the availability of the latest security patch. Since we are failing to connect to the network, let us go ahead and check for Windows Updates. If there is an update available, you need to install it.
Next up, we need to check for driver updates. You can follow any of the solutions mentioned below to update drivers.
- Download the Drivers from the manufacturer’s website.
- Get a Driver Updater Software.
- Install Driver and Optional Updates.
Finally, check if the issue is resolved.
3] Manually configure the Wi-Fi Network
In this solution, we are going to bypass your device’s automatic, and often incorrect, negotiation of security settings. By manually specifying the exact authentication protocol (EAP method) and certificate requirements that the network expects, we can easily eliminate the compatibility mismatch causing the sign-in error. To do so, you need to follow the steps mentioned below.

- Open Settings by Win + I.
- Go to Network & internet.
- Click on Wi-Fi.
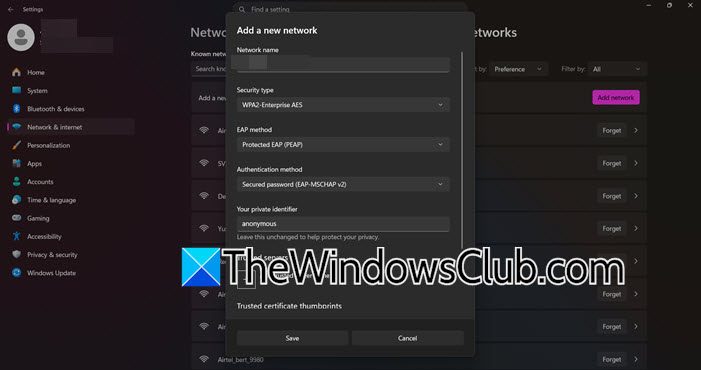
- Go to Manage known networks > Add network.
- Enter the exact network name (SSID).
- Set the Security type to WPA2-Enterprise or WPA3-Enterprise (ask your network admin which one to use).
- You will now see additional options:
- EAP Method: This is critical. The most common types are PEAP (Protected EAP) and EAP-TLS. Your IT department must tell you which one to use. You will get other details from them as well, including the Authentication method (this might be set to “MSCHAPV2” for PEAP) and Private identifier.
- Server Certificate: Often, you can set this to “Don’t validate” or “Use system certificates” to proceed.
If some other details are required, contact your IT admin for them.
4] Install the required Certificate
A secure network uses a digital certificate from its own internal Certificate Authority to prove its identity to your device. By default, Windows does not trust this specific certificate. Manually installing it into the “Trusted Root Certification Authorities” store explicitly tells Windows to trust this network’s identity, eliminating the trust barrier that is causing the connection to fail and allowing the authentication process to proceed. You need to contact your IT admin to get the certificate, then double-click on it, and follow the Certificate wizard to complete the installation process.
Hopefully, with the help of these solutions, you will be able to resolve the issue.
Read: How to fix WiFi problems in Windows 11
How to fix PC saying can’t connect to this network?
To fix a PC that can’t connect to a network, first restart your router and computer. If that fails, use Windows’ Network Troubleshooter. You can also “forget” the Wi-Fi network in your settings and then reconnect by entering the password again. Ensure your Wi-Fi is on, airplane mode is off, and check if your antivirus isn’t blocking the connection. Updating your network adapter drivers from the manufacturer’s website can also resolve the issue.
Read: Fix Network Adapter Code 31 error on Windows 11
How to update Wi-Fi adapter driver?
There are various ways to update the WiFi adapter or network drivers. You can install the latest version from the manufacturer’s website, use a free driver update tool, or look for the updates in Windows Driver and Optional Updates. We recommend you check our guide on how to update network drivers to know more.
Also Read: No internet, Secured WiFi error on Windows 11.