
Some users have complained that they cannot insert a picture in Word, Excel, or PowerPoint. Some users can add images by copying and pasting or dragging and dropping, but the Pictures option is greyed out. For other users, the Online Pictures option works fine, but they cannot add images via the This Device option, and vice versa. You may also receive the following error while trying to insert a picture using the Online Pictures option in Word, PowerPoint, or Excel:
The service required to use this feature is turned off. Check your privacy settings.
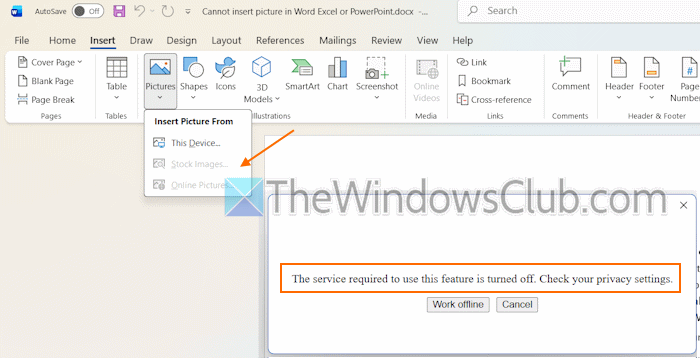
If you also face this issue, the working fixes covered in this post will be helpful.
Why can’t I insert a picture in Word?
If you can’t insert a picture in Word using the Online Pictures option, it may be because Privacy Settings prevent the download of online content. A different View mode that doesn’t support showing images, old file format, and third-party add-ins can also be the reason for it.
Cannot insert picture in Word, Excel, or PowerPoint
If you cannot insert a picture in a Word document, Excel file, or PowerPoint presentation, use these solutions:
- Change the View mode to Print Layout
- Turn off the Show picture placeholders option
- Check your Privacy Settings
- Convert the document to a newer file format
- Disable Add-ins
- Restore the default Normal Template (Normal.dotm)
- Repair Office.
Let’s check these solutions.
1] Change the View mode to Print Layout

We can apply different views to a Word document. However, if the document view mode in Word is set to Draft or Outline, inserting an image using the This device option won’t show the inserted picture(s). If this is the cause of your problem, you need to change the view mode to Print Layout.
After opening your Word document, go to the View menu and click on the Print Layout option. This should solve the problem.
2] Turn off the Show picture placeholders option
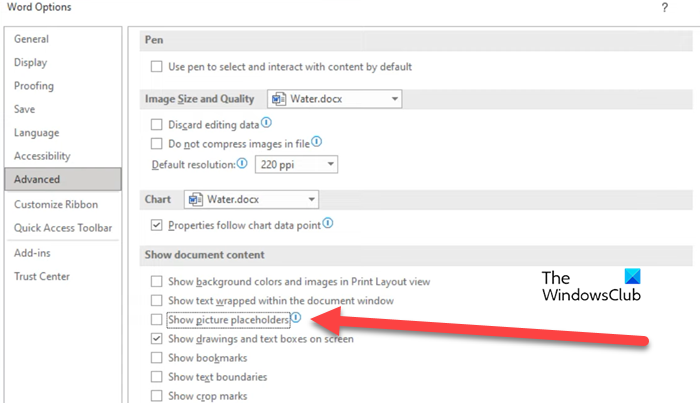
If you are using an earlier version of Word (e.g., Word 2013 or 2016), you can turn off the Show picture placeholders option under Advanced options to fix this issue. This option is removed in recent versions of Word (like Word 2024) and Microsoft 365. Here are the steps to turn off this option:
- Open the Word app on your Windows 11 PC
- Click File > Options
- A Word Options window will open. Select the Advanced category in that window from the left section
- Scroll down to the Show document content section
- Uncheck the Show picture placeholders option
- Also, tick the Show drawings and text boxes on screen option. This option is available in all versions of Word
- Press OK.
Related: This image cannot currently be displayed in Word, Excel, or PowerPoint
3] Check your Privacy Settings
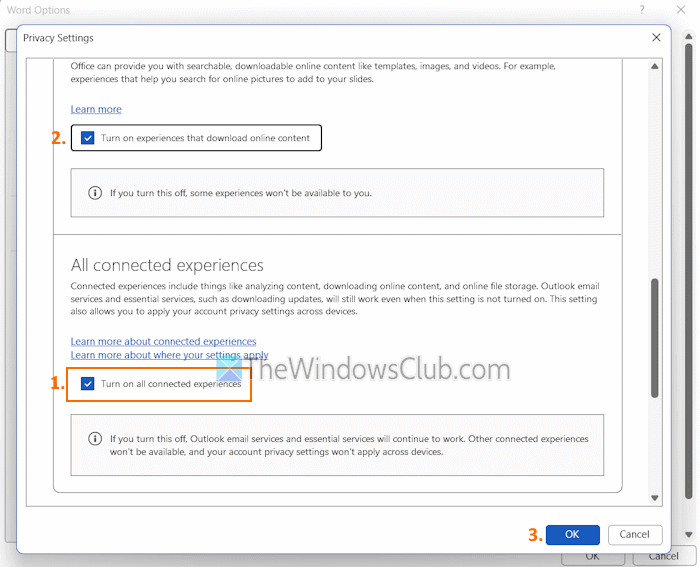
This is one of the best solutions here, as it solved this problem for some users. If you can insert pictures from your device, but the Stock Images option and Online Pictures option are greyed out in the Pictures menu of Word, PowerPoint, or Excel, you should check your Privacy Settings and make sure that the All connected experiences setting is enabled. Here are the steps to enable connected experiences in Word or Microsoft 365:
- Open a Word document, PowerPoint presentation, or Excel file
- Click File > Options
- Click on the Privacy Settings button
- In the Privacy Settings window, scroll down to the All connected experiences section
- Tick the Turn on all connected experiences option
- In the Experiences that download online content section, tick the Turn on experiences that download online content option
- Press the OK button
- A Restart Required box will pop up. Press OK in that pop-up
- Press OK to close Word Options.
4] Convert the document to a newer file format
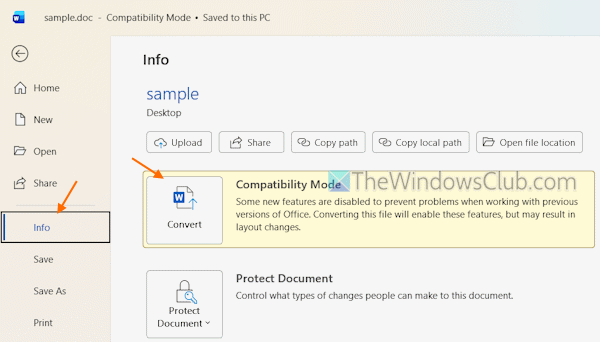
If a document is created and saved in an older format (Word 97-2004 (*.doc)) and you open it in a newer version of Word, it will open in Compatibility Mode. You can also see the Word title bar, where Compatibility Mode is visible for the open document. In this case, new features are disabled to prevent problems. This could be why you are unable to insert images or use the Pictures option in Word or other Office apps. To fix the issue, you have to convert your document to a newer file format (DOC to DOCX). The steps are as follows:
- After opening a Word document, click on the File menu
- Select the Info option
- Press the Convert button
- Press OK to confirm.
This will enable new features, including the Pictures option. Alternatively, you can also disable or turn off Compatibility Mode in Word.
5] Disable Add-ins
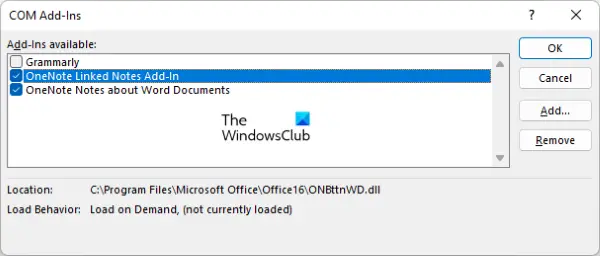
Third-party add-ins (COM Add-ins) can cause various issues in your Office programs. If you are not able to use the Pictures option at all, it can be caused by some add-in(s). To confirm it, first, open Word in Safe mode. If everything works fine and you can insert images, some add-ins are conflicting with it.
To solve your problem, access the Word Options and select the Add-ins category. Press the Go button for the Manage COM Add-ins option. Now, disable add-ins one by one until you find the culprit.
6] Restore the default Normal Template (Normal.dotm)
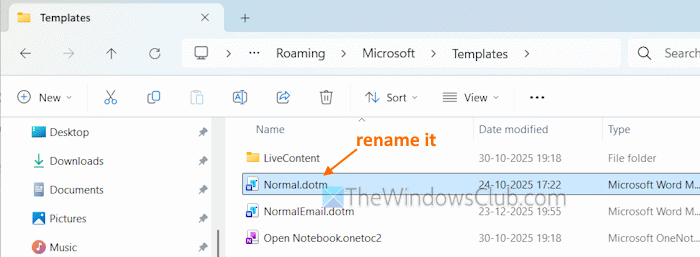
If Word is working fine in Safe mode and add-ins are not causing the trouble, the default Normal Template (Normal.dotm) may be corrupted, damaged, or changed. This could be the reason you cannot insert pictures in Word. To get rid of this issue, you need to restore the global or default Normal Template (Normal.dotm). Here are the steps:
- Close Word app (if opened)
- Access the following location:
C:\Users\%username%\AppData\Roaming\Microsoft\Templates
- Here you will see a Normal.dotm file. Rename it to Normal.old.dotm or delete it
- Open your Word app, and a new/default Normal.dotm file will be created automatically in the same location.
7] Repair Office
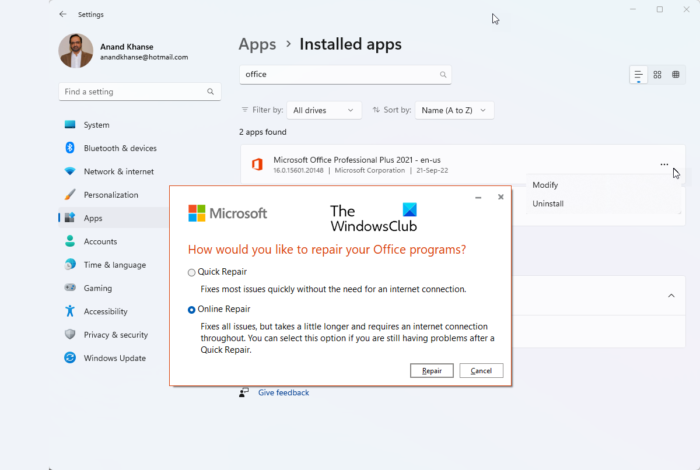
If the above solutions don’t help, the problem could be with the Office installation. In such a case, you should repair Office or reinstall it.
That’s all.
Now read: Word not displaying images correctly
How do I enable the insert picture in Excel?
If you want to insert an image into a cell in Excel, first, select a cell where you want to add the picture. After that, open the Pictures drop-down menu in the Insert menu. Select the Place in Cell option. Now you can use the This Device, Stock Images, and Online Pictures options to find, select, and insert the selected picture in that cell.
Read next: How to move a Picture freely in Word.
