Dolby Vision is a premium HDR format with strict hardware and software requirements. Windows fails to recognize it when one of these requirements isn’t met. The issue isn’t that Windows is broken, but that the communication chain between your GPU, cable, display, and OS is incomplete or misconfigured. In this post, we are going to talk about this issue and see what you can do if Windows 11 does not recognize your Dolby Vision display.

Why is my Dolby Vision not working?
Dolby Vision may not be working due to a missing hardware or software requirement. The most common causes are using a non-certified HDMI cable, not enabling the required HDR or Enhanced Format setting on the display itself, or lacking the necessary Dolby Vision extension from the Microsoft Store. Ensure both your graphics card and display officially support the feature to rule out a hardware limitation.
Fix Windows 11 does not recognize my Dolby Vision display
If Windows 11 does not recognize the Dolby Vision display, you can follow the solutions mentioned below.
- Verify Display & GPU Hardware Support
- Reinstall Graphics Drivers
- Enable HDR
- Install the Dolby Vision Extension from the Store
- Check Display Firmware and Source Settings
Let us talk about them in detail.
1] Verify Display & GPU Hardware Support
It is crucial to note that not all HDR displays support Dolby Vision; therefore, we need to check and ensure that yours does. You need to first check the display configuration, check your monitor/TV’s exact model number on the manufacturer’s website. Look explicitly for Dolby Vision support, not just HDR10. Many HDR monitors only support HDR10. Additionally, check your graphics card; it should have Dolby Vision support.
2] Reinstall Graphics Drivers
Standard driver updates often leave behind outdated files and settings that can interfere with advanced features like Dolby Vision. It’s like stacking new gears onto a misaligned watch; without removing the old ones, the mechanism can’t run smoothly. A clean install clears out those remnants, giving the system a fresh foundation for optimal performance.
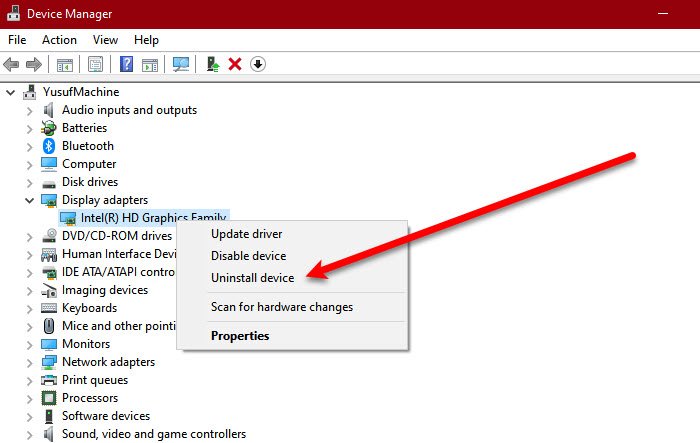
First of all, you need to uninstall the Graphics Drivers using the steps mentioned below.
- Open Device Manager by searching for it in the Start Menu.
- Now, expand Display adapters, right-click on the driver, and click on Uninstall device.
- Click on Uninstall to confirm.
Alternatively, you can use Display Driver Uninstaller to remove the display driver. Once done, you need to download the latest version of the driver from the manufacturer’s website. After downloading the driver, double-click on it and follow the on-screen instructions to complete the process.
3] Enable HDR
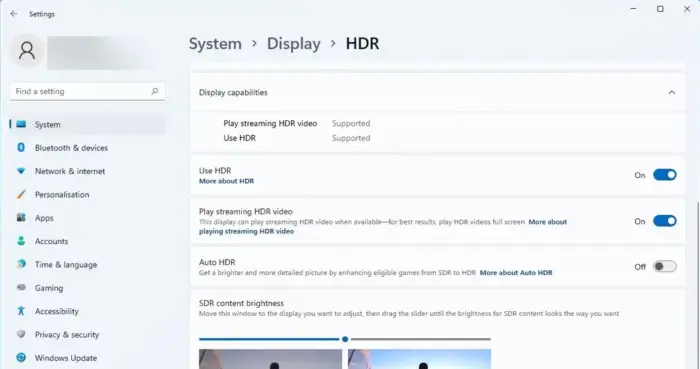
When you enable HDR, your system and your monitor try to establish the necessary foundation and force a critical re-negotiation, giving them another chance to correctly identify and enable the Dolby Vision protocol that sits on top of that foundation. To enable HDR, you need to follow the steps mentioned below.

- Open Settings by Win + I.
- Now, go to System > Display.
- Click on HDR and enable HDR.
If Dolby Vision is supported and working, a “Dolby Vision” option will appear here, often under “HDR” or in a dropdown menu. If HDR itself looks bad or isn’t available, Dolby Vision won’t be either.
Read: Dolby Atmos not working on Windows 11 computer
4] Install the Dolby Vision Extension from the Store

Your GPU sends a Dolby Vision signal that includes compressed data and dynamic metadata. Windows cannot interpret this signal by itself. The extension from the Microsoft Store installs the necessary software decoder and processing tools. These tools act as a translator, allowing the operating system to unpack, understand, and display the Dolby Vision signal correctly on supported hardware. Without this codec, the signal cannot be recognized, even if your hardware is fully capable. So, open Microsoft Store, search for “Dolby Atmos Extension”, and download it. Hopefully, the extension will do the job for you.
Read: How to enable and use Dolby Atmos on Windows 11
5] Check Display Firmware and Source Settings
Dolby Vision needs the display to actively communicate with Windows. If the display’s software is buggy or its ports aren’t set up for high-bandwidth signals, it won’t properly report its capabilities, so Dolby Vision stays disabled.
First of all, we need to update the display firmware. The firmware is like the brain of your display, and older versions often have bugs or lack support for features like Dolby Vision. Updating it can fix those issues, add missing protocols, and improve how the display communicates with Windows and your GPU. To do this, go to the support page for your display’s exact model on the manufacturer’s website, such as LG, Samsung, Sony, or Dell, download the firmware update, and follow their instructions. This usually involves copying the update file to a USB drive and plugging it into your display to install.
Next, enable the correct HDMI or input mode. Most TVs default to low-bandwidth settings for compatibility, but Dolby Vision needs full bandwidth. Look for options like HDMI Deep Color (LG), Enhanced Format (Sony), or Ultra HD Deep Color, and turn them on for the HDMI port your PC uses. You’ll find this in the display’s settings menu, usually under something like General > External Devices > HDMI Signal Format.
Hopefully, with the help of these solutions, your issue will be resolved.
Read: How to install Dolby Audio on Windows 11 computer
Does Windows 11 support Dolby?
Yes, Windows 11 supports certain Dolby technologies like Dolby Vision (for HDR video) and Dolby Atmos (for spatial audio), but this support depends on your specific hardware, software configuration, and content.
Also Read: Dolby Home Theater not working in Windows 11.