
Dolby Home Theater systems are the best way to get that movie theater experience when watching a film or whatever else. These devices are truly phenomenal, especially the ones that deliver 5.1 and 7.1 surround sound. You may not be aware of this, but Windows 11/10 supports home theater systems in a significant way. It’s easy to connect your system to your Windows computer, and sit back and enjoy the show with a bag of popcorn to boot.
It’s quite impressive, but as we know, things don’t always work as they should when it comes to software. So, what should we do when the Dolby home theater system is not working and gives errors? Well, the particular problem we’re going to talk about today is all about the driver.
Dolby Home Theater not working in Windows 11/10
It could be that the Dolby Home Theater cannot be launched, or that certain features became unworkable, maybe the equalizer does not move, the Dolby Digital Plus feature does not work or you just get the Missing driver message. In any case, installing the correct driver version will help.
You see, some users have encountered an error that essentially states the current driver is installed, but the system expects an older version of the driver. That doesn’t make any sense, so what could be the cause?
From what we’ve come to understand, this issue is occurring because the current Dolby Digital Plus audio driver is not compatible with your standard audio driver. To fix this problem, you must then have the correct version of both drivers that complement each other well.
1] Run the Audio Troubleshooter
Run the Audio Troubleshooter via the Get Help app and see if it offers suggestions.
2] Remove the audio driver
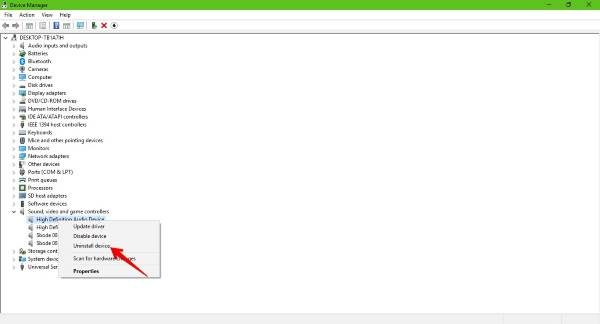
Click on the Windows Key + X to launch the Device Manager. When the window pops up, seek out the category titled Sound, video and game controllers and expand it.
Finally, right-click on the correct device name then select Uninstall from the context menu.
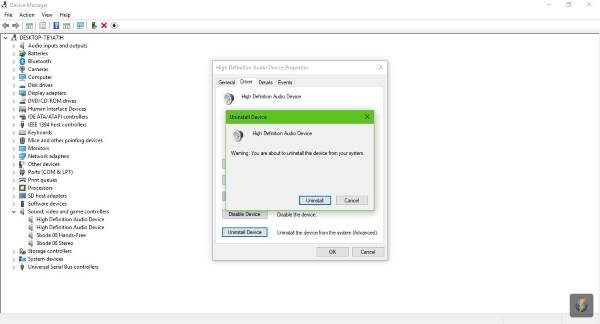
Reboot your computer and Windows should automatically download and install the correct driver when you connect to the Internet.
3] Install the previous version of the audio driver
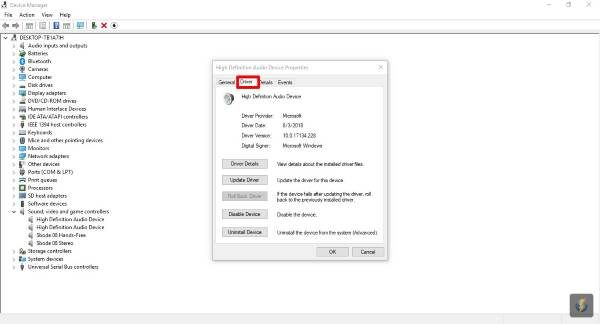
First, you must check the current version of the audio driver installed before installing an older version. Hit the Windows Key + X to launch the Device Manager, then locate the audio device, and right-click on it.
Select the Properties option, then click on the Driver tab, and from here, you’ll see something that says Driver Version. Go on ahead and view the driver number, and make sure the older version has a lower number.
From the same section, look below, and you’ll see the Uninstall button. Click on it to remove the driver, then visit the official website of your audio device, and download an older version.
After installation, restart your computer and verify that everything is functioning properly.
4] Install Compatible Dolby Drivers
You may have to install a specific version of the Dolby Digital Plus driver. So visit the manufacturers site and download the correct driver for your device.
5] Enable Exclusive Mode
Open Run box, type mmsys.cpl and hit Enter to open the Sound settings. Right-click on your playback device > Properties > Advanced tab and select both boxes under Exclusive Mode. Click OK and exit.
6] Repair or Reset Dolby Access App
Open Windows Settings > Apps > Installed apps and locate Dolby Access. Click on Advanced options and then on Repair or Reset.
If this does not help, reinstall the Dolby Access app.
If nothing helps, you may need to update the BIOS.
How do I enable Dolby Vision on my PC?
To enable Dolby Vision on your PC, ensure your monitor supports Dolby Vision and HDR. Go to Settings > Display > HDR and WCG settings, and turn on the HDR switch. Then, set your monitor to support Dolby Vision in the display settings. Update your graphics driver for the best compatibility.
Read: Windows does not recognize my Dolby Vision display
How to enable Dolby Digital on PC?
To enable Dolby Digital on a PC, go to ‘Control Panel,’ select ‘Sound,’ and under ‘Playback’ tab, choose your audio device. Click ‘Properties,’ go to the ‘Advanced’ tab, and select a Dolby Digital option from the dropdown menu. Finally, click ‘Apply’ and ‘OK’ to save the settings.
