Gaming is one of the most taxing things you can do on your computer. Most AAA games require you to have a supercomputer to run at their highest settings. However, we have noticed a peculiar scenario where the CPU usage is so low when gaming. In this post, we are going to talk about this issue and see what you can do if your CPU usage is extremely low when gaming.
Why is my CPU usage so low when gaming?
When gaming, low CPU usage can be an issue if the processor is not being utilized as expected, leading to potential problems like stuttering or unresponsive controls, even if the GPU is working hard. Next, this scenario might occur if the game is designed to rely mostly on the GPU, if there is a system bottleneck, or if background settings and processes limit the CPU’s performance.
Then, check your game settings, drivers, and power management configurations to ensure they are not unintentionally limiting the CPU’s performance. Since these factors can cause the CPU to operate at a lower capacity than needed, proper adjustment may help balance the load and enhance overall performance.
However, there can be a silver lining to it as well, namely that yours is an efficient system and the game is optimized. Modern software distributes tasks across multiple cores, ensuring that each component only handles the work it needs to. Next, if your game and drivers are well-optimized, the CPU may end up underutilized because all the heavy lifting is handled by the GPU and other parts of the system.
Fix CPU usage low when gaming on Windows PC
If your CPU usage is low when gaming in Windows 11/10, follow the solutions mentioned below.
- Check the GPU usage
- Disable Throttling
- Enable DLSS/FSR
- Overclock the GPU
- Upgrade your GPU
Let us talk about them in detail.
1] Check the GPU usage
First, we need to check if the GPU usage is high while the CPU usage is low. If the GPU is at 95-100%, but the CPU is hovering around the 10-20% mark, this is clearly a bottleneck issue.
Your CPU prepares game data (physics, AI, draw calls) and sends “frames-to-render” to the GPU. If your GPU is at 95–100%, it’s overwhelmed and can’t keep up with the CPU’s instructions, forcing the CPU to wait idly (hence low CPU usage).
For example, if the CPU processes 120 frames/sec but the GPU maxes out at 60 frames/sec, the CPU idles half the time waiting for the GPU to catch up. This imbalance forces your system to operate at the GPU’s slower speed, resulting in lower FPS, stuttering, or frame drops despite the CPU having unused capacity, as the GPU is the limiting factor in the rendering pipeline.
Read: Best free Bottleneck Calculators for Windows PC
2] Disable Throttling
Power Throttling (Modern Standby) is a CPU-focused Windows feature that dynamically reduces clock speeds for background/light tasks to save power. Since the CPU is not getting utilized, we need to go ahead and disable it. To do so, follow one of the given methods.
Using Group Policy Editor
Launch Gpedit by searching for it from the Start Menu. Then, go to:
Computer Configuration > Administrative Templates > System > Power Throttling
Now, set it to Disabled.
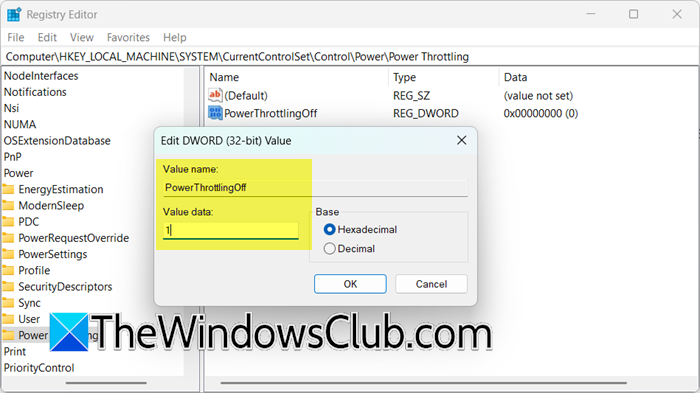
Using Registry Editor
Before making any changes, we need to take a backup of the registry. Once done, go to the following location.
Computer\HKEY_LOCAL_MACHINE\SYSTEM\CurrentControlSet\Control\Power
See if there is a Power Throttling key there. If it’s not present there, right-click on the Power folder, select New > Key, and name it Power Throttling.
Now, create a new value by right-clicking on the newly created Power Throttling and selecting New > DWORD (32-bit) value. Name it PowerThrottlingOff. Double-click on PowerThrottlingOff and set its value data to 1.
3] Enable DLSS/FSR
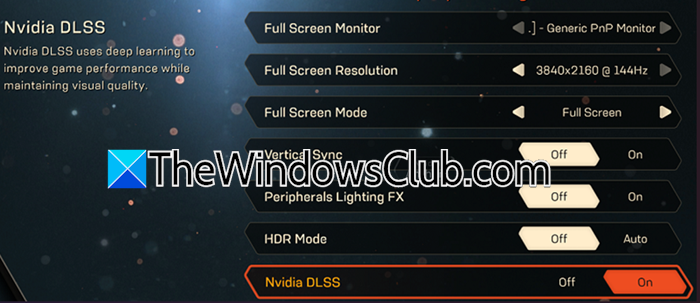
DLSS and FSR reduce GPU workload by rendering frames at a lower resolution and then using AI to upscale them, which lowers the stress on the GPU. To enable DLSS, you need a NVIDIA RTX GPU (RTX 20-series or newer), and FSR works with any GPU, be it AMD, NVIDIA, or Intel. Additionally, you need to ensure that your game has DLSS/FSR in settings. You need to open the game, go to Options or Settings, then see DLSS, FSR, FidelityFX Super Resolution, or Upscaling options, and enable them.
4] Overclock the GPU
One method to mitigate GPU bottlenecking is to overclock the GPU. To safely overclock your GPU and alleviate bottlenecks, gradually increase core and memory clock speeds in small increments (e.g., +10–15MHz per step), then stress-test for stability after each adjustment while rigorously monitoring temperatures to ensure they stay below 85°C. If you encounter crashes, artifacts, or overheating, dial back the clocks until stable, as this can yield a 5–15% FPS boost in GPU-bound scenarios but is inherently limited by your cooling and silicon quality. You can use a free overclocking tool to do the same.
5] Upgrade your GPU
If nothing works, your last resort is to upgrade your GPU, as the one that you have right now is bottlenecking your entire system.
That’s it!
Read: Alt Tab causes low FPS in games on PC
How to reduce high CPU usage while gaming?
High CPU usage during gaming typically occurs when your processor becomes the bottleneck, struggling to process game logic faster than the GPU can render frames. To reduce high CPU usage while gaming, check out the solutions mentioned in our guide.
Also Read: Games loading slow on my Windows PC.