We have observed that when attempting to run a VirtualBox image in Oracle VirtualBox, an error appears stating that VirtualBox is not signed with a build certificate. This issue disrupts the workflow, preventing users from accessing their VirtualBox images. In this post, we will discuss this problem and provide an easy solution to resolve it.
![VirtualBox not signed with build certificate [Fix]](https://www.thewindowsclub.com/wp-content/uploads/2025/09/build-certificate.png "VirtualBox not signed with build certificate [Fix]")
NtCreateFile(\Device\VBoxDrvStub) failed, Not signed with the build certificate
Make sure the kernel module has been loaded successfully.
VERR_SUP_VP_NOT_SIGNED_WITH_BUILD_CERT – The image is required to be signed with the same certificate as the rest of VirtualBox.
Fix VirtualBox not signed with build certificate
When you try to start a VirtualBox virtual machine, the operation fails with an error message similar to VERR_SUP_VP_NOT_SIGNED_WITH_BUILD_CERT (-5657) or VBoxDrvStub error: Not signed with the build certificate. This is a security feature called hardening. VirtualBox checks that the correct Oracle certificate digitally signs all its components to prevent tampering with malicious code. The error indicates that this check has failed, typically because the system is attempting to load an older, incorrectly signed driver file alongside the new one.
This problem typically happens after upgrading VirtualBox on a Windows host. The new version installs correctly signed files, but outdated driver files (vboxdrv.sys, etc.) from the previous installation remain on the system. These leftover files conflict with the new ones, resulting in a failed signature check.
If your VirtualBox is not signed with a build certificate, you need to follow the solutions mentioned below.
- Repair installation
- Check for Leftover Drivers
- Disable Security Application
- Troubleshoot in Clean Boot
Let us talk about them in detail.
1] Repair installation
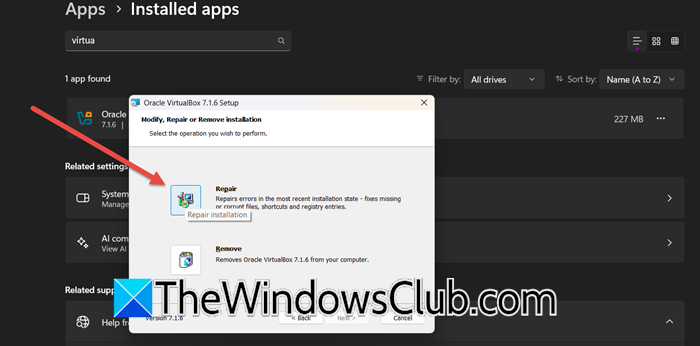
The Repair function of the installer is designed to resolve issues with the existing installation without requiring the removal of your virtual machine configurations. It works by comparing the currently installed VirtualBox files against the original ones in the installer cache. It then replaces any missing, corrupted, or incorrectly signed files with genuine, correctly signed versions from Oracle. This directly addresses the root cause of the build certificate error. You can follow the steps mentioned below to repair the installation.
- Close VirtualBox completely first.
- Open Settings by Win + I.
- Then, go to Apps > Installed apps.
- Search for “VirtualBox”, click on the three dots, and click on Modify.
- Once the setup starts, click on Next, and then select the Repair icon.
- Click on Repair.
- Finally, wait for the process to complete.
Now, try importing the VB image and check if the issue is resolved.
2] Check for Leftover Drivers
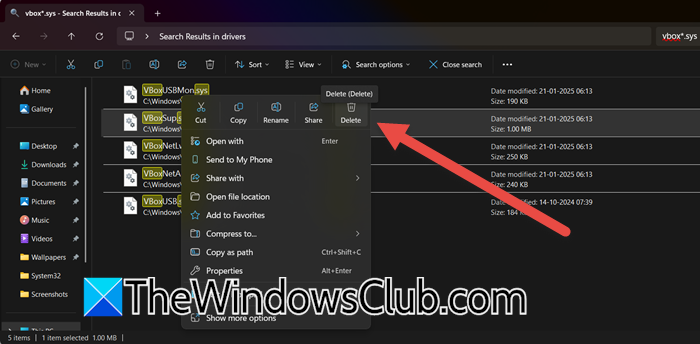
When you uninstall VirtualBox, some driver files (*.sys) may remain in the system’s driver directory. These leftover files might be unsigned or signed with an old certificate. When you install a new version of VirtualBox, Windows may use these incompatible drivers, causing a signature conflict. To prevent this issue, it’s best to manually delete the leftover files for a clean installation. Follow the steps mentioned below to do the same.
- First of all, uninstall VirtualBox from your computer.
- Open Run by Win + R.
- Type C:\Windows\System32\drivers and press Enter.
- Once in the drivers folder, look for the search bar in the top-right corner of the window.
- Type vbox*.sys into the search bar and press Enter. The * is a wildcard that will find any file starting with “vbox” and ending with “.sys”.
- Windows will now search and display all files matching that pattern (e.g., vboxdrv.sys, vboxnetadp.sys, vboxsup.sys).
- Select all of these files, right-click, and choose Delete.
- You may receive a prompt requesting administrator permissions to delete these system files. Confirm by clicking Yes.
- Finally, empty the Recycle Bin.
After the reboot, download the latest version of VirtualBox from the official website and install it by right-clicking the installer and selecting “Run as administrator”.
3] Disable Security Application
Some third-party antivirus and security suites have aggressive behavioral monitoring features that can interfere with the installation and operation of low-level system drivers, such as those used by VirtualBox. They might incorrectly flag the driver installation as suspicious activity or prevent the proper loading of the signed drivers, resulting in a certificate error. Temporarily disabling this software removes this potential interference, allowing VirtualBox’s drivers to install and run correctly. If you are not using any third-party antivirus, try temporarily disabling Windows Security and then importing the VB image.
Read: VirtualBox error VT-X/AMD-V hardware acceleration is not available
4] Troubleshoot in Clean Boot
Besides antivirus software, other background applications and services can sometimes conflict with VirtualBox. Performing a Clean Boot starts Windows with a minimal set of drivers and startup programs. This helps eliminate software conflicts that occur from third-party services. By installing VirtualBox in this clean state, you ensure no other program is interfering with the driver installation process.
That’s it!
Read: Keyboard not working in VirtualBox virtual machine
How to fix error 0x80004005 in VirtualBox?
To fix error 0x80004005 in VirtualBox, first perform a complete reinstall by uninstalling the software, rebooting your PC, and then installing the latest version from the official website as an administrator. If the error persists, the most common cause is a conflict with Windows Hyper-V; disable it by opening an administrator command prompt and running the command bcdedit /set hypervisorlaunchtype off, followed by a system restart. This typically resolves the permission and virtualisation conflict that triggers the error.
Read: How to install Manjora on VirtualBox on Windows 11
How to fix display failure on VirtualBox?
To resolve a display failure in VirtualBox, start by updating to the latest version, as many errors are often due to bugs that get fixed in newer releases. If the issue continues, try disabling the Auto-resize Guest Display option in the View menu; this is a common solution for Failed to change display parameter errors. Additionally, check the virtual machine’s Display settings and turn off 3D Acceleration, as this feature can sometimes conflict with the graphics drivers of the host system.
Also Read: VirtualBox kernel modules do not match this version of VirtualBox.