When a VirtualBox virtual machine boots directly into the UEFI Interactive Shell, it’s typically because the EFI firmware cannot automatically find a bootable operating system loader. This could be due to misconfiguration or some issue with the Bootloader. In this post, we will explore what you can do if your VirtualBox boots only in the UEFI interactive shell.

Why is my VirtualBox stuck in the UEFI Interactive Shell?
Your virtual machine (VM) uses the EFI boot environment, but it cannot find a valid bootloader file to start the operating system. This issue can occur after an incomplete OS installation, if you change the VM settings, or if the bootloader file is missing or damaged. When this happens, the system will take you to the UEFI Interactive Shell, where you can manually enter the boot file.
Fix VirtualBox boots only in UEFI Interactive shell
If your VirtualBox boots only in the UEFI Interactive shell, follow the solutions mentioned below.
- Disable EFI in VirtualBox Settings
- Manually Boot from the Shell
- Use the built-in Boot Manager
- Copy and rename the Bootloader
Let us talk about them in detail.
1] Disable EFI in VirtualBox Settings
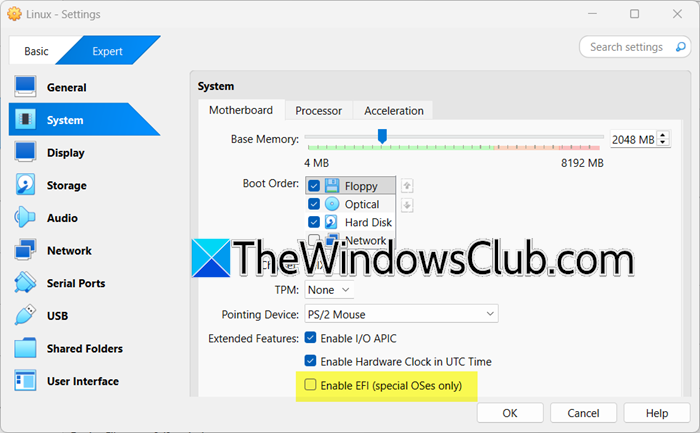
In this solution, we will switch the virtual machine’s boot method from the modern UEFI firmware to the traditional Legacy BIOS system that VirtualBox emulates by default. When EFI is enabled, the VM looks for a specific bootloader file in an EFI system partition, which may be missing or misconfigured. By disabling EFI, VirtualBox reverts to the simpler BIOS method, which reads boot instructions directly from the master boot record (MBR) of your virtual disk. This is the default configuration for most operating systems during installation. To implement these changes, follow the steps outlined below.
- Make sure your VM is Power Off or Aborted state, and not in the Saved state.
- Then, right-click on your VM and select Settings.
- Now, go to System > Motherboard.
- Untick Enable EFI.
- Click on Ok.
Now start your VM normally. It should bypass the UEFI shell entirely and boot directly into your installed operating system using the traditional BIOS method.
2] Manually Boot from the Shell
UEFI Interactive Shell allows direct access to the virtual machine’s file systems. When EFI boot fails, it’s usually because the firmware doesn’t know which .efi file to launch. By manually navigating to the correct file system and specifying your operating system’s bootloader, you perform the task that the automated process should have done, ensuring the system starts properly.
You need to start your VirtualBox VM and wait until you see the UEFI Interactive Shell prompt (usually displayed as Shell>). Then, type map and press Enter to view all available file systems. Look for drives labeled FS0:, FS1:, FS2:, etc., and identify which one corresponds to your VirtualBox Boot Disk.
Type the drive letter followed by a colon (e.g., FS0:) and press Enter. If you’re unsure which drive contains your OS, try each FSx: drive one by one. Now, type dir and press Enter to see what’s in the root directory. Look for an EFI folder. If you see it, navigate there by typing cd EFI and pressing Enter.
Inside the EFI directory, look for your operating system’s folder, it would be something like.
- Ubuntu/Linux: \EFI\ubuntu\grubx64.efi
- Windows: \EFI\Microsoft\Boot\bootmgfw.efi
- Other Linux: \EFI\fedora\grubx64.efi or similar
Type the full path to the bootloader file and press Enter.
\EFI\ubuntu\grubx64.efi
If you’ve selected the correct file, your operating system should now begin loading normally. Do keep in mind that this is a temporary solution and in order to make this permanent, we can create a script.
First, boot into your operating system using the steps provided above. Then, in Terminal or Command Prompt (as admin), mount the EFI system partition (usually the first partition on your virtual disk). Then, create or edit the startup.nsh file on that partition and add the following boot command.
FS0:
\EFI\ubuntu\grubx64.efi
Save the file. The UEFI shell will now automatically run this script every time the VM starts.
3] Use the built-in Boot Manager

From the UEFI Interactive Shell, you can access a graphical menu to select your boot device. To do the same, at the shell prompt, type exit and press Enter. This will take you to the UEFI Boot Manager menu. From there, you can select the correct boot device (like EFI Internal Shell) or enter the Boot Maintenance Manager to configure boot options.
4] Copy and rename the Bootloader

Copying and renaming your OS bootloader to the \EFI\Boot\bootx64.efi path works because this is the fallback boot path that the UEFI firmware will use when it cannot find other valid boot entries, which is a common issue in VirtualBox.
Before renaming Bootloader, let us learn how to boot from the Installation Media in case of VirtualBox. You need to first download the official ISO of your OS. Then, in your VM’s Settings, go to Storage. Click on the Empty, then click the disc icon > Add attachment > Optical Drive. Select your Windows or Linux ISO. Start your VM. It will now boot from the ISO instead of the broken hard disk.
If you are on a Windows guest, follow the steps mentioned below.
- Boot from the Installation Media (steps for VirtualBox are explained above).
- Press Shift + F10 to open the Command Prompt.
- Now, run the following commands.
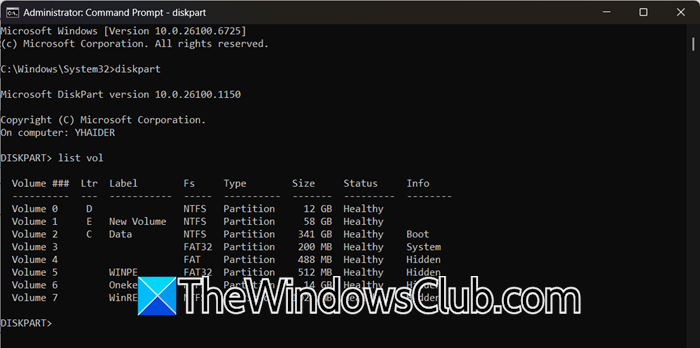
diskpart
list vol
exit
- Note the drive letter of your EFI System Partition (usually a small FAT32 partition).
- Copy and rename the bootloader:
copy S:\EFI\Microsoft\Boot\bootmgfw.efi S:\EFI\Boot\bootx64.efi
Replace S: with your actual EFI partition drive letter.
-
Restart your VM. Windows should now boot automatically.
For the Linux Guest OS (Ubuntu), follow the steps mentioned below.
- Boot using a Live USB.
- Open a terminal and find your EFI partition using the following command.
sudo fdisk -l
- Mount the EFI partition using the following command.
sudo mount /dev/sda1 /mnt
Replace /dev/sda1 with your actual EFI partition.
- Finally, copy and rename the bootloader using the following command.
sudo cp /mnt/EFI/ubuntu/grubx64.efi /mnt/EFI/Boot/bootx64.efi
Use shimx64.efi instead if your system has Secure Boot enabled.
- Restart your VM. Linux should now boot automatically.
Finally, your issue should be resolved.
That’s it!
Read: Do I need to enable UEFI to run Windows 11?
How do I permanently fix the UEFI shell boot issue in VirtualBox?
The most effective permanent fix is to copy your OS bootloader to the default UEFI fallback path, \EFI\Boot\bootx64.efi. For a quicker solution, you can disable the Enable EFI setting in your VM’s System preferences, which switches the VM to a more compatible BIOS boot method and often resolves the issue immediately.
Also Read: VirtualBox error VT-X/AMD-V hardware acceleration is not available.