
Microsoft Scout (Frontier) is an Autopilot agent and an AI application for Windows and macOS. It can help you edit, search, or create documents in your workplace; execute commands; manage emails, calendar, and Teams messages; or work autonomously (heartbeat mode). You describe your task, and it will carry out the task, similar to Copilot Cowork. Intune administrators can enable Microsoft Scout for managed devices or users. In this post, we have covered the ultimate guide to deploying Microsoft Scout via Intune for Windows devices.
Does Intune support Microsoft Scout?
Yes, Intune supports Microsoft Scout. Intune tenant administrators can deploy it with the required ADMX/ADML templates files and by creating a Windows Microsoft Scout policy. Administrators can also select groups, users, or devices to receive the policy.
Prerequisites for Microsoft Scout
Before deploying Microsoft Scout via Intune, have a look at these prerequisites:
- Microsoft Scout is in preview. You have to be a part of the Frontier preview program to get early access to Microsoft Scout
- You must have access to the Microsoft Intune admin center
- Intune tenant administrator credentials are required
- The latest Microsoft Visual C++ Redistributable is needed
- A Microsoft 365 school or work account is required, associated with your organization
- Personal Microsoft accounts are not supported yet
- You must have Microsoft-scout.admx and Microsoft-scout.adml template files.
The Ultimate Admin Guide to Deploying Microsoft Scout via Intune
Here is the ultimate admin guide to deploy Microsoft Scout via Intune:
- Access the Microsoft Intune admin center
- Import Microsoft Scout Windows policy template files
- Create and assign the Windows Microsoft Scout policy to devices
- Validate the deployment.
Let’s check each step in detail.
1] Access the Microsoft Intune admin center
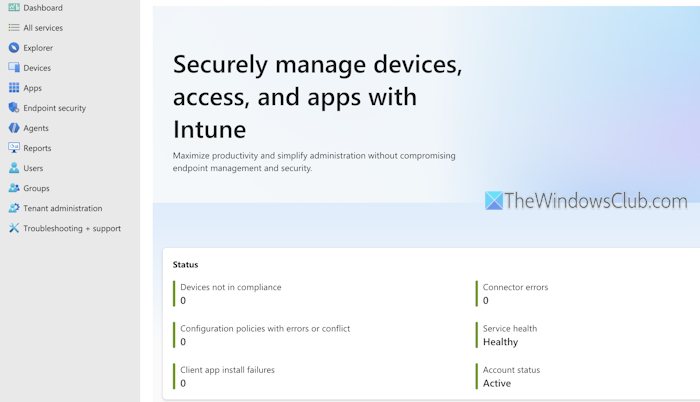
Open the Microsoft Intune admin center (https://intune.microsoft.com/) homepage. Use the correct tenant administrative credentials to sign in and access the dashboard. Make sure the admin center loads for the correct tenant.
2] Import Microsoft Scout Windows policy template files
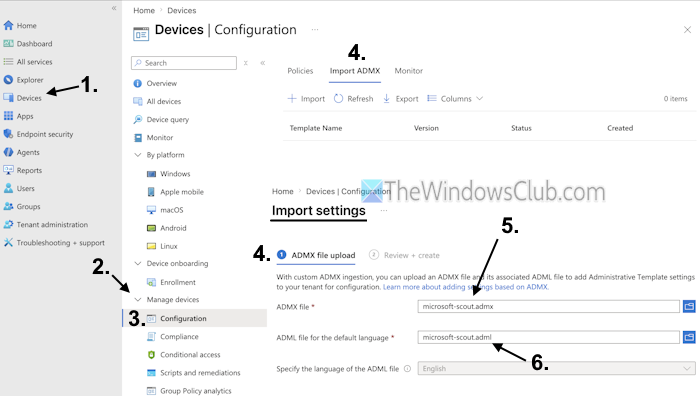
This is one of the important steps to deploy Microsoft Scout via Intune. You have to grab Microsoft-scout.admx and Microsoft-scout.adml template files. These Microsoft Scout Windows policy template files can be downloaded from github.com. Once done, follow these steps to import the Microsoft Scout template files:
- Select Devices from the navigation pane
- Expand the Manage devices section in the middle section
- Select the Configuration option
- Switch to the Import ADMX tab
- Click on the Import option
- You will see an ADMX file upload tab under the Import settings
- In that tab, use the folder icon (or file picker icon) for ADMX file and ADML file for the default settings options, and import the microsoft-scout.admx and microsoft-scout.adml template files one by one from the download location
- Press the Next button
- Switch to the Review + create tab to make sure that both policy template files are added correctly
- Press the Create button.
Now, let the upload process complete for both template files.
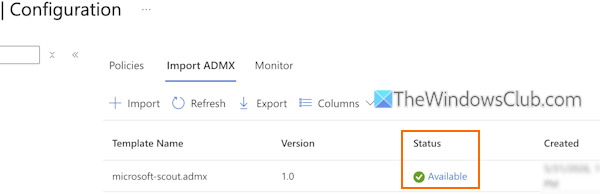
When the Template Status changes from Upload in progress to Available (as shown in the image above), you are ready to proceed to the next step.
Related: How to optimize Workflow with Scheduled Copilot Cowork Tasks
3] Create and assign the Windows Microsoft Scout policy to devices
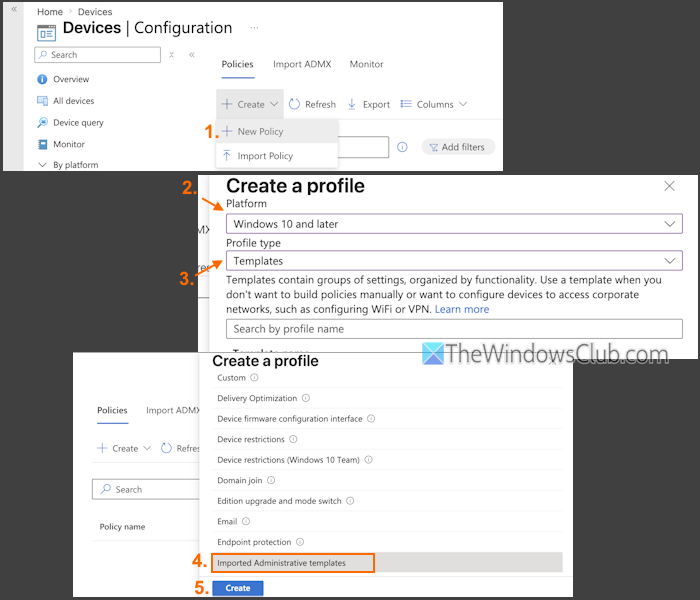
In this part, you need to create a new Microsoft Scout Windows policy and assign it to the devices or groups you select. This will enable Frontier access for those devices. Here are the steps:
- Navigate to Devices > Manage Devices > Configuration in the Microsoft Intune admin center homepage
- Select the Policies tab
- Go to Create > New Policy
- A Create a profile panel will open on the right part
- In that panel, set Platform to Windows 11/10 or later, and Profile type to Templates
- There will be a list of available templates. Select the Imported Administrative templates option so that you can use the ADMX template that you imported
- Press the Create button.
Now there are five main tabs (or sections) to successfully import the policy and assign it to groups or users. All these sections come under the Create profile wizard.
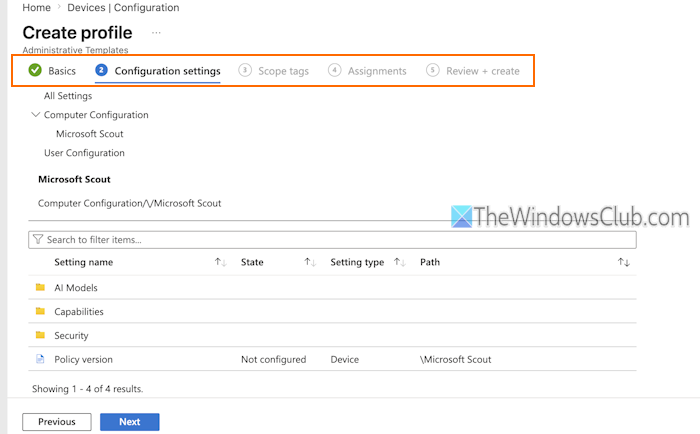
These are:
- Basics: Here, you can give a name to the policy, say Microsoft Scout for Windows. You can also add a policy description (optional). When done, press the Next button
- Configuration settings: In this tab, select the Microsoft Scout template (under the Computer Configuration). After that, access the template and select the Policy version. Now go back to Microsoft Scout > select Capabilities folder > and double-click on the Allow Microsoft Scout Frontier access setting. Set this setting to Enabled and press OK. This is the key setting for Frontier access, and it enables the AllowScoutFrontierAccess capability for assigned devices
- Scope tags: In case your organization needs a particular Intune RBAC scope tag, use the Select scope tags option. Otherwise, don’t make any changes and keep it to the Default. Press the Next button
- Assignments: This is one of the crucial tabs where you can select devices, users, or groups to receive your Microsoft Scout Windows policy. If you are planning a broader rollout, you can assign it to all devices. Press Next
- Review + create: This is the final part. Here, you can check the policy summary to confirm whether the policy version is enabled, whether the policy includes Frontier access and is set to enabled, check scope tags, etc.
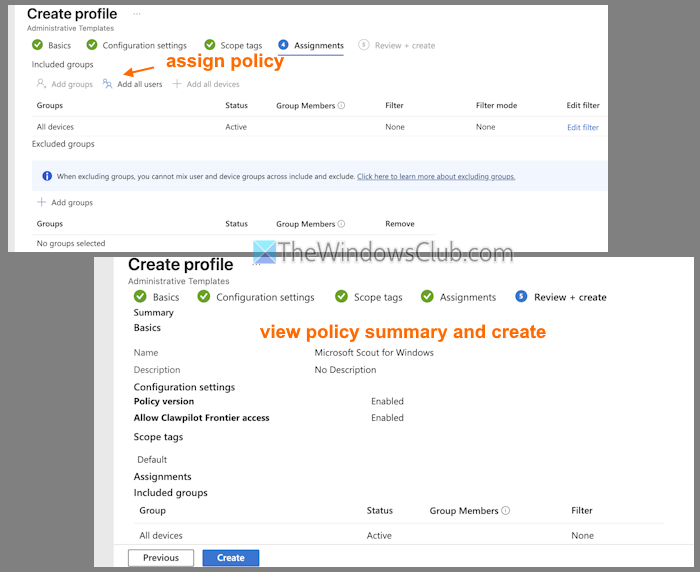
When everything is OK, press the Create button. This will create and assign your Windows Microsoft Scout policy to devices. To confirm whether the policy has been created, go to Configuration > Policies. Your created policy should appear in the list.
Read: How to choose the right AI Model for your Copilot Cowork Tasks
4] Validate the deployment
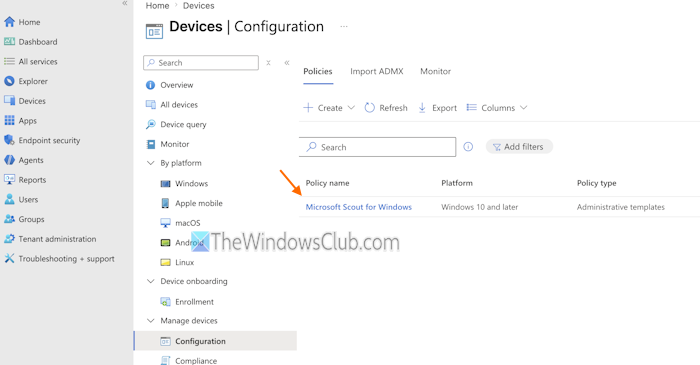
Once your Microsoft Scout Windows policy is created and assigned, you should validate the deployment to ensure there are no issues. For this:
- Check if assigned devices are present in the target groups
- Open Microsoft Scout and verify that each assigned group/user can sign in without any waitlist screen
- Intune policy sync should be completed on target devices
- Check if the Allow Microsoft Scout Frontier access setting shows the AllowScoutFrontieraccess capability as Enabled.
That’s all.
Now read: What is Microsoft Entra Agent ID?
The Microsoft Scout Windows settings don’t appear
If Microsoft Scout Windows settings don’t appear, make sure that the Microsoft-scout-adml and Microsoft-scout.admx template files are imported successfully. If yes, check if their Status is visible as Available.
Read: Decoding Microsoft Scout’s Dual-Licensing Model
Users see a waitlist screen in Microsoft Scout
If, after opening Microsoft Scout, users see a waitlist screen, check that the device is synced with Intune. Also, make sure the Allow Microsoft Scout Frontier access setting is configured to Enabled, and the Windows policy is assigned to target users or devices.
Microsoft Scout policy applies to the wrong audience
If you encounter this situation, you should review the assignment groups for Windows profiles. This will help you apply the policy to the correct audience.
How do I enable Microsoft Scout for managed users?
To enable Microsoft Scout for managed users, first deploy the Microsoft Scout Windows policy and assign users/groups that can receive it. You must also enable Frontier Access via the Microsoft 365 admin center. After successful completion, users can download the Microsoft Scout application, open it, and sign in with their organization accounts to start using it.
Read next: How to use Plugins in Copilot Cowork.
