You are not alone if you are facing a dim screen when connecting through the remote desktop. Many Windows users are experiencing this drop in brightness during an RDP session and are often mistaken for a display glitch. However, it is highly cued due to system settings or graphics adjustments. In this article, we will explore the reasons behind it and see what you can do if the Screen brightness drops when using Remote Desktop.
Screen brightness drops when using Remote Desktop in Windows 11
If the screen brightness is dropping when using a Remote Desktop, execute the solutions given below.
- Disable adaptive brightness
- Modify your current power plan
- Increase Color Depth
- Use a Custom .RDP File for Resolution
- Update display and monitor drivers
Let’s get started with the troubleshooting guide.
1] Disable adaptive brightness
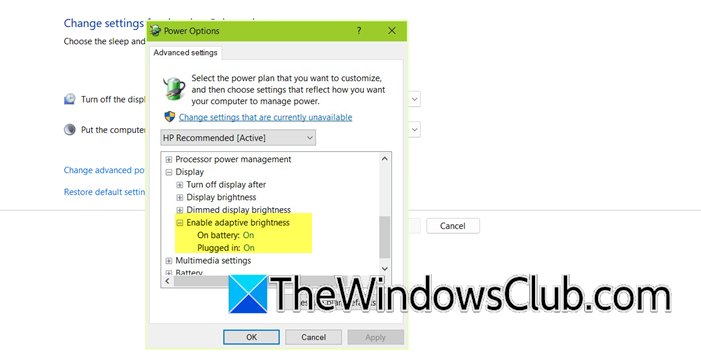
Adaptive brightness automatically adjusts the screen brightness according to the surrounding light, but it can be a bit of a hassle during the Remote Desktop sessions. Therefore, it is recommended to disable the feature to ensure a constant brightness level.
- Click Win + R to open the Run dialogue box, type control, and hit Enter to open the Control Panel.
- Click on Hardware and Sound, then go to the Power Options, and click Change Plan settings.
- Select Change advanced power settings.
- Scroll down to find the Display category, expand it, and then expand the Enable adaptive brightness settings menu.
- Set both On battery and Plugged in to Off, and click Apply and OK to save the changes.
The adaptive brightness is present on devices with an ambient light sensor. So if you are unable to find the feature and its settings, move on to the next solution.
2] Modify your current power plan
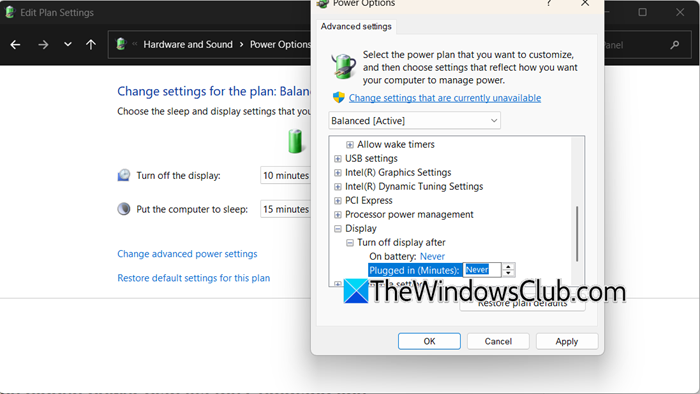
The power settings that control the display and sleep during a remote session are those of the host computer’s currently active plan. Let’s go ahead and make the needful changes.
- Click Win + R to open the Run dialogue box, type powercfg.cpl, and hit enter.
- Find your current active power plan (usually “Balanced”) and click Change plan settings next to it.
- Set both Turn off the display and Put the computer to sleep to Never for both “On battery” and “Plugged in” states.
- Use the Adjust plan brightness slider to set the preferred level.
- Click on Save to apply changes.
Finally, check if the issue is resolved.
3] Increase Color Depth
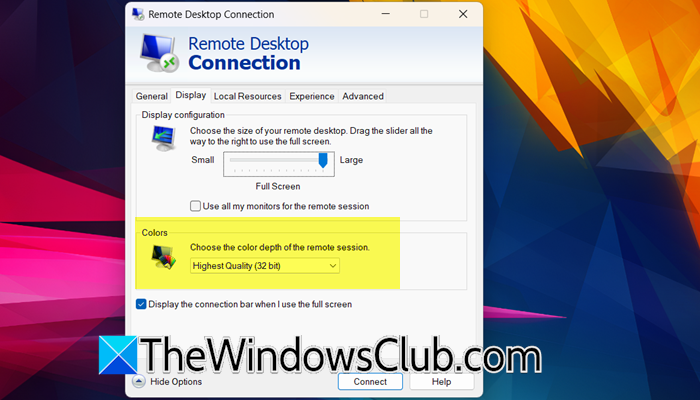
Higher color depth can make colors appear richer and more vibrant, improving the overall viewing experience. To make the changes, you need to open Remote Desktop Connection (mstsc.exe), click Show Options, and go to the Display tab. Use the Colors drop-down menu to select a higher color depth, like Highest Quality (32-bit). Finally, check if the issue is resolved.
4] Use a Custom .RDP File for Resolution

A mismatched resolution forces Windows to scale the remote session, often making elements appear blurry, oversized, or distorted. By setting a custom resolution that perfectly matches your local monitor’s native ratio or the host’s desktop, you ensure a 1:1 pixel mapping. This eliminates scaling artifacts and provides a sharper, more stable image, which can also prevent the display driver from making automatic adjustments that affect perceived brightness.
- Open the Remote Desktop Connection client.
- Enter the computer name and your username.
- Before connecting, click Show Options, go to the General tab, and click Save As to save your connection as an .rdp file to your desktop.
- Open File Explorer, go to the Documents folder (default location), right-click on the .rdp file, and open it with Notepad.
- Add the following two lines, replacing 1920 and 1080 with your desired width and height:
desktopwidth:i:1920
desktopheight:i:1080
- Finally, save the file.
- Double-click your modified .rdp file to start the remote session. It will now open in your specified custom resolution.
Finally, check if the issue is resolved.
5] Update display and monitor drivers
Outdated or faulty display drivers are one of the common reasons for brightness issues during RDP sessions. It’s necessary to eliminate this factor by ensuring that screen settings, brightness control, and resolution adjustment work smoothly. You can follow any of the solutions mentioned below to update drivers:
- Download the drivers from the manufacturer’s website.
- Get the driver update software.
- Install the Driver and optional updates.
Hopefully, the screen won’t automatically dim during the Remote Desktop session. This will not prevent screen dimming, but it also improves overall performance.
That’s it!
Read: How to use Remote Desktop over LAN on Windows 11
Why does my screen keep dimming with auto brightness off?
The screen can still dim even with the auto brightness feature switched off due to various reasons. It can be due to power-saving settings, the adaptive contrast feature, or outdated display drivers. Moreover, certain Windows power plans automatically reduce brightness when running on battery or during Remote Desktop sessions. If you are facing something similar, check out the article mentioned above to troubleshoot it.
Read: Create Remote Desktop Connection shortcut in Windows 11
How to fix remote desktop display?
To fix the remote desktop display, start by checking the condition of the graphics and monitor drivers. Next, disable the display timeout within the power settings, and select a high-performance power plan. Then, configure the RDP client settings and try lowering the display resolution, changing the colour depth, and disabling visual effects. Finally, check the network connection, as a slow or unstable connection can also degrade display quality.
Also Read: Enable RDP for multiple users on Windows 11.